Ir para o conteúdo principal
Participe da comunidade de reparos - Criar conta
Olympus C-765 LCD Screen Replacement

Olympus C-765 LCD Screen Replacement

Mason Morgan

Mason Morgan e 8 outros colaboradores

Última atualização em 3 de jan de 2023

Nenhuma estimativa
Fácil
Faltando detalhes

Introdução

Ir para o passo 1

This guide may help in the process of replacing the LCD Screen on the Olympus C-765.

Over time, the LCD Screen may become damaged, which can cause a disconnect between the displayed image and the photographs being taken.

The guide will show the steps necessary for replacement, including disconnecting ribbon cables.

Take care before beginning by first disconnecting any external power source from the device and ensuring that it is powered off.

O que você precisa

Ferramentas

  • Phillips #00 Screwdriver
    Phillips #00 Screwdriver
  • Spudger
    Spudger

Exibir mais…

  1. Olympus C-765 LCD Screen Replacement, LCD Screen: passo 1, imagem 1 %32 Olympus C-765 LCD Screen Replacement, LCD Screen: passo 1, imagem 2 %32 Olympus C-765 LCD Screen Replacement, LCD Screen: passo 1, imagem 3 %32
    • Remove all the screws using your Phillips #00 holding the back plate in place. This includes:

    • On the Back: Unscrew the 4mm screw to the right of the viewfinder.

    • On the Bottom:

    • Unscrew the 3mm screw in the top left corner.

    • Unscrew the four 3mm screws under the battery cover.

    • On the Right Side: Unscrew the one 3mm screw holding the right-side panel.

    • On the Left Side: Unscrew the two 2mm screws holding the left-side panel.

  2. Olympus C-765 LCD Screen Replacement: passo 2, imagem 1 %32 Olympus C-765 LCD Screen Replacement: passo 2, imagem 2 %32
    • After you remove the back cover:

    • Gently pull the two ribbon cables out of their sockets.

    • Gently disconnect the white cable.

  3. Olympus C-765 LCD Screen Replacement: passo 3, imagem 1 %32 Olympus C-765 LCD Screen Replacement: passo 3, imagem 2 %32 Olympus C-765 LCD Screen Replacement: passo 3, imagem 3 %32
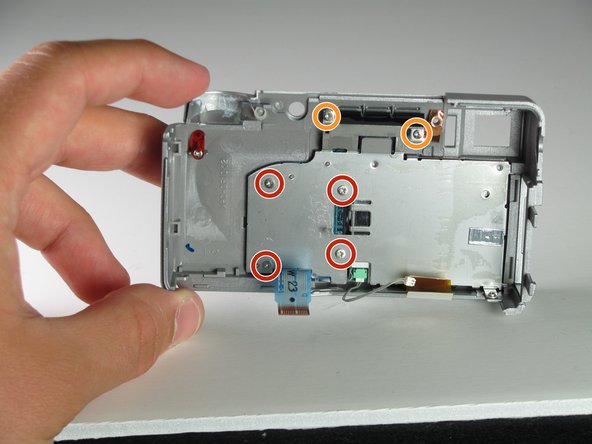
    • Peel the black tape off the back of the LCD.

    • Using the Phillips #00 remove the four 3mm screws on the LCD bracket.

    • Remove the two 2mm screws from the top of the bracket.

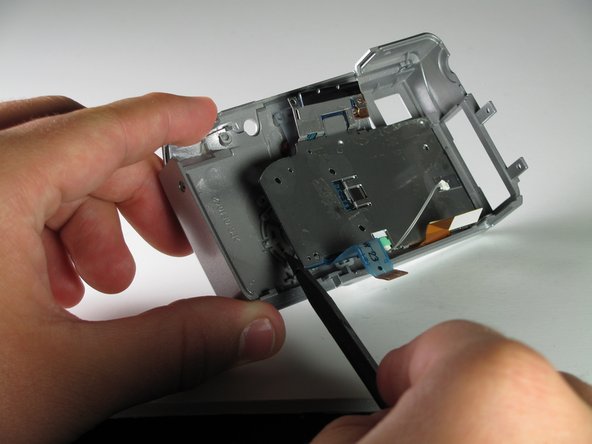
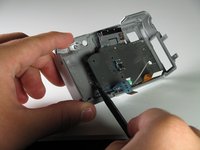
    • Use a spudger to pop the LCD screen out of the camera’s backplate.

    • When the bracket comes off, the buttons from the top section may fall out of place. If this happens then put them back in the position they were in.

Conclusão

To reassemble your device, follow these instructions in reverse order.

2 outras pessoas executaram este guia.

Gear Up For Future Repairs

Shop all

Mason Morgan

Membro desde: 04/05/11

118 Reputação

Autoria de 6 guias

Equipe

Cal Poly, Team 12-33, Maness Spring 2011 Membro de Cal Poly, Team 12-33, Maness Spring 2011

CPSU-MANESS-S11S12G33

3 Membros

Autoria de 7 guias

0Comentários do guia

Comentar

Visualizações:

Últimas 24 horas: 1

Últimos 7 dias: 6

Últimos 30 dias: 18

Ao todo: 3,057