Ir para o conteúdo principal
Nintendo DS Back Panel Replacement

Nintendo DS Back Panel Replacement

dnguye26

dnguye26 e 15 outros colaboradores

Última atualização em June 9, 2024

5 minutos
Fácil

Introdução

Ir para o passo 1

Removing the back panel is simple, provided you have the correct screwdriver. Nintendo uses a special Tri-point bit for the case, be sure you have one of these before disassembling!

O que você precisa

Ferramentas

Exibir mais…

  1. Nintendo DS Back Panel Replacement, Battery: passo 1, imagem 1 %32 Nintendo DS Back Panel Replacement, Battery: passo 1, imagem 2 %32 Nintendo DS Back Panel Replacement, Battery: passo 1, imagem 3 %32
    • Remove the cartridge from the console.

    • Use a Phillips #00 Screwdriver to remove the screw securing the battery door to the rear case.

    • Remove the battery door.

    • In the images, it shows that the fixer is using a flathead screwdriver. This flathead screwdriver will work just like the Phillips #00 Screwdriver.

  2. Nintendo DS Back Panel Replacement: passo 2, imagem 1 %32
    • Use a plastic opening tool or spudger to pry out the battery from the bottom. If a plastic opening tool or spudger isn't available, your fingernails may work.

  3. Nintendo DS Back Panel Replacement: passo 3, imagem 1 %32
    • Remove the battery from the Nintendo DS.

  4. Nintendo DS Back Panel Replacement, Back Panel: passo 4, imagem 1 %32
    • Remove the seven 6.4mm Y00 screws located on the back.

    • If your DS has a lanyard attached to it, you can remove it to make the process of opening the top-left screw easier.

  5. Nintendo DS Back Panel Replacement: passo 5, imagem 1 %32 Nintendo DS Back Panel Replacement: passo 5, imagem 2 %32 Nintendo DS Back Panel Replacement: passo 5, imagem 3 %32
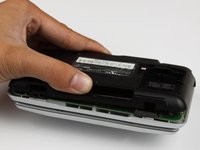
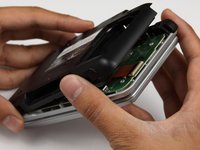
    • With your hands, pry the back panel off the main case.

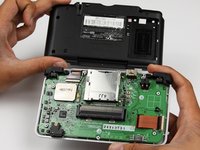
    • Separate the back from the front, and set it aside.

    If some of your screws spin free but can’t be removed, it maybe that the screw posts have separated from the shell.

    This makes separating the back panel more difficult, but it will still work.

    The plastic used for the original silver nds may be the most prone to the UV damage that causes the plastic to become brittle.

    Del Riordan - Responder

Conclusão

To reassemble your device, follow these instructions in reverse order.

18 outras pessoas executaram este guia.

dnguye26

Membro desde: 10/28/09

710 Reputação

Autoria de 4 guias

Equipe

Cal Poly, Team 18-3, Maness Fall 2009 Membro de Cal Poly, Team 18-3, Maness Fall 2009

CPSU-MANESS-F09S18G3

4 Membros

Autoria de 31 guias

2Comentários do guia

Where do I get a nintendo DS gamepak?

Kayla Maison - Responder

Kayla Maison , a gamepak is simply a GBA game.

Bob - Responder

Comentar

Visualizações:

Últimas 24 horas: 5

Últimos 7 dias: 34

Últimos 30 dias: 158

Ao todo: 18,830