
Lenovo ThinkPad X1 Extreme SSD Replacement

Introdução
Ir para o passo 1This guide will lead you through the steps to replace the SSD card on the Lenovo ThinkPad X1 Extreme Generation 1. The SSD card, or solid-state drive, acts as extra storage for the device, however, oftentimes the SSD can wear out, or run slower with age.
The steps to replace the SSD card are simple, the hardest part being keeping track of all the screws while taking apart the device.
It is important to remember to turn off the device while replacing the SSD card.
O que você precisa
Kits de conserto
Estes kits contêm todas as peças e ferramentas necessárias para executar este guia.


Peças


Ferramentas


Exibir mais…
-
-
Orient the laptop so that it is bottom up, and the trackpad is closest to you.
-
Unscrew the seven captive screws with a Phillips #00 screwdriver.
-
Slide a blue opening pick in the gap between the bottom panel and chassis, and pry off the one clip on each side.
-
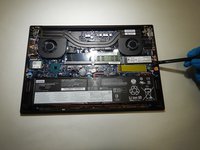
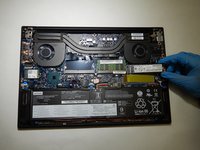
Remove the back cover from the device.
-
-
-
Using the Phillips #00 screwdriver, remove the single screw securing the SSD to the motherboard.
-


To reassemble your device, follow these instructions in reverse order.
To reassemble your device, follow these instructions in reverse order.
Cancelar: não concluí este guia.
Uma outra pessoa concluiu este guia.

Equipe

The Citadel Military College of South Carolina, Team S2-G17, Eggleston Spring 2021 Membro de The Citadel Military College of South Carolina, Team S2-G17, Eggleston Spring 2021
CMCSC-EGGLESTON-S21S2G17
3 Membros
Autoria de 3 guias