Ir para o conteúdo principal
Lenovo B50 HDD, RAM, WiFi, CMOS Battery Replacement

Lenovo B50 HDD, RAM, WiFi, CMOS Battery Replacement

ZFix

ZFix e 4 outros colaboradores

Última atualização em October 14, 2024

Nenhuma estimativa
Fácil
Guia colaborativo

Introdução

Ir para o passo 1

How to disassemble the device and replace / upgrade Hard Disk Drive with SSD, SO-DIMM memory modules, WiFi / Wireless card M.2 aka NGFF (Next Generation Form Factor) and CMOS Battery (Complementary Metal-Oxide-Semiconductor (CMOS), Real-Time Clock (RTC)).

O que você precisa

Peças

Ferramentas

Exibir mais…

Vídeo de Apresentação

  1. Lenovo B50 HDD, RAM, WiFi, CMOS Battery Replacement, Battery: passo 1, imagem 1 %32
    • Switch off the laptop, disconnect the AC adapter, and remove the battery.

  2. Lenovo B50 HDD, RAM, WiFi, CMOS Battery Replacement, Memory / HDD cover: passo 2, imagem 1 %32 Lenovo B50 HDD, RAM, WiFi, CMOS Battery Replacement, Memory / HDD cover: passo 2, imagem 2 %32
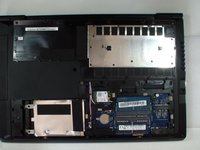
    • Remove the screws securing the Memory / HDD cover.

    • Slide the cover down and remove it.

  3. Lenovo B50 HDD, RAM, WiFi, CMOS Battery Replacement, Memory Modules: passo 3, imagem 1 %32 Lenovo B50 HDD, RAM, WiFi, CMOS Battery Replacement, Memory Modules: passo 3, imagem 2 %32
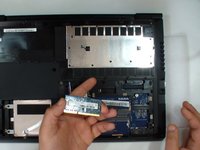
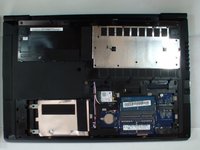
    • To pop up the memory module you’ll have to spread latches on both sides of the slot.

    • MEMORY

    • Speed 1600 MHz / PC3L-12800

    • Technology DDR3L SDRAM SODIMM

    • Max Supported Size 16 GB

    • Form Factor SO-DIMM 204-pin

    • Slots Qty 2

    • Empty Slots 1

  4. Lenovo B50 HDD, RAM, WiFi, CMOS Battery Replacement, Hard Disk Drive (HDD): passo 4, imagem 1 %32 Lenovo B50 HDD, RAM, WiFi, CMOS Battery Replacement, Hard Disk Drive (HDD): passo 4, imagem 2 %32 Lenovo B50 HDD, RAM, WiFi, CMOS Battery Replacement, Hard Disk Drive (HDD): passo 4, imagem 3 %32
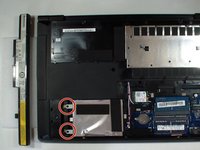
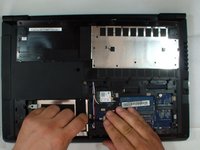
    • Remove two screws securing the hard drive mounting bracked.

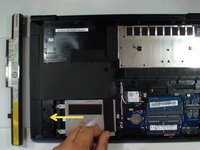
    • Slide the HDD to the left to disconnect it from the motherboard and remove it from the device.

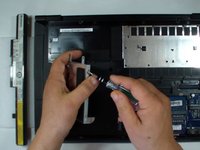
    • Remove two screws on each side of the HDD to remove the mounting bracket.

    • Now you have to transfer the mounting bracket to the new HDD or SSD.

  5. Lenovo B50 HDD, RAM, WiFi, CMOS Battery Replacement, Wireless / Bluetooth Card: passo 5, imagem 1 %32 Lenovo B50 HDD, RAM, WiFi, CMOS Battery Replacement, Wireless / Bluetooth Card: passo 5, imagem 2 %32
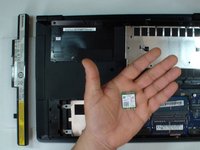
    • Remove the screw and disconnect the two coaxial antenna cables from the WiFi card.

    • Pop it up and remove it from the slot.

    • Wireless N M.2, or Next Generation Form Factor (NGFF) Card.

  6. Lenovo B50 HDD, RAM, WiFi, CMOS Battery Replacement, CMOS Battery: passo 6, imagem 1 %32 Lenovo B50 HDD, RAM, WiFi, CMOS Battery Replacement, CMOS Battery: passo 6, imagem 2 %32 Lenovo B50 HDD, RAM, WiFi, CMOS Battery Replacement, CMOS Battery: passo 6, imagem 3 %32
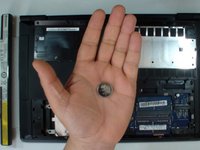
    • Complementary Metal-Oxide-Semiconductor (CMOS) aka Real-Time Clock (RTC)

    • CR2032

  7. Lenovo B50 HDD, RAM, WiFi, CMOS Battery Replacement: passo 7, imagem 1 %32
    • That's all.

Conclusão

To reassemble your device, follow these instructions in reverse order.

3 outras pessoas executaram este guia.

ZFix

Membro desde: 12/09/13

194.325 Reputação

Autoria de 330 guias

Equipe

Master Techs Membro de Master Techs

Community

327 Membros

Autoria de 1.677 guias

0Comentários do guia

Comentar

Visualizações:

Últimas 24 horas: 0

Últimos 7 dias: 3

Últimos 30 dias: 31

Ao todo: 7,769