Ir para o conteúdo principal

How to remodel and fix an Old Medicine Cabinet.

O que você precisa

  1. How to remodel and fix an Old Medicine Cabinet., How to remodel and fix an Old Medicine Cabinet.: passo 1, imagem 1 %32 How to remodel and fix an Old Medicine Cabinet., How to remodel and fix an Old Medicine Cabinet.: passo 1, imagem 2 %32 How to remodel and fix an Old Medicine Cabinet., How to remodel and fix an Old Medicine Cabinet.: passo 1, imagem 3 %32
    • Remove four screws using a screw driver.

    • Make sure to save the screws for reassembly.

  2. How to remodel and fix an Old Medicine Cabinet.: passo 2, imagem 1 %32 How to remodel and fix an Old Medicine Cabinet.: passo 2, imagem 2 %32 How to remodel and fix an Old Medicine Cabinet.: passo 2, imagem 3 %32
    • After the top of cabinet is off, remove the screws on the left side of cabinet.

    • Save the screws for reassembly.

  3. How to remodel and fix an Old Medicine Cabinet.: passo 3, imagem 1 %32 How to remodel and fix an Old Medicine Cabinet.: passo 3, imagem 2 %32 How to remodel and fix an Old Medicine Cabinet.: passo 3, imagem 3 %32
    • After finishing the left side of cabinet, do the right side.

    • Remove the screws on the right wall of cabinet.

    • Save screws for reassembly.

  4. How to remodel and fix an Old Medicine Cabinet.: passo 4, imagem 1 %32 How to remodel and fix an Old Medicine Cabinet.: passo 4, imagem 2 %32 How to remodel and fix an Old Medicine Cabinet.: passo 4, imagem 3 %32
    • Turn the cabinet over so that it's easier to unscrew the screws from the bottom of cabinet.

    • Save screws for reassembly.

  5. How to remodel and fix an Old Medicine Cabinet.: passo 5, imagem 1 %32 How to remodel and fix an Old Medicine Cabinet.: passo 5, imagem 2 %32 How to remodel and fix an Old Medicine Cabinet.: passo 5, imagem 3 %32
    • Now the back wall of cabinet needs to be removed.

    • It's screwed in by little nails. To remove the back wall, use a flathead screwdriver.

    • Save the screws for reassembly.

    • The flathead screwdriver is an option, there are other tools that can be used.

  6. How to remodel and fix an Old Medicine Cabinet.: passo 6, imagem 1 %32 How to remodel and fix an Old Medicine Cabinet.: passo 6, imagem 2 %32 How to remodel and fix an Old Medicine Cabinet.: passo 6, imagem 3 %32
    • The cabinet doors are left with the knobs.

    • Unscrew the knobs.

    • Save the knobs for reassembly.

  7. How to remodel and fix an Old Medicine Cabinet.: passo 7, imagem 1 %32 How to remodel and fix an Old Medicine Cabinet.: passo 7, imagem 2 %32
    • Take the top wall of medicine cabinet and use sandpaper to sand it.

    • Smooth out all the rough edges and bumps.

    • For best results, use sandpaper to get the old paint off.

  8. How to remodel and fix an Old Medicine Cabinet.: passo 8, imagem 1 %32 How to remodel and fix an Old Medicine Cabinet.: passo 8, imagem 2 %32 How to remodel and fix an Old Medicine Cabinet.: passo 8, imagem 3 %32
    • Take the left wall and right wall of cabinet and the two doors of cabinet.

    • Sand the walls and doors of the cabinet.

  9. How to remodel and fix an Old Medicine Cabinet.: passo 9, imagem 1 %32 How to remodel and fix an Old Medicine Cabinet.: passo 9, imagem 2 %32
    • Take bottom piece of cabinet and the back wall of cabinet.

    • Use same directions as in step 7.

  10. How to remodel and fix an Old Medicine Cabinet.: passo 10, imagem 1 %32 How to remodel and fix an Old Medicine Cabinet.: passo 10, imagem 2 %32 How to remodel and fix an Old Medicine Cabinet.: passo 10, imagem 3 %32
    • Take the doors of cabinet and sand them down.

    • Sand down the area, where the knobs were.

  11. How to remodel and fix an Old Medicine Cabinet.: passo 11, imagem 1 %32 How to remodel and fix an Old Medicine Cabinet.: passo 11, imagem 2 %32 How to remodel and fix an Old Medicine Cabinet.: passo 11, imagem 3 %32
    • After sanding down the top wall of cabinet and back wall, it is time to spray paint.

    • Use color of your choice but make sure it is for wood.

    • Spray paint and wait at least 3-4 hours to dry before painting other sides.

    • Make sure to wear a mask if you have asthma.

  12. How to remodel and fix an Old Medicine Cabinet.: passo 12, imagem 1 %32 How to remodel and fix an Old Medicine Cabinet.: passo 12, imagem 2 %32 How to remodel and fix an Old Medicine Cabinet.: passo 12, imagem 3 %32
    • Take the doors of cabinets.

    • Spray paint them as well.

    • In here the colors are pink and blue.

    • Make sure to wait 3-4 hours after painting, before painting the other side of doors.

  13. How to remodel and fix an Old Medicine Cabinet.: passo 13, imagem 1 %32 How to remodel and fix an Old Medicine Cabinet.: passo 13, imagem 2 %32 How to remodel and fix an Old Medicine Cabinet.: passo 13, imagem 3 %32
    • Take the left and right side walls of cabinet.

    • Use color of choice.

    • Make sure it's for wood.

    • Wait 3-4 hours after painting to dry, before painting other side.

  14. How to remodel and fix an Old Medicine Cabinet.: passo 14, imagem 1 %32 How to remodel and fix an Old Medicine Cabinet.: passo 14, imagem 2 %32 How to remodel and fix an Old Medicine Cabinet.: passo 14, imagem 3 %32
    • After the painting is done and the drying, it is time to fix some of the holes.

    • The back wall of cabinet has holes that need to be filled in.

    • Take a spatula and wood filler and carefully fill the holes in.

    • Leave to dry.

    • The wood filler can be used before painting the wall, that way time and paint is saved.

  15. How to remodel and fix an Old Medicine Cabinet.: passo 15, imagem 1 %32 How to remodel and fix an Old Medicine Cabinet.: passo 15, imagem 2 %32 How to remodel and fix an Old Medicine Cabinet.: passo 15, imagem 3 %32
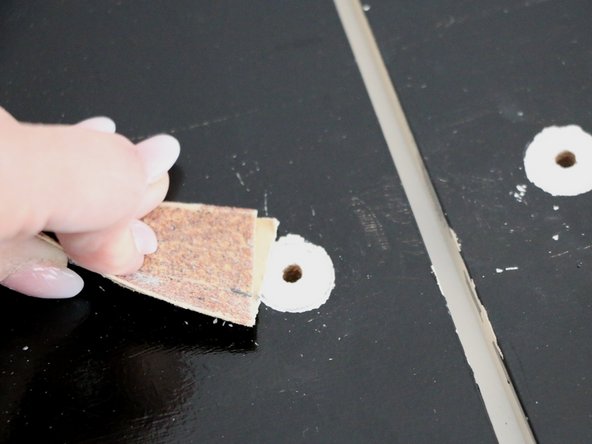
    • After wood filler has dried make sure to sand it.

    • Make the areas that were filled, nice and smooth, spray paint will not cover up bumps.

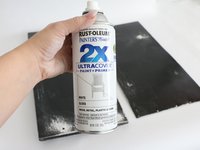
    • After all areas are nice and smooth, use paint color of choice.

    • Make sure the paint is for wood.

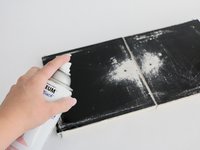
    • Spray paint and wait 3-4 hours to dry before painting other side.

  16. How to remodel and fix an Old Medicine Cabinet.: passo 16, imagem 1 %32 How to remodel and fix an Old Medicine Cabinet.: passo 16, imagem 2 %32 How to remodel and fix an Old Medicine Cabinet.: passo 16, imagem 3 %32
    • After the rest of cabinet has dried, it is time to decorate.

    • Make sure to have rollers, one for different color of paint.

    • The paint used here is blue and pink acrylic stencil paint, good on wood.

    • Decorating cabinet is an option, it is not a requirement.

  17. How to remodel and fix an Old Medicine Cabinet.: passo 17, imagem 1 %32 How to remodel and fix an Old Medicine Cabinet.: passo 17, imagem 2 %32 How to remodel and fix an Old Medicine Cabinet.: passo 17, imagem 3 %32
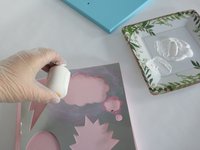
    • Plastic plates are used to pour paint into.

    • Take a roller and dip it into paint.

    • Take stencil of your choice and place it onto the wood and use roller to fill the stencil space in with paint.

    • Use a a different plate for the pink paint and use a new roller.

    • Do the same thing with pink paint as was done with the blue.

  18. How to remodel and fix an Old Medicine Cabinet.: passo 18, imagem 1 %32 How to remodel and fix an Old Medicine Cabinet.: passo 18, imagem 2 %32 How to remodel and fix an Old Medicine Cabinet.: passo 18, imagem 3 %32
    • Now take the doors after they have dried and decorate them both as well.

    • This time use white paint or color of your own choice.

    • Take stencil and fill in the space with the white paint.

    • Remember to have a place to pour the paint and use a new roller for the new paint color.

    • Do this for both doors.

    • Designs can be done on both sides of the doors, not just the front side.

  19. How to remodel and fix an Old Medicine Cabinet.: passo 19, imagem 1 %32 How to remodel and fix an Old Medicine Cabinet.: passo 19, imagem 2 %32 How to remodel and fix an Old Medicine Cabinet.: passo 19, imagem 3 %32
    • The final step is to attach the knobs on the cabinet doors.

    • In this step, new knobs were purchased and are used.

    • Screw in the knobs, a screwdriver is not needed, hands can be used.

    • The old knobs can also be reused and remodeled or new ones can be purchased as was demonstrated.

Conclusão

To reassemble your device, follow these instructions in reverse order.

0 comentários

Adicione um comentário

Exibir estatísticas:

Últimas 24 horas: 0

Últimos 7 dias: 1

Últimos 30 dias: 27

Duração total: 781