
How to Adjust a Violin Bow
Introdução
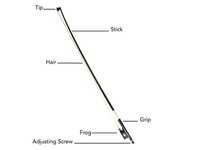
Ir para o passo 1The violin might be the heart of the instrument, but it is the bow that gives it soul. A crisp, clear sound comes not only from good technique but also from a properly tightened bow. After playing the violin, it is normal to loosen the hairs of the bow to prevent damage and in reverse, to tighten it before you play. The problem arises when you cannot tighten the bow to allow for clear sound from the violin. This guide shows how to adjust a bow back to a usable condition.


To reassemble your device, follow these instructions in reverse order.
To reassemble your device, follow these instructions in reverse order.
Equipe

Embry-Riddle Aeronautical University, Team S19-G5, Ives Spring 2020 Membro de Embry-Riddle Aeronautical University, Team S19-G5, Ives Spring 2020
ERAU-IVES-S20S19G5
3 Membros
1 Guia de autoria