
HP Pavilion 15-ba003ds Disc Drive Removal

Introdução
Vá para o passo 1If your HP Pavilion 15-ba003ds disc drive is making unusual clicking sounds or failing to read discs properly, you may be dealing with a faulty drive. This could be caused by a dirty lens covered in dust, preventing the drive from reading the disc and causing it to repeatedly search for it.
If cleaning the lens doesn't fix the issue, this guide will provide you with step-by-step instructions on safely accessing and removing the Disc Drive.
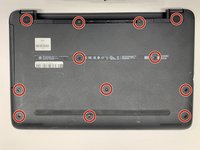
Before beginning the repair, make sure to find your laptop's model name, product number, and serial number. You can locate these on a sticker at the bottom of your device or behind the battery on some models. The model name will look like "Pavilion 15-bxxxxxx," while the product number will consist of letters and numbers, such as "D8X43UA." These details are important for finding the right drivers and getting support.
Whether you're replacing a faulty drive or upgrading to a new one, these instructions will help you complete the process.
Be sure to power down your device before starting to prevent any potential damage or safety hazards.
O que você precisa
Ferramentas

-
-
Unplug the AC adapter from the corresponding socket in the laptop.
-
Use your fingers to push the slider located just under the battery on either side to unlock the battery from the laptop.
-
Carefully slide the battery out of the laptop frame and place it somewhere safe.
-


To reassemble your device, follow these instructions in reverse order.
To reassemble your device, follow these instructions in reverse order.

