Ir para o conteúdo principal
HP 15-da0002dx SSD Replacement

HP 15-da0002dx SSD Replacement

Abigail Aron

Abigail Aron e 2 outros colaboradores

Última atualização em November 16, 2022

10 minutos
Moderado
Fotos de ação

Introdução

Ir para o passo 1

If your HP Notebook 15-da0002dx laptop is making ticking sounds, experiences frequent crashes, or if your computer has trouble reading files, saving files, or is generally running slow, the SSD may need to be replaced. The SSD (Solid State Drive) acts as a storage device that reads, writes, and stores data.

Before using this guide, make sure your computer’s issues are not caused by its software. Restart the computer and see of the problems continue. If not, make sure your computer’s operating system is updated.

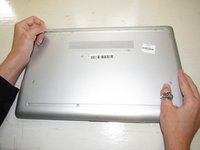
Before using this guide, power off the computer and wait for the components to cool. Working over a non-carpeted surface will reduce the risk of ESD damage (electrostatic discharge). A non-carpeted surface should not be able to conduct electricity and is connected to a grounded surface. Another way to reduce the risk of ESD damage is by using a plastic tool when removing the battery as plastic does not conduct electricity.

O que você precisa

Kits de conserto

Estes kits contêm todas as peças e ferramentas necessárias para executar este guia.

Peças

Ferramentas

Exibir mais…

  1. HP 15-da0002dx SSD Replacement, Back Cover: passo 1, imagem 1 %32
    • Make sure the computer is completely turned off.

  2. HP 15-da0002dx SSD Replacement: passo 2, imagem 1 %32
    • Turn over the laptop.

    • The HP label should be touching the table and the bottom cover should be facing up.

  3. HP 15-da0002dx SSD Replacement: passo 3, imagem 1 %32 HP 15-da0002dx SSD Replacement: passo 3, imagem 2 %32
    • Two plastic feet are located on adjacent sides of the back cover.

    • Peel back the plastic feet using the plastic opening tools.

  4. HP 15-da0002dx SSD Replacement: passo 4, imagem 1 %32
    • Using the Phillips #1 screwdriver, unscrew the eleven 9.0 mm screws holding the back cover in place.

  5. HP 15-da0002dx SSD Replacement: passo 5, imagem 1 %32
    • Carefully flip over the computer so the HP label is now facing the ceiling.

  6. HP 15-da0002dx SSD Replacement: passo 6, imagem 1 %32 HP 15-da0002dx SSD Replacement: passo 6, imagem 2 %32
    • Open the screen.

    • Run the plastic opening tools along the edge of the back cover. Do this until the back cover becomes loose.

  7. HP 15-da0002dx SSD Replacement: passo 7, imagem 1 %32
    • Close the screen and flip over the laptop. Using the plastic opening tools, gently take off the back cover starting from the middle, bottom edge.

  8. HP 15-da0002dx SSD Replacement, Battery: passo 8, imagem 1 %32
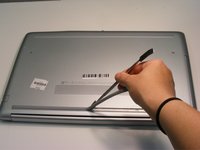
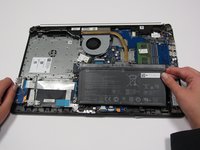
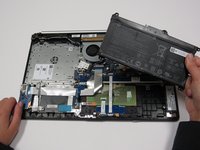
    • Remove the screws holding the battery in place using a Phillips #1 screwdriver.

  9. HP 15-da0002dx SSD Replacement: passo 9, imagem 1 %32 HP 15-da0002dx SSD Replacement: passo 9, imagem 2 %32
    • Using your fingers, tilt the top part of the battery towards you.

    • Continue to pull the rest of the battery away from the mounting tabs to remove.

  10. HP 15-da0002dx SSD Replacement, SSD: passo 10, imagem 1 %32
    • Remove the screw holding the SSD in place using the Phillips #1 screwdriver.

  11. HP 15-da0002dx SSD Replacement: passo 11, imagem 1 %32
    • Carefully pull the SSD away from the socket.

Conclusão

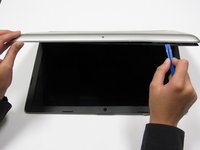
To reassemble your device, follow these instructions in reverse order.

3 outras pessoas executaram este guia.

Um comentário

sir

can we add a hdd of 1tb also without replacing ssd???

Kranti Ajit - Responder

Comentar

Exibir estatísticas:

Últimas 24 horas: 2

Últimos 7 dias: 6

Últimos 30 dias: 17

Ao todo: 2,201