Ir para o conteúdo principal
Game Boy Color Speaker Replacement

Game Boy Color Speaker Replacement

Finn Dooley

Finn Dooley e um outro colaborador

Última atualização em October 31, 2023

10 - 15 minutos
Moderado
Guia colaborativo

Introdução

Ir para o passo 1

The speakers on the device may become dirty or damaged by dust and dirt, requiring a cleaning or replacement. This guide will show you how to do both.

O que você precisa

Ferramentas

Exibir mais…

  1. Game Boy Color Speaker Replacement, Battery: passo 1, imagem 1 %32 Game Boy Color Speaker Replacement, Battery: passo 1, imagem 2 %32 Game Boy Color Speaker Replacement, Battery: passo 1, imagem 3 %32
    • Remove any games in the system before beginning.

    • Press up on the battery holder tab on the back to lift it up and remove it

  2. Game Boy Color Speaker Replacement, Removing the back shell: passo 2, imagem 1 %32 Game Boy Color Speaker Replacement, Removing the back shell: passo 2, imagem 2 %32
    • Using a Y1 screwdriver, remove the six screws on the back of the device.

  3. Game Boy Color Speaker Replacement, Removing the motherboard: passo 3, imagem 1 %32
    • When reassembling, make sure to align the power switch with the corresponding piece of plastic inside the shell. If not aligned it will stop you from screwing it back together and will break if force is applied.

    • Don't yet unsolder the speaker, as you'll be unable to remove it until the motherboard comes off.

    • Remove the 3 PH0 Phillips screws near the bottom of the device.

  4. Game Boy Color Speaker Replacement, Display Ribbon Cable: passo 4, imagem 1 %32 Game Boy Color Speaker Replacement, Display Ribbon Cable: passo 4, imagem 2 %32 Game Boy Color Speaker Replacement, Display Ribbon Cable: passo 4, imagem 3 %32
    • Push up on the two dark grey pieces of plastic on the display ribbon cable bracket.

    • Make sure they are in a position similar to the one in the second image. Then they are fully extended.

    • Be very careful pushing on these as they are fragile and will break easily. If they do, the display cable will no longer be as secure and could have a bad connection.

  5. Game Boy Color Speaker Replacement: passo 5, imagem 1 %32 Game Boy Color Speaker Replacement: passo 5, imagem 2 %32
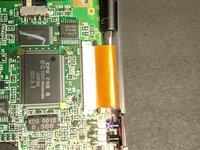
    • Using a spudger, screwdriver or other long thin object, gently pull the ribbon cable out of the bracket.

  6. Game Boy Color Speaker Replacement, Speaker: passo 6, imagem 1 %32 Game Boy Color Speaker Replacement, Speaker: passo 6, imagem 2 %32
    • If the speaker is simply dirty, clean it and the speaker holes in the case. Then, reassemble it and test the speakers. If they still don't work then continue on.

    • Once you've removed the motherboard, you are now free to desolder the speaker wires and replace it with a new one.

    • Make sure to keep the same polarity as the original, as otherwise it may sound a bit different. However, it likely doesn't matter and won't damage anything if the polarity is reversed.

Conclusão

To reassemble your device, follow these instructions in reverse order.

9 outras pessoas executaram este guia.

Finn Dooley

Membro desde: 03/09/22

359 Reputação

Autoria de 1 guia

0 comentários

Comentar

Exibir estatísticas:

Últimas 24 horas: 4

Últimos 7 dias: 52

Últimos 30 dias: 141

Ao todo: 7,890