Ir para o conteúdo principal
Disassembling IBM ThinkPad T42 Plastic Edge Cover

Disassembling IBM ThinkPad T42 Plastic Edge Cover

Gerald Watanabe

Gerald Watanabe e 8 outros colaboradores

Última atualização em January 10, 2025

15 - 20 minutos
Moderado
Precisa de melhores imagens
Faltando Passos
Ferramentas incorretas
Melhor Introdução

Introdução

Ir para o passo 1

How to remove the edge cover of the IBM ThinkPad T42 and access specific components within your personal device.

O que você precisa

Ferramentas

  1. Disassembling IBM ThinkPad T42 Plastic Edge Cover, Bottom cover: passo 1, imagem 1 %32
    • Use a Phillips #0 screwdriver to remove the twenty screws on the underside of the T42.

  2. Disassembling IBM ThinkPad T42 Plastic Edge Cover, Rear screws: passo 2, imagem 1 %32
    • Remove the four Phillips screws located on either side of the rear of the T42 (there are two on each end.)

  3. Disassembling IBM ThinkPad T42 Plastic Edge Cover, Keyboard and Trackpad: passo 3, imagem 1 %32
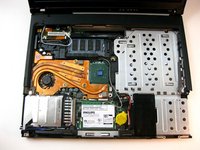
    • Flip the laptop over and open the screen to access the keyboard and trackpad.

    • The keyboard and trackpad are connected to the motherboard. Before removing the keyboard and trackpad, disconnect both components from the motherboard, as shown in the following step.

    • The bezel and keyboard will be loose, be careful.

  4. Disassembling IBM ThinkPad T42 Plastic Edge Cover: passo 4, imagem 1 %32 Disassembling IBM ThinkPad T42 Plastic Edge Cover: passo 4, imagem 2 %32
    • Carefully maneuver the palm rest away from the keyboard, as both the keyboard and palm rest/trackpad will come off together.

    • Remember, both the keyboard and trackpad have connectors to the motherboard. Disconnect these before completely removing either component.

  5. Disassembling IBM ThinkPad T42 Plastic Edge Cover, Plastic Edge Cover: passo 5, imagem 1 %32 Disassembling IBM ThinkPad T42 Plastic Edge Cover, Plastic Edge Cover: passo 5, imagem 2 %32
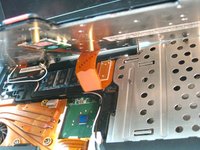
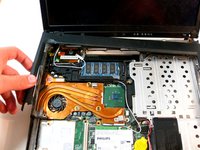
    • Starting from the bottom right, carefully remove the bezel by pulling it up gently. If needed use a spudger or flathead screwdriver to help.

Conclusão

To reassemble your device, follow these instructions in reverse order.

Gerald Watanabe

Membro desde: 04/14/10

288 Reputação

Autoria de 7 guias

Equipe

Cal Poly, Team 29-76, Johann Spring 2010 Membro de Cal Poly, Team 29-76, Johann Spring 2010

CPSU-JOHANN-S10S29G76

4 Membros

Autoria de 37 guias

0 comentários

Comentar

Exibir estatísticas:

Últimas 24 horas: 1

Últimos 7 dias: 7

Últimos 30 dias: 12

Ao todo: 6,961