Ir para o conteúdo principal
Dell Latitude E4300 CPU Cooling Fan Replacement

Dell Latitude E4300 CPU Cooling Fan Replacement

Maritza Martinez

Maritza Martinez e um outro colaborador

Última atualização em January 3, 2019

6 - 10 minutos
Fácil

Introdução

Ir para o passo 1

The CPU cooling fan is used to cool down the Dell Latitude E4300's central processing unit. The CPU is an electronic circuitry that carries out the computer's programs. There are some occasions in which the fan can collect dust or break down. When this occurs, the CPU will not receive the cooling it needs and your laptop will begin to overheat. If you are having a constant issue with overheating, try following this guide to replace your cooling fan.

O que você precisa

Ferramentas

  1. Dell Latitude E4300 CPU Cooling Fan Replacement, Keyboard: passo 1, imagem 1 %32
    • Open the laptop and remove the small panel located above the keyboard.

  2. Dell Latitude E4300 CPU Cooling Fan Replacement: passo 2, imagem 1 %32
    • Using a Phillips 1 Screwdriver, unscrew the three M2x3-mm screws located above the keyboard where the small panel was originally.

  3. Dell Latitude E4300 CPU Cooling Fan Replacement: passo 3, imagem 1 %32
    • Pull off keyboard forward and then outwards.

    • The keyboard is fragile, so make sure you pull the keyboard off carefully.

  4. Dell Latitude E4300 CPU Cooling Fan Replacement, Keyboard Docking Component: passo 4, imagem 1 %32
    • With your Phillips 1 screwdriver, unscrew the five M2.5x5-mm screws and the five M2.5x8-mm screws that lie underneath the keyboard panel.

    • Be aware there are two deeply recessed screws on both sides to the rear of this panel. There are also two screws externally on the rear face either side of the battery that hold the monitor on and pass through this panel, support the screen when you remove these. There are also two screws above the hard drive bay that need to be removed.

  5. Dell Latitude E4300 CPU Cooling Fan Replacement: passo 5, imagem 1 %32 Dell Latitude E4300 CPU Cooling Fan Replacement: passo 5, imagem 2 %32
    • Remove additional wires located within the panel.

    • For the smaller wires, try using a spudger for easier access.

  6. Dell Latitude E4300 CPU Cooling Fan Replacement: passo 6, imagem 1 %32
    • Lift the keyboard panel to separate the component from the rest of the device.

  7. Dell Latitude E4300 CPU Cooling Fan Replacement, CPU Cooling Fan: passo 7, imagem 1 %32
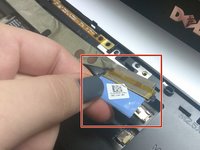
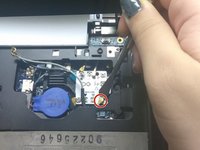
    • Using a Phillips 1 Screwdriver, remove the two M2.5x5-mm screws located on opposite sides of the fan.

  8. Dell Latitude E4300 CPU Cooling Fan Replacement: passo 8, imagem 1 %32
    • Disconnect the wires that connect the fan to the rest of the computer.

  9. Dell Latitude E4300 CPU Cooling Fan Replacement: passo 9, imagem 1 %32
    • Lift the fan upwards and remove it from the device.

Conclusão

To reassemble your device, follow these instructions in reverse order.

Uma outra pessoa concluiu este guia.

Um comentário

I would rate this more moderate than easy.

Bob Green - Responder

Comentar

Exibir estatísticas:

Últimas 24 horas: 2

Últimos 7 dias: 8

Últimos 30 dias: 48

Ao todo: 2,627