
Canon PowerShot A480 LCD Screen Replacement
Introdução
Ir para o passo 1If you are looking at this guide, that means you have used our troubleshooting page to diagnose your camera and have come to the conclusion that your only course of action is to replace your camera’s screen. Before you start make sure to take a look at the required tools and parts. Good luck fixers!
O que você precisa

-
-
First, we will start by removing all of the black 5mm screws on the exterior.
-
Flip the camera upside down revealing two black screws on either side of the tripod mount.
-
Turn to the side of the camera closest to the lens to unscrew the third and final black screw.
-
-
-
Open the rubber panel on the side of the camera to reveal the last two 5mm exterior screws which are silver.
-
Once you have removed the last of the screws, use an iFixit opening tool to separate the two halves of the camera.
-
Take a half of the camera in each hand and gently pry them apart, pulling up on the side across from where the buttons are located.
-
-
-
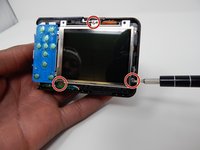
With the screen now exposed, you must unscrew the three silver 2mm screws attaching it to the body of the camera.
-
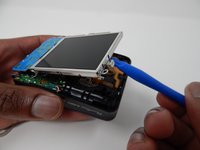
Use the iFixit opening tool to lift the screen away from the body so that the only thing connecting it to the rest of the camera is the thin, orange wire cable.
-
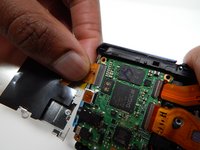
Using your pointer finger and thumb, firmly grasp the cable and pull it straight away from the camera to disconnect it.
-


To reassemble your device, follow these instructions in reverse order using your new LCD display.
To reassemble your device, follow these instructions in reverse order using your new LCD display.
Cancelar: não concluí este guia.
4 outras pessoas executaram este guia.
Equipe

UW Tacoma, Team S1-G5, Cardinal Spring 2019 Membro de UW Tacoma, Team S1-G5, Cardinal Spring 2019
UWT-CARDINAL-S19S1G5
4 Membros
Autoria de 4 guias