Ir para o conteúdo principal
Canon EOS Rebel T5 LCD Screen Replacement

Canon EOS Rebel T5 LCD Screen Replacement

Austin Tucker

Austin Tucker e 4 outros colaboradores

Última atualização em January 3, 2025

20 minutos
Moderado

Introdução

Ir para o passo 1

If the display on your camera has stopped working or is cracked and otherwise not functional, it will need to be replaced. This guide will show you how.

O que você precisa

A iFixit ganha comissão quando você compra por estes links.
  1. Canon EOS Rebel T5 LCD Screen Replacement, Battery: passo 1, imagem 1 %32
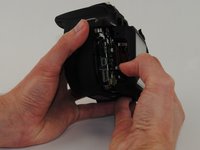
    • Lay the camera on its back so that the card/battery door is facing you.

    • Using your fingernail, slide the tab on the battery door up to release the battery door latch.

  2. Canon EOS Rebel T5 LCD Screen Replacement: passo 2, imagem 1 %32
    • Lift the now free card/battery door to reveal the battery compartment.

    • Push the gray lever to the right side so that the battery can be removed and replaced with a new one.

  3. Canon EOS Rebel T5 LCD Screen Replacement, Back Cover: passo 3, imagem 1 %32
    • Turn the camera so that the back is facing to your right.

    • Remove the 5mm JIS #000 screw above the rubber USB port cover.

  4. Canon EOS Rebel T5 LCD Screen Replacement: passo 4, imagem 1 %32
    • Remove the rubber piece.

    • Unscrew the two screws under the rubber cover to completely remove the rubber cover piece.

    • It is held in place by a notched tether, but can be easily manipulated to slide out.

  5. Canon EOS Rebel T5 LCD Screen Replacement: passo 5, imagem 1 %32
    • Turn your camera so that the bottom is facing you.

    • Remove the 5mm JIS #000 screws.

  6. Canon EOS Rebel T5 LCD Screen Replacement: passo 6, imagem 1 %32
    • Now turn the camera so that the front is facing towards your right.

    • Remove the two remaining 5mm JIS #000 screws.

  7. Canon EOS Rebel T5 LCD Screen Replacement: passo 7, imagem 1 %32 Canon EOS Rebel T5 LCD Screen Replacement: passo 7, imagem 2 %32 Canon EOS Rebel T5 LCD Screen Replacement: passo 7, imagem 3 %32
    • Now that all of the exterior screws have been removed, grip the camera firmly on both sides.

    • Gently pry the back panel from the main body of the camera.

    • There are two ribbon cables that need to be removed in order for the back panel to come free from the camera body, as indicated.

    • This back panel contains various control components of the camera as well as the LCD screen.

  8. Canon EOS Rebel T5 LCD Screen Replacement, LCD Screen: passo 8, imagem 1 %32 Canon EOS Rebel T5 LCD Screen Replacement, LCD Screen: passo 8, imagem 2 %32
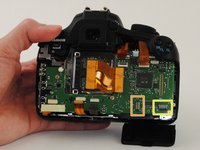
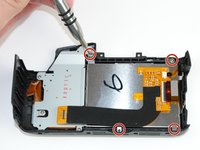
    • Remove the four silver 4mm JIS #000 screws connecting the LCD screen to the back of the camera.

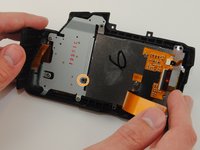
    • Be sure to lift the ribbon cable to remove the remaining hidden black 4mm JIS #000 screw.

  9. Canon EOS Rebel T5 LCD Screen Replacement: passo 9, imagem 1 %32
    • The LCD screen can now be lifted from the right side to be replaced.

Conclusão

To reassemble your device, follow these instructions in reverse order.

3 outras pessoas executaram este guia.

Austin Tucker

Membro desde: 08/27/15

1.057 Reputação

Autoria de 4 guias

Equipe

USF Tampa, Team 16-4, Wollert Fall 2015 Membro de USF Tampa, Team 16-4, Wollert Fall 2015

USFT-WOLLERT-F15S16G4

4 Membros

Autoria de 16 guias

8Comentários do guia

This guide is NOT COMPLETE. THere are several missing screws that need to be removed.

2 from the viewfinder,

and 2 from the IO ports....

Do not follow this and force the back open or you will need more repair!

11romej - Responder

Hi, I followed every step and replaced the LCD screen but when turned on the camera, I only got a yellow horizontal line. Do you know what could have gone wrong? Thank you.

Griselda Garcia - Responder

Hi, excellent guide but I’ve a problem.

I’m need to buy a lcd display. Do you know where can I buy ? Can you recommend me one store to buy it?

Nicolás Morales - Responder

@nickmorales I found the lcd display as well as the connected controller card ar eBay.

Tom Kane

Tom Kane - Responder

I had problems connected the actual LCD component to the controller card, as seen in step 9. We need more illustrations for actually connecting the ribbon cables (plural!) and for actually mounting the LCD and the controller card.

Tom Kane

Tom Kane - Responder

Comentar

Visualizações:

Últimas 24 horas: 3

Últimos 7 dias: 14

Últimos 30 dias: 80

Ao todo: 8,303