
Canon EOS 6D Analog Screen Replacement
Introdução
Ir para o passo 1Use this guide to replace a cracked or malfunctioning top analog screen on your EOS 6D.
O que você precisa


-
-
Remove the viewfinder cover by pinching the sides and sliding it upward.
-
-
-
Slide your fingernail or the flat end of the spudger underneath the rubber covering and gently peel it off all sides of the camera.
-
-
-
Open the covers to the HDMI/AV/MIC ports on the side of the camera by gently pulling outward on the bottom of the covers.
-
Rotate the covers to the side so that you can see the connection ports inside.
-
Remove the following screws:
-
Two silver 5mm Phillips #00
-
One black 6mm Phillips #00
-
-
-
Rotate your camera so the bottom side is facing you.
-
Remove the following screws:
-
One 6mm Phillips #00
-
Two 3mm Phillips #00
Correction:
2x 3mm Phillips #00
1x 6mm Phillips #00 in battery compartment
Figure circle is not correct. Joey Fresco is right.
-
-
-
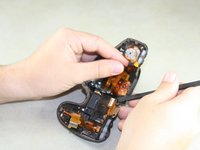
Carefully use your fingers to tilt the back panel downward to about a 90 degree angle.
-
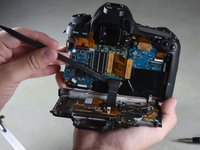
Use the flat end of the spudger to gently pry off the ribbon wire from the inside of the camera.
There is a metal piece protruding from the back panel into the main body, down near the battery door. DO NOT simply bend the back panel down 90 degrees! Gently pull the entire back (including the lower right corner near the battery door) straight away from the camera about 1cm, and then lower the back panel 90 degrees.
-
-
-
Remove the 8mm Phillips #00 screw from the bottom of the front of the camera.
-
-
-
Rotate the camera so the side with the SD card slot is facing you.
-
Remove the following screws:
-
One 4mm fine-thread Phillips #00
-
Two 4mm coarse-thread Phillips #00
Screw types were wrong. There is only one coarse-tread Philips on the botton. The top two are fin-thread.
Not on mine, the two orange-labeled screws were coarse threaded, but they are not the same length. The 0.5mm longer screw goes in the hole nearest the battery door.
rakurai -
-
-
-
Remove the 4mm Phillips #00 screw on the inside of the front panel to separate the panel from the speaker wire.
Can the lens mount ring (the EF mount ring with the red dot) actually be removed without having to remove the front panel by just removing the four screws? Or does one actually have to disassemble the whole camera as shown in this guide?
Better to remove mount ring after disassemble the whole came as this guide. The ring was caught and could not be removed.
Removing the front panel is unnecessary for removing the top case. Just pull the panel forward 0.5cm to unhook the top case from the pins in the front panel, then slide it back into position temporarily while you work with the top. This avoids needing to unhook the speaker or otherwise damage front components.
-
-
-
Remove the 4mm Phillips #00 screw from the inside of the top panel, below the shutter button.
-
-
-
Rotate the camera so the back is facing you.
-
Remove the Phillips #00 screw from the viewfinder focus.
-
-
Ferramenta utilizada neste passo:Tweezers$4.99
-
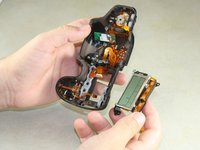
Carefully detach the two light brown ribbon wires on the top panel:
-
The right ribbon by prying it out with the flat end of the spudger.
-
The left ribbon by using tweezers to gently wiggle it out toward the top.
The ribbon connector indicated in orange has a lever on the back of the connector that you lift with the spudger to release the cable. Then reinsert the cable until you feel it hit home and close the lever.
-
-
-
Use the pointed end of the spudger to flip up two silver ribbon wire latches on the inside of the top panel.
-


To reassemble your device, follow these instructions in reverse order.
To reassemble your device, follow these instructions in reverse order.
Cancelar: não concluí este guia.
9 outras pessoas executaram este guia.
Equipe

Cal Poly, Team 11-48, Amido Spring 2014 Membro de Cal Poly, Team 11-48, Amido Spring 2014
CPSU-AMIDO-S14S11G48
4 Membros
Autoria de 18 guias
2Comentários do guia
any way to replace the sd card side panel without having to take the lcd panel off