Ir para o conteúdo principal

Blu Studio Selfie Front Facing Camera Replacement

O que você precisa

  1. Blu Studio Selfie Front Facing Camera Replacement, Rear Cover: passo 1, imagem 1 %32
    • Make sure your phone is powered off.

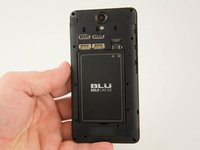
    • Turn the front of the phone away from you.

    • Run your fingers along the sides of the phone to identify where the case can be pulled apart.

  2. Blu Studio Selfie Front Facing Camera Replacement: passo 2, imagem 1 %32
    • Insert the flat end of your plastic opening into the crevice you found along the side of the phone.

    • Gently apply pressure until you feel the back case pop free of the phone.

    • Continue the previous two steps around the rest of the phone until the case is fully removed.

  3. Blu Studio Selfie Front Facing Camera Replacement, Battery: passo 3, imagem 1 %32 Blu Studio Selfie Front Facing Camera Replacement, Battery: passo 3, imagem 2 %32
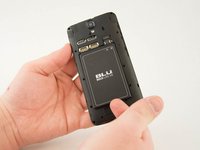
    • Identify the crevice at the bottom of the battery.

    • There should be enough space for you to fit your fingernail between the battery and the phone.

    • Gently lift the battery free of the phone.

  4. Blu Studio Selfie Front Facing Camera Replacement, Midframe: passo 4, imagem 1 %32
    • Remove all the 4mm Phillips #000 screws from the midframe.

  5. Blu Studio Selfie Front Facing Camera Replacement: passo 5, imagem 1 %32
    • Insert the spudger between the midframe and the display assembly.

    • Gently pry up the midframe.

    • When working with electronics, it's important to choose a tool that's ESD-safe to avoid accidental damage to the device. The metal spudger is great when you need serious prying power, but the regular black nylon spudger or a plastic opening tool should be used whenever possible.

  6. Blu Studio Selfie Front Facing Camera Replacement: passo 6, imagem 1 %32
    • Where the battery rested before, you will find a small clip that holds down the midframe.

    • After the rest of the midframe is detached, from the phone place the flat end of the spudger beneath the clip.

    • Gently lift up on the clip until it comes free.

    • Remove the midframe from the phone.

  7. Blu Studio Selfie Front Facing Camera Replacement, Front Facing Camera: passo 7, imagem 1 %32 Blu Studio Selfie Front Facing Camera Replacement, Front Facing Camera: passo 7, imagem 2 %32 Blu Studio Selfie Front Facing Camera Replacement, Front Facing Camera: passo 7, imagem 3 %32
    • Use tweezers to lift the black tab on the ZIF connector and pull the ribbon cable out of place.

    • Using a pair of tweezers for assistance, remove the front facing camera from its case.

Conclusão

To reassemble your device, follow these instructions in reverse order.

3 outras pessoas executaram este guia.

Stacy Kam

Membro desde: 01/20/16

630 Reputação

Autoria de 5 guias

Equipe

USF Tampa, Team 10-1, Remmell Spring 2016 Membro de USF Tampa, Team 10-1, Remmell Spring 2016

USFT-REMMELL-S16S10G1

Membros da 4

Autoria de 6 guias

0 comentários

Adicione um comentário

Exibir estatísticas:

Últimas 24 horas: 0

Últimos 7 dias: 0

Últimos 30 dias: 1

Duração total: 446