Ir para o conteúdo principal
Arturia Microbrute Opening Procedure

Arturia Microbrute Opening Procedure

Tobias Isakeit

Tobias Isakeit e um outro colaborador

Última atualização em July 26, 2024

20 - 35 minutos
Moderada

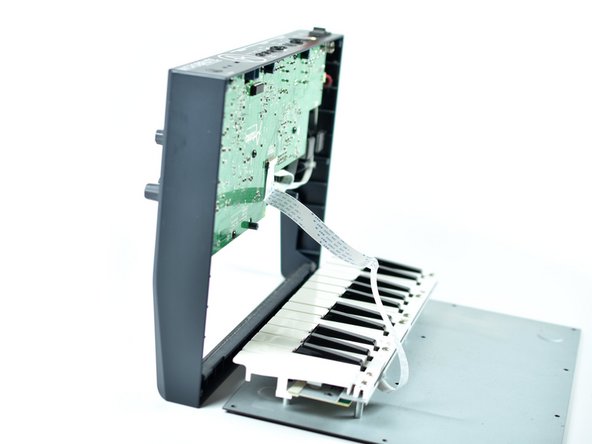
This guide shows you how to open up the Arturia Microbrute and remove the bottom plate including the keyboard.

O que você precisa

Ferramentas

  • Phillips #0 Screwdriver
    Phillips #0 Screwdriver
  • Spudger
    Spudger
  1. Arturia Microbrute Opening Procedure, Arturia Microbrute Opening Procedure: passo 1, imagem 1 %32 Arturia Microbrute Opening Procedure, Arturia Microbrute Opening Procedure: passo 1, imagem 2 %32
    • Switch off the Microbrute and make sure to disconnect any cables.

    • Don’t forget the mini patch bay on the top right.

  2. Arturia Microbrute Opening Procedure: passo 2, imagem 1 %32
    • Flip the Microbrute over and put it on a soft surface to not damage the knobs and faders.

    • Use a screwdriver to remove the twelve Philips screws on the bottom plate.

  3. Arturia Microbrute Opening Procedure: passo 3, imagem 1 %32 Arturia Microbrute Opening Procedure: passo 3, imagem 2 %32 Arturia Microbrute Opening Procedure: passo 3, imagem 3 %32
    • Put the Microbrute on its front edge and carefully tilt open the bottom plate including the keyboard.

    • Be aware of the ribbon cable connecting the keyboard to the PCB.

    • The cable should give you enough slack to put the top section over the keyboard section for better handling.

  4. Arturia Microbrute Opening Procedure: passo 4, imagem 1 %32
    • Next, focus on the connector of the keyboard.

  5. Arturia Microbrute Opening Procedure: passo 5, imagem 1 %32 Arturia Microbrute Opening Procedure: passo 5, imagem 2 %32 Arturia Microbrute Opening Procedure: passo 5, imagem 3 %32
    • Use a spudger to unlock the connector by pushing both left and right locking tabs tabs towards the cable.

  6. Arturia Microbrute Opening Procedure: passo 6, imagem 1 %32 Arturia Microbrute Opening Procedure: passo 6, imagem 2 %32
    • Grab the ribbon cable with your fingers and pull it out of the connector.

  7. Arturia Microbrute Opening Procedure: passo 7, imagem 1 %32
    • Now the Microbrute is open and the bottom plate with the keyboard is separated from the rest of the device.

Conclusão

To reassemble your device, follow these instructions in reverse order.

Tobias Isakeit

Membro desde: 03/31/14

123.911 Reputação

Autoria de 189 guias

Equipe

0 comentários

Adicione um comentário

Exibir estatísticas:

Últimas 24 horas: 0

Últimos 7 dias: 3

Últimos 30 dias: 17

Duração total: 144