Ir para o conteúdo principal
Akai MPK25 LCD Replacement

Akai MPK25 LCD Replacement

Will Saba

Will Saba e 8 outros colaboradores

Última atualização em July 19, 2021

5 - 10 minutos
Moderado
Guia do aluno destaque

Introdução

Ir para o passo 1

Use this guide to replace a screen that is scratched, cracked, or broken.

O que você precisa

Peças

Ferramentas

Exibir mais…

A iFixit ganha comissão quando você compra por estes links.
  1. Akai MPK25 LCD Replacement, Face Plate: passo 1, imagem 1 %32
    • Remove all the selector knob covers by pulling them off.

    There’s NO need to remove all of the knobs in Steps 1 & 2…the faceplate lifts off with or without them attached.

    NY Prince - Responder

  2. Akai MPK25 LCD Replacement: passo 2, imagem 1 %32
    • Using needle nose pliers, remove the washers from the four corner selector knobs.

    Please, don’t use any pliers. Try to find a wrench in order to not damage the nuts nor scratch the panel. Anyway, many thanks for the explanation. Regards.

    Beto - Responder

  3. Akai MPK25 LCD Replacement: passo 3, imagem 1 %32
    • Flip the device over. Using a Philips #2 screw driver, remove the fourteen 10.3 mm black screws holding the back panel in place.

  4. Akai MPK25 LCD Replacement: passo 4, imagem 1 %32 Akai MPK25 LCD Replacement: passo 4, imagem 2 %32 Akai MPK25 LCD Replacement: passo 4, imagem 3 %32
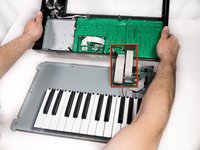
    • Carefully flip the device to the front making sure you secure the face plate and the chassis together.

    • Please use care in following the step above to avoid ripping the ribbon cables connecting the two sides.

  5. Akai MPK25 LCD Replacement: passo 5, imagem 1 %32 Akai MPK25 LCD Replacement: passo 5, imagem 2 %32 Akai MPK25 LCD Replacement: passo 5, imagem 3 %32
    • Rotate the device 180 degrees and carefully remove the face plate by slightly lifting the screen side towards you and then sliding the bottom out from under the keys.

    • Use care when doing the step above so that the ribbon connectors which connect the top of the chassis to the top of the face plate are not damaged.

  6. Akai MPK25 LCD Replacement, LCD: passo 6, imagem 1 %32
    • Using a Phillips #00 screwdriver, remove the four 8.9 mm screws.

  7. Akai MPK25 LCD Replacement: passo 7, imagem 1 %32
    • Using a Phillips #2 screwdriver, remove the one 9.8mm screw holding down the ground wire.

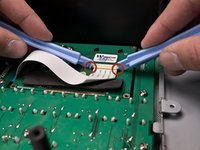
  8. Akai MPK25 LCD Replacement: passo 8, imagem 1 %32 Akai MPK25 LCD Replacement: passo 8, imagem 2 %32
    • Using two plastic opening tools, slide the black locking mechanism on the ZIF connector towards you. This will remove the ribbon cable connecting the motherboard to the screen.

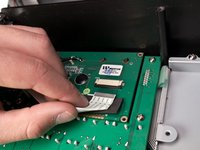
  9. Akai MPK25 LCD Replacement: passo 9, imagem 1 %32
    • Lift the screen from either side, removing it from the board.

Conclusão

To reassemble the display, follow these instructions in reverse order.

3 outras pessoas executaram este guia.

Will Saba

Membro desde: 01/11/13

412 Reputação

Autoria de 2 guias

Equipe

Cal Poly, Team 20-6, Maness Winter 2013 Membro de Cal Poly, Team 20-6, Maness Winter 2013

CPSU-MANESS-W13S20G6

5 Membros

Autoria de 6 guias

1Comentário do guia

Where can I find a new ribbon?

Wise Professor - Responder

Comentar

Visualizações:

Últimas 24 horas: 0

Últimos 7 dias: 1

Últimos 30 dias: 4

Ao todo: 2,167