Ir para o conteúdo principal

Akai MPK25 Face Plate Replacement

O que você precisa

  1. Akai MPK25 Face Plate Replacement, Face Plate: passo 1, imagem 1 %32
    • Remove all the selector knob covers by pulling them off.

  2. Akai MPK25 Face Plate Replacement: passo 2, imagem 1 %32
    • Using needle nose pliers, remove the washers from the four corner selector knobs.

  3. Akai MPK25 Face Plate Replacement: passo 3, imagem 1 %32
    • Flip the device over. Using a Philips #2 screw driver, remove the fourteen 10.3 mm black screws holding the back panel in place.

  4. Akai MPK25 Face Plate Replacement: passo 4, imagem 1 %32 Akai MPK25 Face Plate Replacement: passo 4, imagem 2 %32 Akai MPK25 Face Plate Replacement: passo 4, imagem 3 %32
    • Carefully flip the device to the front making sure you secure the face plate and the chassis together.

    • Please use care in following the step above to avoid ripping the ribbon cables connecting the two sides.

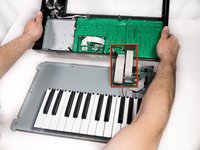
  5. Akai MPK25 Face Plate Replacement: passo 5, imagem 1 %32 Akai MPK25 Face Plate Replacement: passo 5, imagem 2 %32 Akai MPK25 Face Plate Replacement: passo 5, imagem 3 %32
    • Rotate the device 180 degrees and carefully remove the face plate by slightly lifting the screen side towards you and then sliding the bottom out from under the keys.

    • Use care when doing the step above so that the ribbon connectors which connect the top of the chassis to the top of the face plate are not damaged.

Conclusão

To reassemble your device, follow these instructions in reverse order.

Uma outra pessoa concluiu este guia.

Serbinder Singh

Membro desde: 01/30/13

81 Reputação

Autoria de 3 guias

Equipe

Cal Poly, Team 20-6, Maness Winter 2013 Membro de Cal Poly, Team 20-6, Maness Winter 2013

CPSU-MANESS-W13S20G6

Membros da 5

Autoria de 6 guias

0 comentários

Adicione um comentário

Exibir estatísticas:

Últimas 24 horas: 0

Últimos 7 dias: 1

Últimos 30 dias: 11

Duração total: 1,609