Ir para o conteúdo principal
Acer Aspire R5-471T-52EE Fan Replacement

Acer Aspire R5-471T-52EE Fan Replacement

Arda Cetken

Arda Cetken e 3 outros colaboradores

Última atualização em June 4, 2020

20 - 25 minutos
Moderado
Precisa de melhores imagens
Melhor Introdução

Introdução

Ir para o passo 1

The fans of a device keep the device from overheating and provide essential cooling to the other components in the device. If you find that your device is overheating, the fans may need to be replaced. Follow the instructions in this guide to replace the fans in your laptop.

O que você precisa

Ferramentas

Exibir mais…

  1. Acer Aspire R5-471T-52EE Fan Replacement, Back Cover: passo 1, imagem 1 %32 Acer Aspire R5-471T-52EE Fan Replacement, Back Cover: passo 1, imagem 2 %32
    • Unplug the laptop and turn it off.

    • Remove the twelve 3mm screws using the Phillips #1 screwdriver.

  2. Acer Aspire R5-471T-52EE Fan Replacement: passo 2, imagem 1 %32
    • With the hinges of the laptop pointing away from you, gently begin to pull on the portion between the two hinges towards yourself until you feel the cover pop off.

    • Remove the back cover from the device.

  3. Acer Aspire R5-471T-52EE Fan Replacement, Motherboard: passo 3, imagem 1 %32
    • Remove seven 3 mm screws using the Phillips #00 screwdriver.

  4. Acer Aspire R5-471T-52EE Fan Replacement: passo 4, imagem 1 %32
    • Once the screws are removed, disconnect seven plugs from the motherboard.

    • Keep in mind that a majority of these wires are extremely thin and fragile. Disconnect them with light force and care.

  5. Acer Aspire R5-471T-52EE Fan Replacement: passo 5, imagem 1 %32
    • Flip up the small black portion the connectors are connected to and disconnect them from the motherboard.

    • Grab the yellow piece of tape to easily remove the connection from the motherboard with nothing more than some gentle force.

    • Remove the large black ribbon wire by gently pulling on the white tab towards yourself.

    • Remove the large white ribbon wire by pulling up on the small black tab.

  6. Acer Aspire R5-471T-52EE Fan Replacement: passo 6, imagem 1 %32
    • Remove the four remaining screws located on the fan using the Phillips #00 screwdriver.

  7. Acer Aspire R5-471T-52EE Fan Replacement, Fan: passo 7, imagem 1 %32 Acer Aspire R5-471T-52EE Fan Replacement, Fan: passo 7, imagem 2 %32
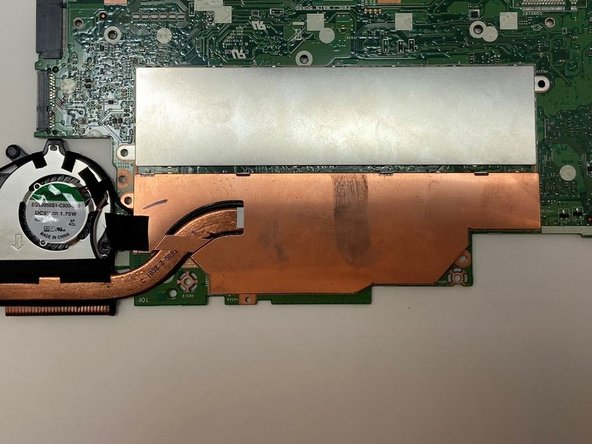
    • Flip the motherboard over so that the silver and copper covers are exposed.

    • Use the opening tool to gently lift the copper cover off the board by sliding the tool underneath the edge.

  8. Acer Aspire R5-471T-52EE Fan Replacement: passo 8, imagem 1 %32
    • Unplug the two power cables for the fans from the motherboard.

    • Remove the four mounting screws from the motherboard using a Phillips #00 screwdriver.

  9. Acer Aspire R5-471T-52EE Fan Replacement: passo 9, imagem 1 %32
    • Gently remove the fans from the motherboard.

Conclusão

To reassemble your device, follow these instructions in reverse order.

Uma outra pessoa concluiu este guia.

0 comentários

Comentar

Exibir estatísticas:

Últimas 24 horas: 0

Últimos 7 dias: 1

Últimos 30 dias: 5

Ao todo: 355