Esta versão pode conter edições incorretas. Mude para o último instantâneo verificado.
O que você precisa
-
-
Desligue o iPhone antes de iniciar a desmontagem.
-
Remova os dois parafusos pentalobe de 6,7 mm na borda inferior do iPhone.
-
-
-
Coloque tiras sobrepostas de fita adesiva transparente sobre a tela do iPhone até que toda a superfície fique coberta.
-
Se não conseguir fazer com que a ventosa grude nas próximas etapas, dobre um pedaço de fita adesiva resistente (como fita adesiva vedante) na forma de uma pega e levante a tela com ela.
-
-
-
Puxe a pega azul para trás para destravar os braços do Anti-Clamp.
-
Deslize os braços pela borda esquerda ou direita do iPhone.
-
Posicione as ventosas próximo à borda inferior do iPhone - uma pela frente e a outra pela traseira.
-
Aperte as ventosas uma contra a outra para aplicar sucção na área desejada.
-
-
-
Puxe a pega azul para a frente para travar os braços.
-
Gire a pega 360 graus no sentido horário ou até que as ventosas comecem a se esticar.
-
Certifique-se de que as ventosas permaneçam alinhadas uma com a outra. Se elas começarem a ficar desalinhadas, solte um pouco as ventosas e realinhe os braços.
-
-
-
Aqueça uma bolsa térmica iOpener e passe-a pelos braços do Anti-Clamp.
-
Dobre a bolsa térmica iOpener de modo que ela fique sobre a borda inferior do iPhone.
-
Aguarde um minuto para que o adesivo tenha a chance de se soltar e apresentar um vão para a abertura.
-
Insira uma palheta de abertura sob a tela e o painel de plástico, mas não abaixo da própria tela.
-
Pule as próximas três etapas.
-
-
-
Use um secador de cabelo, uma pistola de ar quente ou prepare uma bolsa térmica iOpener e aplique-o(a) na borda inferior do iPhone por cerca de um minuto para amolecer o adesivo que se encontra por baixo.
-
-
-
Puxe a ventosa para cima com pressão firme e constante para criar um pequeno vão entre o painel frontal e a estrutura traseira.
-
Insira uma palheta de abertura no espaço abaixo da, tela e da moldura de plástico, mas não debaixo da própria tela.
-
-
-
Deslize a palheta de abertura pelo canto inferior esquerdo e pela borda esquerda do iPhone, cortando o adesivo que mantém a tela no lugar.
-
-
-
Abra o iPhone virando a tela para cima pelo lado esquerdo, como se estivesse virando a contra-capa de um livro.
-
Apoie a tela em algo para deixá-la de pé enquanto você executa os trabalhos no fone.
-
-
-
Remova os três parafusos Y000 de 1,2 mm que prendem o suporte que cobre o conector da bateria.
-
Remova o suporte.
-
-
-
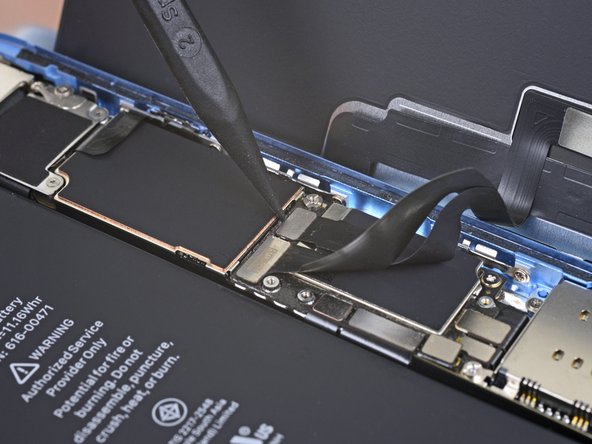
Com a ponta pontiaguda de uma espátula, erga o conector da bateria em linha reta, para fora do soquete.
-
Vire o conector ligeiramente para fora da placa lógica para evitar que ele entre acidentalmente em contato com o soquete e forneça energia elétrica ao telefone durante o reparo.
-
-
-
-
Remova os dois parafusos Y000 de 1,2 mm que prendem o suporte do conector da tela.
-
Remova o suporte.
-
-
-
Com a ponta pontiaguda de uma espátula, erga e desconecte o cabo do digitalizador.
-
-
-
Com a ponta pontiaguda de uma espátula, desconecte o conector do cabo da tela.
-
-
-
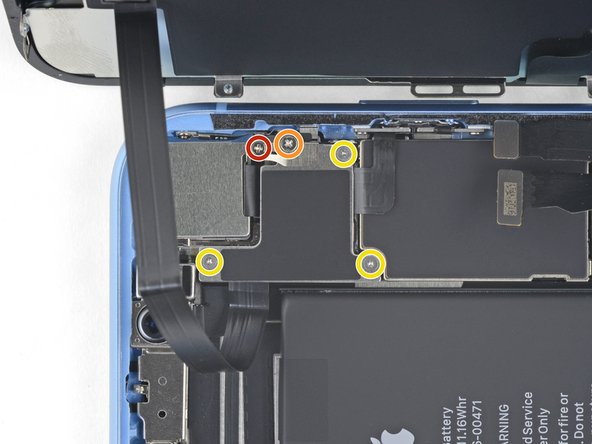
Remova os cinco parafusos que prendem o suporte do conector da placa lógica à estrutura traseira:
-
Um parafuso Phillips nº 000 de 1,3 mm
-
Um parafuso Phillips nº 000 de 1,5 mm
-
Três parafusos Y000 de 1,2 mm
-
Remova o suporte.
-
-
-
Com a ponta pontiaguda de uma espátula, erga o conector do conjunto de sensores dianteiros de seu soquete.
-
-
Este passo não foi traduzido. Ajude a traduzi-lo
-
Remove the seven screws securing the bracket below the Taptic engine and speaker:
-
Three Phillips 1.4 mm screws
-
Two Phillips 1.7 mm screws
-
One Phillips 1.9 mm screw
-
One Phillips 1.6 mm screw
-
-
Este passo não foi traduzido. Ajude a traduzi-lo
-
Lift the bracket from the edge nearest the battery. Don't try to fully remove it, as it's still connected via a small flex cable.
-
-
Este passo não foi traduzido. Ajude a traduzi-lo
-
While holding the bracket out of the way, use the point of a spudger to pry up and disconnect the flex cable underneath.
-
-
Este passo não foi traduzido. Ajude a traduzi-lo
-
Remove the piece of black tape and the small rubber rectangle covering the Taptic Engine connector cover.
-
-
Este passo não foi traduzido. Ajude a traduzi-lo
-
Remove the five screws securing the lower speaker:
-
One 2.8 mm standoff screw
-
One 2.3 mm standoff screw
-
One 2.3 mm Phillips screw
-
One 1.8 mm Phillips screw
-
One 1.6 mm Phillips screw
-
-
Este passo não foi traduzido. Ajude a traduzi-lo
-
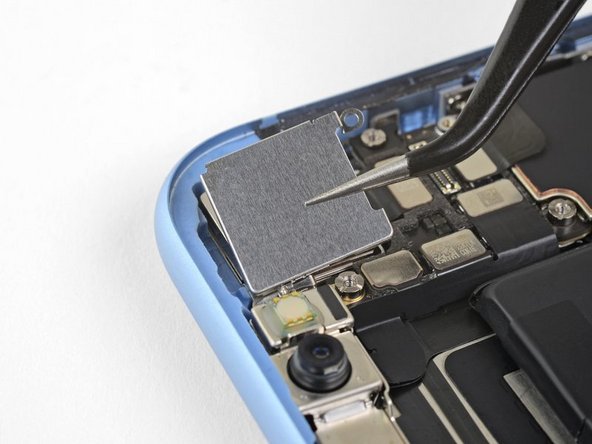
Remove the small bracket on the top right corner of the speaker.
-
Remove the Taptic Engine connector cover.
-
-
Este passo não foi traduzido. Ajude a traduzi-lo
-
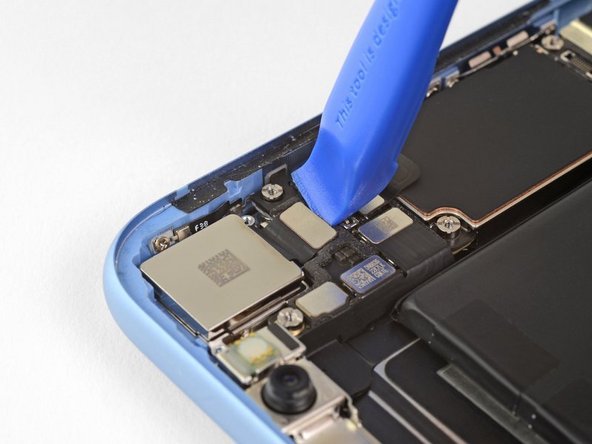
Insert a spudger under the top edge of the speaker near the edge of the iPhone's case.
-
Gently pry up and lift the top edge of the speaker.
-
-
Este passo não foi traduzido. Ajude a traduzi-lo
-
Hold the speaker by its side edges and rock it side-to-side, separating the adhesive securing it to the bottom edge of the iPhone.
-
Pull the speaker away from the bottom edge of the iPhone until the adhesive gasket separates.
-
-
Este passo não foi traduzido. Ajude a traduzi-lo
-
Remove the two 1.8 mm Phillips screws securing the Taptic Engine.
-
-
Este passo não foi traduzido. Ajude a traduzi-lo
-
Use a spudger to disconnect the Taptic Engine flex cable by prying it straight up from its socket.
-
-
Este passo não foi traduzido. Ajude a traduzi-lo
-
Each piece of adhesive has a black pull-tab at the end, which is lightly adhered to the side edge of the battery.
-
-
Este passo não foi traduzido. Ajude a traduzi-lo
-
Peel back the first battery adhesive tab from the bottom right edge of the battery.
-
-
Este passo não foi traduzido. Ajude a traduzi-lo
-
Slowly pull one battery adhesive tab away from the battery, towards the bottom of the iPhone.
-
Pull steadily, maintaining constant tension on the strip until it slips out from between the battery and the rear case. For best results, pull the strip at as low an angle as possible, without snagging it on any of the iPhone's other components.
-
If the battery adhesive tabs break during the removal process, use your fingers or blunt tweezers to retrieve the remaining length of adhesive, and continue pulling.
-
-
Este passo não foi traduzido. Ajude a traduzi-lo
-
Repeat the above steps to remove the remaining three adhesive strips.
-
If you removed all of the adhesive strips successfully, skip the next step.
-
Wait about one minute for the alcohol solution to weaken the adhesive. Use the flat end of a spudger to gently lift the battery.
-
-
Este passo não foi traduzido. Ajude a traduzi-lo
-
If any of the adhesive strips broke off and the battery remains stuck to the rear case, prepare an iOpener or use a hair dryer to heat the rear case directly behind the battery. This will help soften the adhesive.
-
Flip the iPhone back over and thread a strong piece of string (such as dental floss or a length of thin guitar string) underneath the battery.
-
Pull the string from side to side in a sawing motion all along the length of the battery to separate the adhesive. This can take some time since the adhesive is slow to deform, but with patience it will come free. Do not deform or damage the battery.
-
-
Este passo não foi traduzido. Ajude a traduzi-lo
-
Remove the battery from the iPhone.
-
Adhere the battery, disconnect it, and continue reassembling your device.
-
-
Este passo não foi traduzido. Ajude a traduzi-lo
-
Remove the 2 screws securing the camera plate
-
One 1.6 mm Phillips screw
-
One 2.4 mm standoff screw
-
Remove the camera plate
-
With an opening tool, disconnect the camera connector
-
-
Este passo não foi traduzido. Ajude a traduzi-lo
-
With a spudger, gently pry up on the camera to remove the camera.
-
-
Este passo não foi traduzido. Ajude a traduzi-lo
-
Use a sim eject tool or a paperclip to remove the SIM tray.
-
-
Este passo não foi traduzido. Ajude a traduzi-lo
-
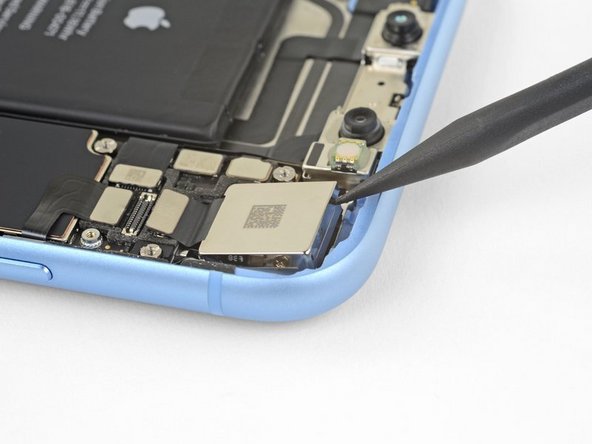
Use an opening tool or a fingernail to remove 9 connectors from the logic board.
-
-
Este passo não foi traduzido. Ajude a traduzi-lo
-
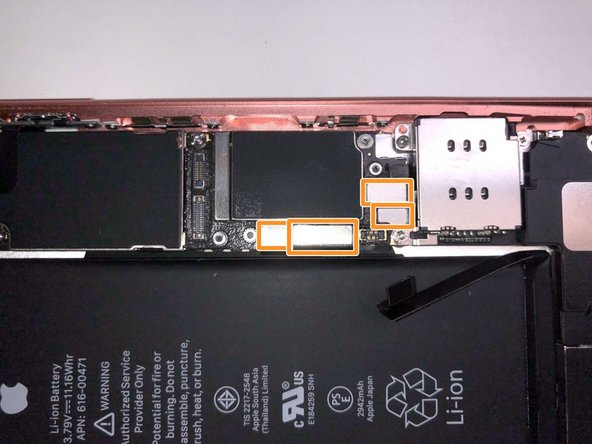
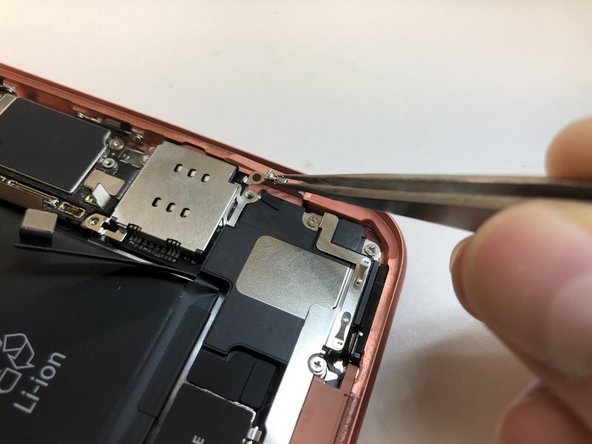
Remove the following screws:
-
2.9mm standoff screw
-
1.5mm Phillips #000
-
1.6mm Phillips #000
-
Remove the grounding bracket
-
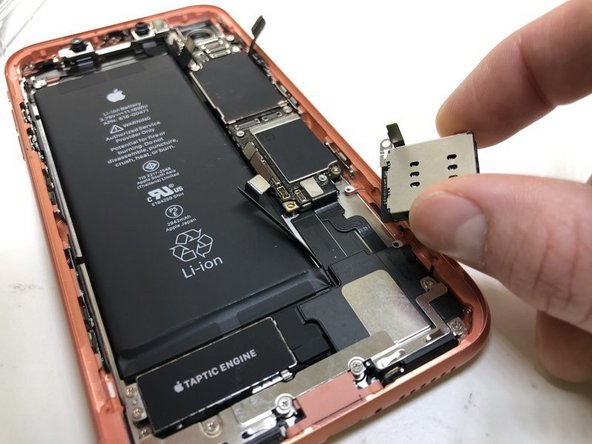
Remove the SIM reader
-
-
Este passo não foi traduzido. Ajude a traduzi-lo
-
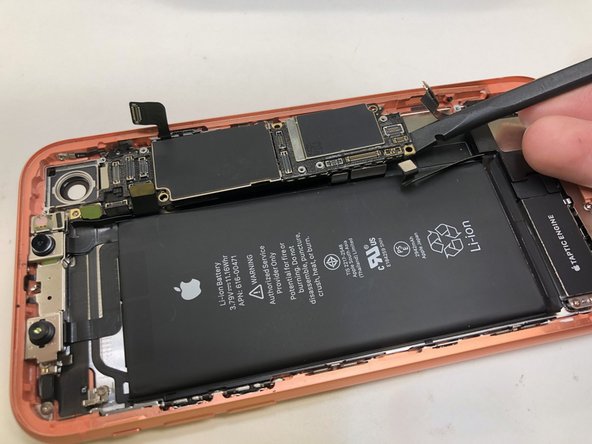
Remove the 5 screws securing the logic board to the case
-
2.9mm Standoff screw
-
2.8mm Standoff screw
-
1.8mm Phillips #000
-
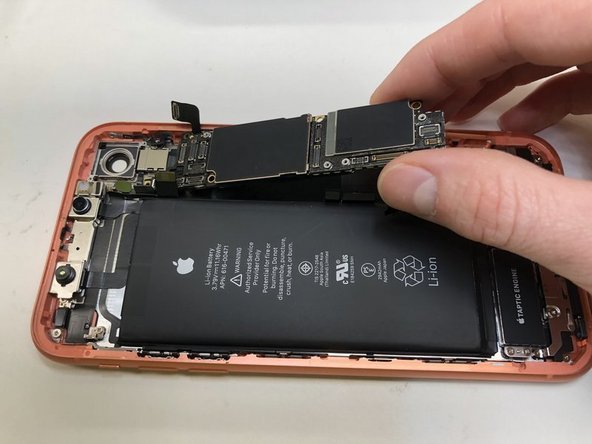
Remove the logic board.
-


Cancelar: não concluí este guia.
45 outras pessoas executaram este guia.

8 comentários
Muy buena explicacion, me salio perfecto, hasta la taza de café me tome mientras se secaba jaja. Saludos
Excellent instruction step by step guide. Great video. This is very complete and very easy guide with superb narrative style . Thank you Mr Arty. This 40 step format , illustration and photo quality, and description narrative is gold standard practice . Thank you !