Ir para o conteúdo principal

Esta versão pode conter edições incorretas. Mude para o último instantâneo verificado.

O que você precisa

  1. , Remover os parafusos pentalobe: passo 1, imagem 1 %32
    • Antes de começar, descarregue o seu iPhone para abaixo de 25%. Uma bateria de íons de lítio carregada pode pegar fogo e/ou explodir, se perfurada acidentalmente.

    • Desligue o seu iPhone antes de começar a desmontagem.

    • Remova os dois parafusos pentalobe de 3,5 mm na borda inferior do iPhone.

    • A abertura da tela do iPhone comprometerá as suas vedações impermeabilizantes. Prepare vedações de reposição antes de proceder a este passo ou evite a exposição a líquidos se você fizer a remontagem de seu iPhone sem repor as vedações.

  2. , Fazer uma marca em suas palhetas: passo 2, imagem 1 %32 , Fazer uma marca em suas palhetas: passo 2, imagem 2 %32 , Fazer uma marca em suas palhetas: passo 2, imagem 3 %32
    • Se você inserir uma palheta de abertura muito fundo, você pode danificar o seu dispositivo. Execute esta etapa para marcar a palheta e evitar danos.

    • Meça 3 mm a partir da ponta e marque a palheta com um marcador permanente.

    • Você também pode marcar as outras pontas da palheta com medidas diferentes.

    • Como alternativa, prenda uma moeda com fita adesiva em uma palheta, deixando 3 mm de ponta.

  3. Este passo não foi traduzido. Ajude a traduzi-lo

    : passo 3, imagem 1 %32 : passo 3, imagem 2 %32 : passo 3, imagem 3 %32
    • If your display glass is cracked, keep further breakage contained and prevent bodily harm during your repair by taping over the glass.

    • Lay overlapping strips of clear packing tape over the iPhone's display until the whole face is covered.

    • This will keep glass shards contained and provide structural integrity when prying and lifting the display.

    • Wear safety glasses to protect your eyes from any glass shaken free during the repair.

    • If the broken glass makes it difficult to get a suction cup to stick in the next few steps, try folding a strong piece of tape (such as duct tape) into a handle and lifting the display with that instead.

  4. , Instruções com o Anti-Clamp: passo 4, imagem 1 %32 , Instruções com o Anti-Clamp: passo 4, imagem 2 %32 , Instruções com o Anti-Clamp: passo 4, imagem 3 %32
    • Para a remontagem de seu dispositivo, siga essas instruções na ordem inversa. Se não estiver usando o Anti-Clamp, pule três etapas para um método alternativo.

    • Para obter instruções completas sobre como usar o Anti-Clamp, consulte este guia.

    • Puxe a pega azul para trás para destravar os braços do Anti-Clamp.

    • Deslize os braços pela borda esquerda ou direita do seu iPhone.

    • Posicione as ventosas próximo à borda inferior do iPhone, diretamente acima do botão home - uma pela dianteira e a outra pela traseira.

    • Aperte as ventosas uma contra a outra para aplicar sucção na área desejada.

    • Se você achar que a superfície do seu iPhone é muito escorregadia para o Anti-Clamp se prender, você pode usar fita para deixar a superfície mais aderente.

  5. : passo 5, imagem 1 %32 : passo 5, imagem 2 %32 : passo 5, imagem 3 %32
    • Puxe a pega azul para a frente para travar os braços.

    • Gire a pega 360 graus no sentido horário até que as ventosas comecem a se esticar.

    • Certifique-se de que as ventosas permaneçam alinhadas uma com a outra. Se elas começarem a ficar desalinhadas, solte um pouco as ventosas e realinhe os braços.

  6. : passo 6, imagem 1 %32 : passo 6, imagem 2 %32
    • Aqueça uma bolsa térmica iOpener e passe-a pelos braços do Anti-Clamp.

    • Você também pode usar um secador de cabelo, uma pistola de ar quente ou uma superfície aquecida, mas calor extremo pode danificar o visor e/ou a bateria interna, portanto, proceda com cuidado.

    • Dobre a bolsa térmica iOpener de modo que ela fique sobre a borda inferior do iPhone.

    • Aguarde um minuto para que o adesivo tenha a chance de se soltar e apresentar um vão para a abertura.

    • Insira uma palheta de abertura no vão.

    • Se o Anti-Clamp não formar espaço suficiente, aplique mais calor na área e gire a pega um quarto de volta.

    • Não gire a pega mais do que um quarto de volta de cada vez e espere um minuto entre cada volta. Deixe que o Anti-Clamp e o tempo façam o trabalho por você.

    • Pule as próximas três etapas.

  7. , Heat the display: passo 7, imagem 1 %32
    • As próximas três etapas mostram como separar a tela usando uma ventosa de sucção.

    • O aquecimento da borda inferior do iPhone ajudará a amolecer o adesivo que prende a tela, facilitando a abertura.

    • Use um secador de cabelo ou prepare uma bolsa térmica iOpener e aplique-o(a) na borda inferior do iPhone por cerca de 90 segundos para amolecer o adesivo que se encontra por baixo.

  8. , Separar o visor: passo 8, imagem 1 %32 , Separar o visor: passo 8, imagem 2 %32
    • Aplique uma ventosa de sucção na metade inferior do painel dianteiro, imediatamente acima do botão home.

    • Certifique-se de que a ventosa de sucção não cubra o botão home, pois isso impediria a formação de um vácuo entre a ventosa de sucção e o vidro dianteiro.

  9. : passo 9, imagem 1 %32 : passo 9, imagem 2 %32 : passo 9, imagem 3 %32
    • Puxe a ventosa para cima com pressão firme e constante para criar um pequeno vão entre a tela e a moldura.

    • Insira uma palheta de abertura no vão.

    • O adesivo impermeabilizante que fixa a tela é muito forte; a formação dessa abertura inicial requer uma quantidade significativa de força.Se estiver com dificuldade para abrir um vão, aplique mais calor e mova suavemente a tela para cima e para baixo para amolecer o adesivo, até se formar um vão de tamanho suficiente para inserir a ferramenta.

  10. : passo 10, imagem 1 %32 : passo 10, imagem 2 %32 : passo 10, imagem 3 %32
    • Passe a palheta de abertura a borda esquerda do fone para cima, começando pela borda inferior e indo em direção aos botões de controle de volume e ao seletor de mudo, cortando o adesivo que mantém a tela no lugar.

    • Pare próximo ao canto superior esquerdo do visor.

    • Não tente separar a borda superior da tela da estrutura traseira, pois ela é mantida no lugar por clipes de plástico que podem quebrar.

  11. , Informações sobre a tela: passo 11, imagem 1 %32
    • Há cabos sensíveis passando ao longo da borda direito de seu iPhone. Não insira a sua palheta aqui, do contrário você pode danificar os cabos.

  12. : passo 12, imagem 1 %32 : passo 12, imagem 2 %32 : passo 12, imagem 3 %32
    • Insira novamente a sua ferramenta no canto direito inferior do iPhone e deslize-a ao redor do canto e subindo pela lateral direita do fone para separar o adesivo.

    • Não insira a palheta mais do que 3 mm, pois isso pode danificar os cabos da tela.

  13. : passo 13, imagem 1 %32 : passo 13, imagem 2 %32
    • Puxe com cuidado a ventosa de sucção para erguer a borda inferior da tela.

    • Não eleve a tela a um ângulo superior a 15º caso contrário você estará arriscando distender ou desgastar os cabos conectados à tela.

    • Puxe a ventosa de sucção pela pequena lingueta para removê-la do painel dianteiro.

  14. : passo 14, imagem 1 %32 : passo 14, imagem 2 %32 : passo 14, imagem 3 %32
    • Passe uma palheta de abertura por debaixo da tela, circundando o canto esquerdo superior e ao longo da borda superior do fone para amolecer o último adesivo.

  15. : passo 15, imagem 1 %32 : passo 15, imagem 2 %32
    • Deslize o conjunto da tela ligeiramente para baixo (afastando-o da borda superior do fone) para desengatar os clipes que o mantêm preso à estrutura traseira.

  16. : passo 16, imagem 1 %32 : passo 16, imagem 2 %32 : passo 16, imagem 3 %32
    • Abra o iPhone virando a tela para cima pelo lado esquerdo, como se estivesse virando a contra-capa de um livro.

    • Não tente ainda separar completamente a tela, pois vários cabos planos frágeis a conectam à placa lógica do iPhone.

    • Apoie a tela em algo para deixá-la de pé enquanto você executa os trabalhos no fone.

  17. Este passo não foi traduzido. Ajude a traduzi-lo

    : passo 17, imagem 1 %32 : passo 17, imagem 2 %32
    Ferramenta utilizada nesse passo:
    Magnetic Project Mat
    $19.95
    Comprar
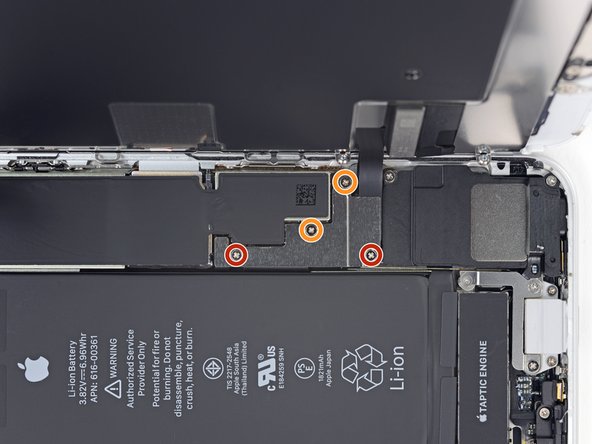
    • Remove four Phillips screws securing the lower display cable bracket to the logic board, of the following lengths:

    • Two 1.3 mm screws

    • Two 2.8 mm screws

    • Throughout this guide, keep careful track of your screws so that each one goes back where it came from during reassembly. Installing a screw in the wrong place can cause permanent damage.

    • Remove the bracket.

  18. Este passo não foi traduzido. Ajude a traduzi-lo

    : passo 18, imagem 1 %32 : passo 18, imagem 2 %32
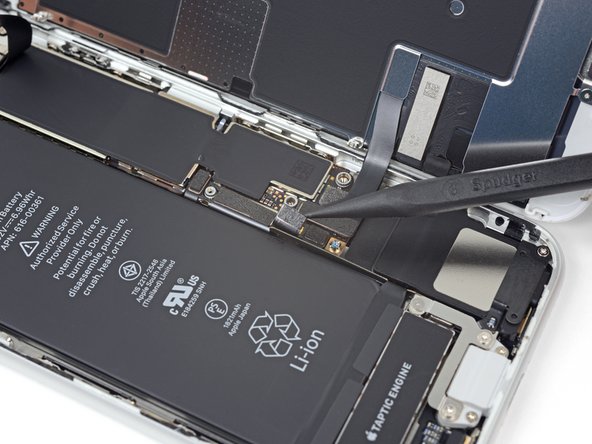
    • Use the point of a spudger to pry the battery connector out of its socket in the logic board.

    • Bend the battery connector cable slightly away from the logic board to prevent it from accidentally making contact with the socket and providing power to the phone during your repair.

  19. Este passo não foi traduzido. Ajude a traduzi-lo

    : passo 19, imagem 1 %32 : passo 19, imagem 2 %32
    • Use the point of a spudger to pry the lower display connector out of its socket.

    • To re-attach press connectors like this one, press down on one side until it clicks into place, then repeat on the other side. Do not press down on the middle. If the connector is even slightly misaligned, the connector can bend, causing permanent damage.

  20. Este passo não foi traduzido. Ajude a traduzi-lo

    : passo 20, imagem 1 %32 : passo 20, imagem 2 %32
    • Use the point of a spudger to disconnect the second lower display cable.

  21. Este passo não foi traduzido. Ajude a traduzi-lo

    : passo 21, imagem 1 %32 : passo 21, imagem 2 %32
    • Remove the three 1.3 mm Phillips screws securing the bracket over the front panel sensor assembly connector.

    • Remove the bracket.

  22. Este passo não foi traduzido. Ajude a traduzi-lo

    : passo 22, imagem 1 %32 : passo 22, imagem 2 %32
    • Use the point of a spudger to disconnect the front panel sensor assembly connector.

  23. Este passo não foi traduzido. Ajude a traduzi-lo

    : passo 23, imagem 1 %32
  24. Este passo não foi traduzido. Ajude a traduzi-lo

    : passo 24, imagem 1 %32 : passo 24, imagem 2 %32
    • Remove the four Y000 screws securing the bracket over the home/Touch ID sensor:

    • One 1.2 mm screw

    • Three 1.3 mm screws

    • Remove the bracket.

    • During reassembly, be careful not to overtighten these screws, or your home button may not work.

  25. Este passo não foi traduzido. Ajude a traduzi-lo

    : passo 25, imagem 1 %32 : passo 25, imagem 2 %32 : passo 25, imagem 3 %32
    • Use an opening tool to pry under the left edge of the home button cable connector to disconnect it from its socket.

    • If the entire connector begins to flip up without separating, press down on the cable at the top edge of the connector with the flat end of your spudger, while simultaneously prying up the left edge of the connector. Be very careful not to damage the cable or connector, or you will permanently disable the sensor.

  26. Este passo não foi traduzido. Ajude a traduzi-lo

    : passo 26, imagem 1 %32
    • Heating the area around the home/Touch ID sensor will help soften the adhesive holding its delicate cable in place, making it easier to remove safely.

    • Flip the display assembly over. Use a hairdryer or prepare an iOpener and apply it to the lower edge of the display for about 90 seconds in order to soften up the adhesive underneath.

    • Don't overheat the display. It should be slightly too hot to touch comfortably.

  27. Este passo não foi traduzido. Ajude a traduzi-lo

    : passo 27, imagem 1 %32 : passo 27, imagem 2 %32 : passo 27, imagem 3 %32
    • Use an opening pick to gently separate the adhesive holding the home/Touch ID sensor cable to the back side of the display panel.

  28. Este passo não foi traduzido. Ajude a traduzi-lo

    : passo 28, imagem 1 %32
    • Remove the home/Touch ID sensor assembly by lifting it through the front side of the display.

    • To reinstall, first feed the cable through the hole in the front of the display as shown.

    • Your replacement part may come with extra Y000 screws already installed near the Home Button. Remove the unnecessary screws so that you can reinstall the home button bracket.

  29. Este passo não foi traduzido. Ajude a traduzi-lo

    : passo 29, imagem 1 %32
    • Remove the three Phillips screws securing the top earpiece bracket to the front panel:

    • Two 2.6 mm screws

    • One 1.8 mm screw

  30. Este passo não foi traduzido. Ajude a traduzi-lo

    : passo 30, imagem 1 %32
    • Remove the earpiece speaker bracket.

  31. Este passo não foi traduzido. Ajude a traduzi-lo

    : passo 31, imagem 1 %32 : passo 31, imagem 2 %32
    • Lift the front facing camera up out of its socket and swing it out of the way.

  32. Este passo não foi traduzido. Ajude a traduzi-lo

    : passo 32, imagem 1 %32
    • Remove the two Phillips screws securing the earpiece speaker to the front panel:

    • One 1.8 mm screw

    • One 2.3 mm screw

  33. Este passo não foi traduzido. Ajude a traduzi-lo

    : passo 33, imagem 1 %32
    • Remove the earpiece speaker.

  34. Este passo não foi traduzido. Ajude a traduzi-lo

    : passo 34, imagem 1 %32
    • Heat an iOpener and apply it to the upper edge of the display to soften the adhesive holding the front camera and sensor assembly in place.

    • Wait about two minutes before moving on to the next step to adequately soften the adhesive.

  35. Este passo não foi traduzido. Ajude a traduzi-lo

    : passo 35, imagem 1 %32 : passo 35, imagem 2 %32
    • Use the point of a spudger to gently pry the proximity sensor out of its recess on the front panel.

    • Try to get your tool all the way under the sensor to pry it away from the clear plastic beneath. If you pry only against the cable, the sensor may separate from the cable assembly and will need replacement. If you're replacing the sensor/cable assembly anyway, then it doesn't matter.

  36. Este passo não foi traduzido. Ajude a traduzi-lo

    : passo 36, imagem 1 %32 : passo 36, imagem 2 %32
    • Slide the tip of a spudger underneath the ambient light sensor flex cable, and lift the sensor out of its housing.

  37. Este passo não foi traduzido. Ajude a traduzi-lo

    : passo 37, imagem 1 %32 : passo 37, imagem 2 %32 : passo 37, imagem 3 %32
    • Slide an opening pick underneath front camera cable assembly, separating the adhesive holding the camera and sensor cable.

  38. Este passo não foi traduzido. Ajude a traduzi-lo

    : passo 38, imagem 1 %32
    • Remove the front camera and sensor cable.

  39. Este passo não foi traduzido. Ajude a traduzi-lo

    : passo 39, imagem 1 %32 : passo 39, imagem 2 %32
    • Remove the three 1.2 mm Y000 screws from either side of the display for a total of six screws.

  40. Este passo não foi traduzido. Ajude a traduzi-lo

    : passo 40, imagem 1 %32
    • Heat an iOpener and lay it over the edge of the shield closest to the home button to soften the adhesive holding it in place.

  41. Este passo não foi traduzido. Ajude a traduzi-lo

    : passo 41, imagem 1 %32 : passo 41, imagem 2 %32 : passo 41, imagem 3 %32
    • Use an opening pick to break up the adhesive near the home button that holds the flat display cable to the LCD shield plate.

  42. Este passo não foi traduzido. Ajude a traduzi-lo

    : passo 42, imagem 1 %32 : passo 42, imagem 2 %32 : passo 42, imagem 3 %32
    • Insert an opening pick from the bottom right corner and continue to separate the display cable from the LCD shield plate.

  43. Este passo não foi traduzido. Ajude a traduzi-lo

    : passo 43, imagem 1 %32 : passo 43, imagem 2 %32
    • Gently lift the LCD shield plate from the display assembly.

    • Be careful not to snag the display data cables when removing the LCD shield plate.

  44. Este passo não foi traduzido. Ajude a traduzi-lo

    : passo 44, imagem 1 %32
    • Only the LCD and digitizer remain.

Linha de Chegada

79 outras pessoas executaram este guia.

Arthur Shi

Membro desde: 01/03/18

254.811 Reputação

Autoria de 529 guias

Equipe

iFixit Membro de iFixit

Staff

Membros da 137

Autoria de 17.457 guias

17 comentários

So I’m pretty sure I know the answer to this - but can I test out the screen replacement without hooking up the camera, home button, etc? Can I just attach the three cables to the phone to make sure the screen works, or would it brick the phone?

Sarah Ybarra - Responder

Hi Sarah,

You can test the display without bricking your phone. It may boot-loop when the front sensor/camera assembly isn’t connected though. Be careful while you work with an opened phone with the battery connected…it is easy to accidentally short things out!

Arthur Shi -

After replacing the iPhone 8 LCD Screen and Digitizer, it seems that the battery is draining faster. I just wanted to see if this is a normal problem or was there something I missed during the install process?

Jason Adams - Responder

My daughters phone was repaired and the same thing is happening to her

tiffinycook -

Do you have to remove the plastic holder for the camera?

Diego Cisneros - Responder

Adicione um comentário

Exibir estatísticas:

Últimas 24 horas: 20

Últimos 7 dias: 315

Últimos 30 dias: 980

Duração total: 108,835