Esta versão pode conter edições incorretas. Mude para o último instantâneo verificado.
O que você precisa
-
-
Desligue o seu iPhone antes de começar a desmontagem.
-
Remova os dois parafusos pentalobe de 3,9 mm de ambos os lados do conector Lightning.
-
-
-
Se o vidro de seu visor estiver rachado, mantenha as rachaduras sob controle e evite danos corporais durante o reparo cobrindo o vidro com fita adesiva.
-
Coloque tiras sobrepostas de fita adesiva transparente sobre a tela do iPhone até que toda a superfície fique coberta.
-
-
-
Independente da ferramenta que você use, você precisa puxar para cima com segurança o visor inteiro.
-
Se o vidro começar a se separar do plástico, como mostra a primeira figura, passe uma ferramenta de abertura de plástico por entre a moldura de plástico e o corpo metálico do fone para liberar os clipes metálicos da estrutura.
-
-
-
Puxe a pega azul para trás para destravar os braços do Anti-Clamp.
-
Deslize os braços pela borda esquerda ou direita do seu iPhone.
-
Posicione as ventosas próximo à borda inferior do iPhone, diretamente acima do botão home - uma pela dianteira e a outra pela traseira.
-
Aperte as ventosas uma contra a outra para aplicar sucção na área desejada.
-
-
-
Se você não tiver um Anti-Clamp, use uma ventosa de sucção simples para erguer o painel dianteiro:
-
Pressione uma ventosa de sucção sobre a tela, imediatamente acima do botão home.
-
-
-
Enquanto segura o iPhone com uma mão, puxe para cima pela ventosa de sucção para separar ligeiramente a extremidade com o botão home do painel dianteiro da estrutura traseira.
-
Com uma ferramenta de abertura de plástico, comece a fazer alavanca para baixo nas bordas da estrutura traseira, afastando-as do conjunto do painel dianteiro, enquanto puxa para cima com a ventosa de sucção.
-
-
-
Abra o fone apenas o bastante para revelar o suporte metálico que cobre o cabo do botão home.
-
Somente o conjunto do botão home original poderá permitir o uso da funcionalidade da identificação por toque. Se você romper o cabo, a instalação de um novo botão home apenas restaurará as funções normais do botão home, mas não os recursos de identificação por toque.
-
Com a ponta pontiaguda de uma espátula, empurre o suporte, liberando-o e remova-o com uma pinça.
-
-
-
Use a ponta pontiaguda de uma espátula para fazer alavanca e separar o conector do cabo do botão home de seu soquete.
-
-
-
Uma vez solto o conector, puxe a ponta com o botão home do conjunto, afastando-o da estrutura traseira, usando a parte superior do fone como uma dobradiça.
-
Abra o visor a um ângulo de 90º e apoie-o em algo para deixá-lo de pé enquanto você executa os trabalhos no fone.
-
Engate uma fita de borracha para manter o visor no lugar com segurança enquanto executa os trabalhos. Isso evita que os cabos do visor sejam submetidos a uma tensão imprópria.
-
-
Este passo não foi traduzido. Ajude a traduzi-lo
-
Insert a SIM card eject tool or a paperclip into the small hole in the SIM card tray.
-
Press to eject the tray. This may require a significant amount of force.
-
-
Este passo não foi traduzido. Ajude a traduzi-lo
-
Use a spudger to gently pry the button assembly cable up from its socket on the logic board.
-
-
-
Este passo não foi traduzido. Ajude a traduzi-lo
-
Use a spudger to pry the Lightning connector cable up from its socket on the logic board.
-
Fold the Lightning connector cable out of the way of the logic board.
-
-
Este passo não foi traduzido. Ajude a traduzi-lo
-
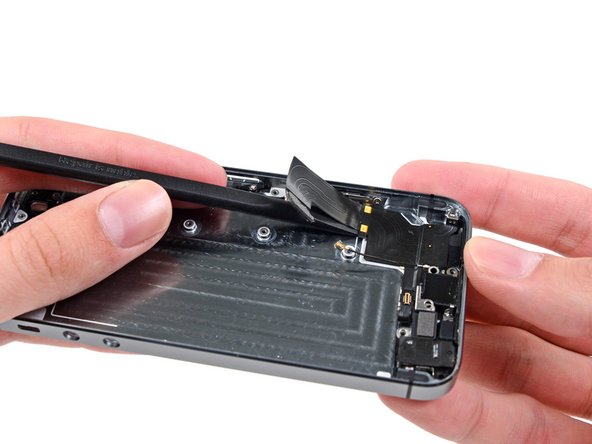
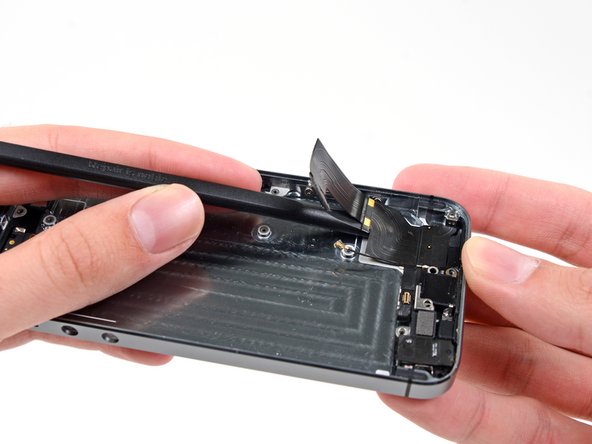
Use the tip of a spudger to pry the antenna cable up from its socket on the logic board.
-
-
Este passo não foi traduzido. Ajude a traduzi-lo
-
Use the flat end of a spudger to disconnect the rear-facing camera cable from its socket on the logic board.
-
-
Este passo não foi traduzido. Ajude a traduzi-lo
-
Remove the following screws from the logic board:
-
One 2.4 mm Phillips #000 screw
-
Two 2.3 mm Phillips #000 screws
-
Four 2.8 mm standoff screws
-
-
Este passo não foi traduzido. Ajude a traduzi-lo
-
Use a plastic opening tool to lift the logic board up enough to grab with your fingers.
-
-
Este passo não foi traduzido. Ajude a traduzi-lo
-
Pull the logic board slightly away from the rear facing camera.
-
Flip the logic board toward the battery, as if you are turning the page in a book.
-
-
Este passo não foi traduzido. Ajude a traduzi-lo
-
Use the flat end of a spudger to disconnect the antenna cable on the back of the logic board.
-
Remove the logic board from the iPhone.
-
-
Este passo não foi traduzido. Ajude a traduzi-lo
-
At this point, a small metal plate near the rear facing camera is loose and may come free from its recess.
-
Use tweezers to remove the plate from beneath the bracket to the left of the rear-facing camera.
-
-
Este passo não foi traduzido. Ajude a traduzi-lo
-
Using a pair of tweezers, flip the rubber camera cover out of its clip and toward the outside of the rear case.
-
-
Este passo não foi traduzido. Ajude a traduzi-lo
-
Remove the two 1.6 mm Phillips #000 screws securing the rear-facing camera bracket.
-
-
Este passo não foi traduzido. Ajude a traduzi-lo
-
Remove the rear-facing camera bracket from the rear case.
-
-
Este passo não foi traduzido. Ajude a traduzi-lo
-
Insert the tip of a spudger into the hole in the battery adhesive tab near the headphone jack.
-
Lift the tab up slightly and use the spudger to unfold the tab from its recess.
-
-
Este passo não foi traduzido. Ajude a traduzi-lo
-
Pull the battery adhesive tab straight up from the phone.
-
Cut the black battery adhesive tab between the two white adhesive strips, separating them.
-
-
Este passo não foi traduzido. Ajude a traduzi-lo
-
Slowly pull one of the battery adhesive strips away from the battery, toward the bottom of the iPhone.
-
Pull steadily, maintaining constant tension on the strip as it slips out from between the battery and the rear case. For best results, pull the strip at a 60º angle or less.
-
-
Este passo não foi traduzido. Ajude a traduzi-lo
-
Guide the strip carefully around the corner and up the side of the battery.
-
-
Este passo não foi traduzido. Ajude a traduzi-lo
-
Repeat to remove the second adhesive strip.
-
If you removed both strips successfully, skip the next two steps.
-
-
Este passo não foi traduzido. Ajude a traduzi-lo
-
If any of the adhesive strips broke off and the battery remains stuck to the rear case, prepare an iOpener or use a hair dryer to heat the rear case directly behind the battery.
-
-
Este passo não foi traduzido. Ajude a traduzi-lo
-
Flip the iPhone back over and insert a plastic card between the case side of the battery and the rear case.
-
Press the card in farther to break up the adhesive behind the battery.
-
-
Este passo não foi traduzido. Ajude a traduzi-lo
-
Remove the following Phillips #000 screws from the vibrator bracket:
-
One 1.7 mm screw
-
One 2.5 mm screw
-
-
Este passo não foi traduzido. Ajude a traduzi-lo
-
With a set of tweezers, remove the vibrator bracket.
-
-
Este passo não foi traduzido. Ajude a traduzi-lo
-
Remove the 1.7 mm Phillips #000 screw securing the vibrator to the rear case.
-
-
Este passo não foi traduzido. Ajude a traduzi-lo
-
Use a set of tweezers to remove the vibrator from the rear case.
-
-
Este passo não foi traduzido. Ajude a traduzi-lo
-
Remove the following screws securing the volume button and ringer switch brackets to the side of the rear case:
-
One 1.9 mm Phillips screw
-
Two 1.6 mm Phillips screws
-
-
Este passo não foi traduzido. Ajude a traduzi-lo
-
Use the tip of a spudger to pry the ringer switch bracket from the side of the rear case.
-
Remove the ringer switch.
-
-
Este passo não foi traduzido. Ajude a traduzi-lo
-
Use a spudger to pry the volume button bracket from the side of the rear case.
-
Remove the volume buttons.
-
-
Este passo não foi traduzido. Ajude a traduzi-lo
-
Use tweezers to pull the rubber rear-facing camera cover out of its slot in the rear case.
-
-
Este passo não foi traduzido. Ajude a traduzi-lo
-
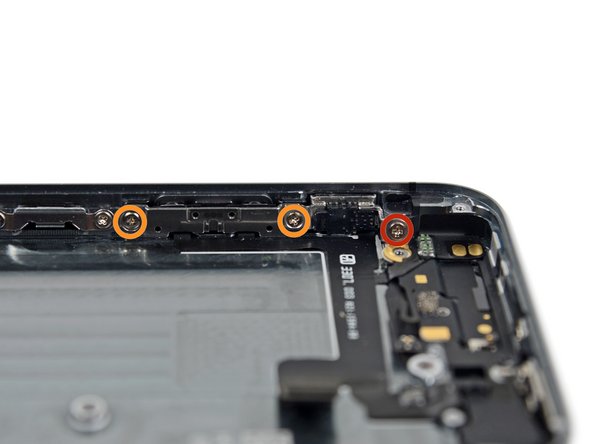
Remove the 1.3 mm Phillips #000 screw securing the logic board antenna bracket to the rear case.
-
-
Este passo não foi traduzido. Ajude a traduzi-lo
-
Remove the 2.1 mm Phillips #000 screw securing the contact clip and power/sleep button bracket.
-
-
Este passo não foi traduzido. Ajude a traduzi-lo
-
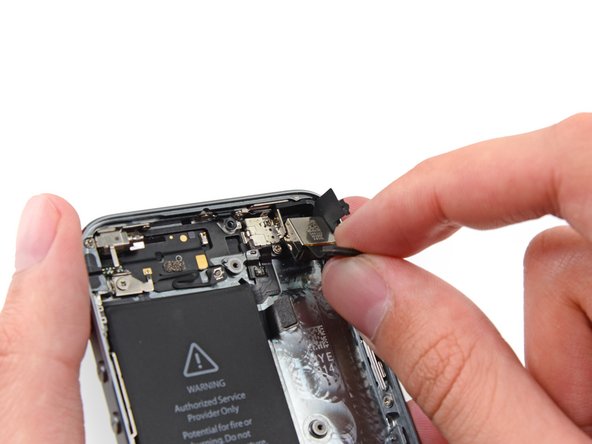
Slide the flat end of a spudger under the upper component assembly cable to free it from the rear case.
-
-
Este passo não foi traduzido. Ajude a traduzi-lo
-
Run the flat end of the spudger under the portion of the cable near the volume control buttons.
-
-
Este passo não foi traduzido. Ajude a traduzi-lo
-
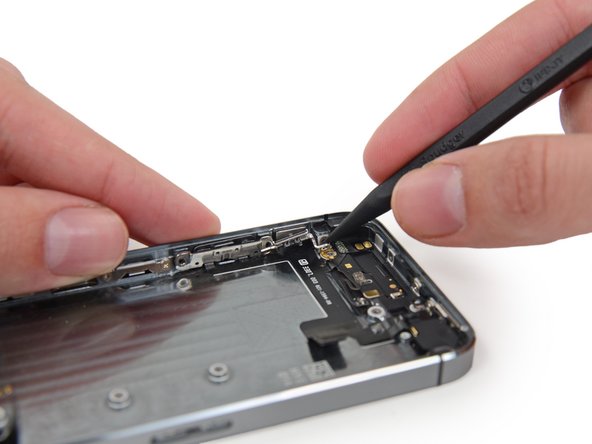
Use the tip of a spudger to free the adhesive securing the vibrator contact portion of the upper assembly cable from the rear case.
-
If the flash assembly has not already popped out of its hole in the rear case, use the tip of a spudger to push it free.
-
-
Este passo não foi traduzido. Ajude a traduzi-lo
-
Use the tip of a spudger to free the microphone portion of the assembly from the case.
-
-
Este passo não foi traduzido. Ajude a traduzi-lo
-
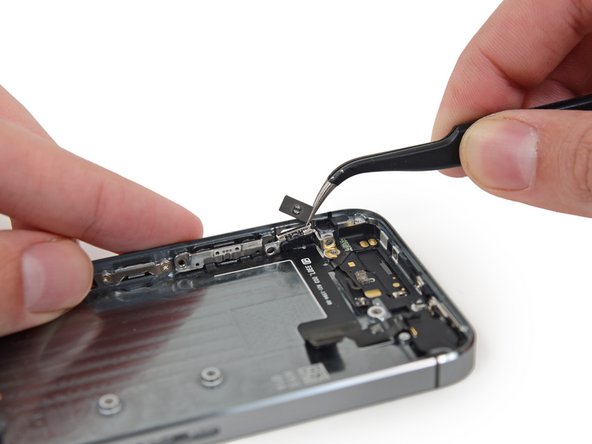
Use a set of tweezers to swing the power/sleep button bracket away from the case.
-
-
Este passo não foi traduzido. Ajude a traduzi-lo
-
Use the tip of a spudger to push the power/sleep button into the phone slightly.
-
Use a set of tweezers to remove the button.
-
-
Este passo não foi traduzido. Ajude a traduzi-lo
-
Unclip the power/sleep button bracket hinge from the post holding it in the iPhone.
-
-
Este passo não foi traduzido. Ajude a traduzi-lo
-
Remove the upper component assembly from the iPhone.
-
-
Este passo não foi traduzido. Ajude a traduzi-lo
-
Remove the following Phillips #000 screws:
-
Two 2.9 mm
-
Two 1.5 mm
-
One 3.1 mm
-
One 3.6 mm
-
One 3.4 mm
-
-
Este passo não foi traduzido. Ajude a traduzi-lo
-
Remove the speaker by lifting it up and out of the rear case.
-
-
Este passo não foi traduzido. Ajude a traduzi-lo
-
Slide the flat end of a spudger under the right-hand side of the lightning connector cable assembly to free it from the rear case.
-
-
Este passo não foi traduzido. Ajude a traduzi-lo
-
Continue to detach the lightning cable assembly by sliding the spudger under the port components.
-
-
Este passo não foi traduzido. Ajude a traduzi-lo
-
Remove the lightning cable assembly from the rear case.
-
-
Este passo não foi traduzido. Ajude a traduzi-lo
-
Take these pieces out and set them aside for safe keeping.
-


Cancelar: não concluí este guia.
206 outras pessoas executaram este guia.


24 comentários
I quote scott56 except the last pic I see the piece is #61 and I have two clips per side plus the spring of the SIM card.
The guide is excellent, but few things are missing. You will need double stick adhesive to reattach the battery otherwise it will rattle inside the case. Also the lightening cable need double stick tape to stick to case. Its highly recommended that you have a roll of 3M thin double stick tape before you start. The guide also left out that you need to remove and reinstall SIM card lever and three mounting clips. Plus you need to pull off various rubber components all around the old case including those that secure lightening, speaker, audio jack etc to the case and reinstall them in the new case.
I don't get service please help ?
Are you in the restaurant and waiting to be served? Wrong place and definitely not good question - why are you not asking what is wrong because the phone is not working? Come on!!