Esta versão pode conter edições incorretas. Mude para o último instantâneo verificado.
O que você precisa
-
Este passo não foi traduzido. Ajude a traduzi-lo
-
If your display glass is cracked, keep further breakage contained and prevent bodily harm during your repair by taping the glass.
-
Lay overlapping strips of clear packing tape over the iPhone's display until the whole face is covered.
-
-
Este passo não foi traduzido. Ajude a traduzi-lo
-
Power off your iPhone before beginning disassembly.
-
Remove the two 3.8 mm P2 Pentalobe screws on either side of the Lightning connector.
-
-
Este passo não foi traduzido. Ajude a traduzi-lo
-
Close the handle on the iSclack, opening the suction-cup jaws.
-
Place the bottom of your iPhone in between the suction cups, against the plastic depth gauge.
-
The top suction cup should rest just above the home button.
-
Open the handles to close the jaws of the iSclack. Center the suction cups and press them firmly onto the top and bottom of the iPhone.
-
-
Este passo não foi traduzido. Ajude a traduzi-lo
-
Hold onto your iPhone securely and close the handle of the iSclack to separate the suction cups, pulling the front panel up from the rear case.
-
The iSclack is designed to safely open your iPhone just enough to separate the pieces, but not enough to damage any cables.
-
Skip the next three steps and continue on to Step 8.
-
-
Este passo não foi traduzido. Ajude a traduzi-lo
-
Press a suction cup onto the screen, just above the home button.
-
-
Este passo não foi traduzido. Ajude a traduzi-lo
-
While holding the iPhone down with one hand, pull up on the suction cup to slightly separate the front panel assembly from the rear case.
-
With a plastic opening tool, begin to gently pry the rear case down, away from the display assembly, while you pull up with the suction cup.
-
-
Este passo não foi traduzido. Ajude a traduzi-lo
-
Pull the plastic nub to release the vacuum seal on the suction cup.
-
Remove the suction cup from the display assembly.
-
-
Este passo não foi traduzido. Ajude a traduzi-lo
-
Lift the home button end of the front panel up to gain access to the connectors near the top of the phone.
-
Open the display to about a 90º angle, and lean it against something to keep it propped up while you're working on the phone.
-
In a pinch, you can use an unopened canned beverage to hold the display.
-
Add a rubber band to keep the display securely in place while you work. This prevents undue strain on the display cables.
-
-
Este passo não foi traduzido. Ajude a traduzi-lo
-
Remove the two 1.6 mm Phillips #000 screws securing the metal battery connector bracket to the logic board.
-
-
-
Este passo não foi traduzido. Ajude a traduzi-lo
-
Remove the metal battery connector bracket from the iPhone.
-
-
Este passo não foi traduzido. Ajude a traduzi-lo
-
Use a spudger or a clean fingernail to gently pry the battery connector up from its socket on the logic board.
-
-
Este passo não foi traduzido. Ajude a traduzi-lo
-
Remove the following Phillips #000 screws securing the front panel assembly cable bracket to the logic board:
-
Two 1.3 mm screws
-
One 1.7 mm screw
-
One 3.25 mm screw
-
-
Este passo não foi traduzido. Ajude a traduzi-lo
-
Remove the front panel assembly cable bracket from the logic board.
-
-
Este passo não foi traduzido. Ajude a traduzi-lo
-
Use a plastic opening tool or a fingernail to disconnect the front-facing camera and sensor cable connector.
-
-
Este passo não foi traduzido. Ajude a traduzi-lo
-
Use a plastic opening tool or a fingernail to disconnect the LCD cable connector.
-
-
Este passo não foi traduzido. Ajude a traduzi-lo
-
Remove the front panel assembly from the rear case.
-
-
Este passo não foi traduzido. Ajude a traduzi-lo
-
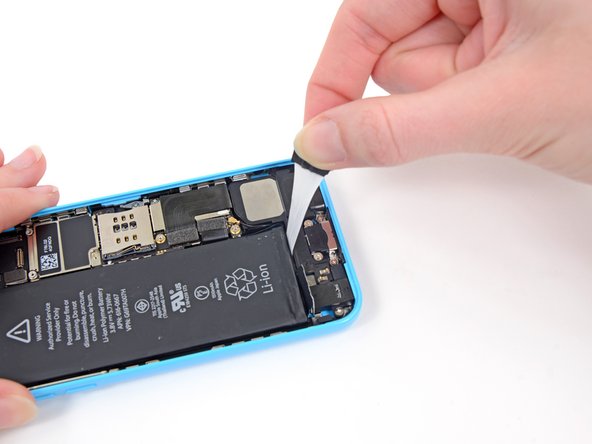
Run the tip of a spudger between the battery and the headphone jack to unfold the battery adhesive tab.
-
-
Este passo não foi traduzido. Ajude a traduzi-lo
-
Cut the black battery adhesive tab between the two white adhesive strips, separating them.
-
-
Este passo não foi traduzido. Ajude a traduzi-lo
-
Slowly pull one of the battery adhesive strips away from the battery, toward the bottom of the iPhone.
-
Pull steadily, maintaining constant tension on the strip as it slips out from between the battery and the rear case. For best results, pull the strip at a 60º angle or less.
-
Guide the strip carefully around the corner and up the side of the battery. Be careful not to snag it on any of the other internal iPhone components.
-
-
Este passo não foi traduzido. Ajude a traduzi-lo
-
Apply a few drops of isopropyl alcohol (90% or greater) under the battery and let it flow around the adhesive to help weaken it. High concentration isopropyl alcohol acts as a solvent and dries without leaving any residue, so it will not hurt your iPhone.
-
Carefully wedge a plastic card under the battery on the side nearest the logic board.
-
Slide the card from the top of the battery to the bottom, pushing toward the edge of the case.
-
-
Este passo não foi traduzido. Ajude a traduzi-lo
-
If the battery is still stuck to the case, follow our iOpener heating instructions or use a hair dryer to heat the adhesive securing your battery to the rear case.
-
Lay the iOpener flat on the backside of the iPhone to the right of the camera. Smooth it out so that there is good contact between the back of the iPhone and the iOpener.
-
Let the bag sit on the iPhone for approximately 90 seconds before attempting to remove the battery.
-
If using a hair dryer or heat gun, heat the back of the iPhone until it's slightly too hot to touch.
-
-
Este passo não foi traduzido. Ajude a traduzi-lo
-
Lift and remove the battery from the iPhone.
-
Adhere the battery, disconnect it, and continue reassembling your device.
-


Cancelar: não concluí este guia.
494 outras pessoas executaram este guia.

49 comentários
I am disappointed with the guide - not up to iFixit's usual standards. I got the iPhone open and the battery out just fine, but there were *three* missing hints that would have cut a half-hour from my re-assembly:
1) The connector cover has three short screws and one long one. The video doesn't show which is the long one, so I had to farble around to get the screws back. (The long one is the top-right one, near the hinge on the right side of the phone)
2) There are no hints on the video or in the box about putting the adhesive strips back in. I was trying to get the tab to fold over, but got all wrapped up in the strips. It took a lot of time to fix it, and I still don't know if it's important to fold the tab over or not.
3) There is no information about whether to retain the clear cellophane wrapper that comes on the battery. I took it off - hope that's right.
That said, all the tools were included in the kit, they work as advertised. And the phone's back together, and we'll see how it works...
In reference to your #1 point, this is very good example of why a SCREW-MAT or iCracked Part Chart come in very handy!
Especially in repairs like the 5s ... some screws look the same, but are .01" different ... enough to scratch/break the trace underneath on the logic board .... adding another $100 (and a week travel time by mail, if you cannot do the repair yourself), to your repair - to have it micro-soldered.
With Screw-Mats or iCracked Part Charts, every screw is placed on it's corresponding marker, so you know exactly which screw is which.
If you are in a pinch, and do not have a Screw Mat, you can draw little diagrams on a piece of paper or a dry erase surface, and mark out where each and every screw goes, as sometimes there is that .01" difference in screw sizes, that can really screw up (no pun intended) your repair.
Cheers!
iBroke -
They did mention the screw size in the guide here by color coding the MM. I agree with point two, but that's nitpicking. Lastly (the reason I commented), you did it right. The plastic should be removed so it is just like the orig battery, if you would leave the cellophane on, the adhesive would be stuck to it instead of the battery and making for a poorly secured battery.
Overall, the parts and kit were good, but this phone is not my favorite iPhone to work on. Getting that old battery out was extremely annoying compared to the 4, 4s, 5, and 5s that I've all done in the past.
On a side note, this is the first ifixit branded battery I've received and I've ordered a lot of parts from them over the years. They used to source what looked line 100% orig batteries. I avoid non original batteries like the plague, I don't care if it's a phone, laptop, or even my APC UPS devices. Ifixit has earned my trust over the years with all the parts and tools so I went ahead and installed it, I'm sure it's good.
Apple doesn’t sell original batteries to outsiders.
If you are buying an Apple-branded battery, it’s either a fake or used.
toni -
Hey Toni, check out our parts and warranty information!