Esta tradução pode não refletir as atualizações mais recentes do guia de fontes. Ajude a atualizar a tradução ou veja guia de fontes.
Introdução
Use este guia para substituir a tampa traseira de seu Huawei P10 Lite.
O que você precisa
-
-
Insira a ponta de uma palheta de abertura entre a tampa traseira e a estrutura intermediária e deslize ao redor do smartphone, para desfazer a união adesiva.
-
Usar um punho de sucção para levantar a tampa traseira pode ser um recurso útil para abrir uma primeira fenda e entrar com a palheta.
-
-
-
-
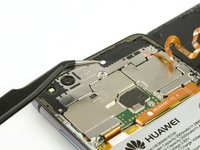
Use uma pinça para remover o indicador.
-
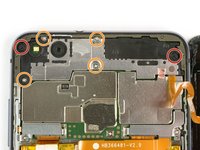
Remova ambos os parafusos Phillips tipo #00.
-
Remova os quatro parafusos Phillips tipo #00, tamanho 2,5 mm.
Schritt 3 und 4 kann man sich komplett sparen. Wozu auch. Kann gleich mit Schritt 5 weitergemacht werden, zuvor einfach das Flachbandkabel vom Fingerabdrucksensor an der Rückabdeckung abklemmen und fertig.
Translate what Bobby mcgee said:
Step 3 and 4 can be completely ignored. What for? You can continue with step 5, just disconnect the ribbon cable from the fingerprint sensor on the back cover and you're done.
However, the reason step 3 and 4 should not be skipped is Step 6 — Use an iOpener to loosen the adhesive beneath the battery. I.e., the adhesive cannot be easily removed without heat, however, that heat might damage the electric chips. Thus they’d better be removed first.
-
-
-
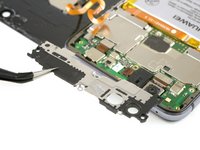
Use uma pinça para remover a placa protetora da placa-mãe.
-
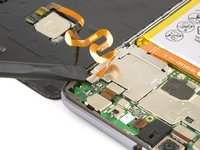
Use a ponta achatada de uma espátula para desconectar o cabo conector flex do sensor de impressão digital.
Welchen Klebstoff soll man verwenden?
Hallo Josef,
sollte bei deinem Ersatzteil kein Klebstoff oder Klebeband dabei gewesen sein, kannst du dünne Streifen Doppelseitiges Klebeband verwenden. Es gibt für das Huawei P10 Lite auch schon zugeschnittene Klebestreifen zu erwerben, hierbei gilt aber je nach Händler Rezessionen zu lesen, ob die Klebestreifen auch wirklich halten.
Hi darren,
pre-cut adhesive would be the best solution if you can source it. Otherwise a two-sided adhesive tape or carefully used E6000 adhesive glue will be your friend. -


Para montar novamente seu dispositivo, siga essas instruções na ordem inversa.
Para montar novamente seu dispositivo, siga essas instruções na ordem inversa.
Cancelar: não concluí este guia.
15 outras pessoas executaram este guia.
Um agradecimento especial a esses tradutores:
87%

Udo Baingo está nos ajudando a consertar o mundo! Quer contribuir?
Comece a traduzir ›


6 comentários
You need to warm the adhesive so it can be loose
Nice guide! Thanks! I got a little question about the coloring of the back panel. What kind of coloring is it? Is it a coating you can take off, or is it more like a layer of paint you can scrape off? I am wondering, because I want to clear the back of my Huawei P10 lite. I hope it’s possible though.
Mit dem Saugnapf die Rückseite anheben hilft ungemein…
Matthias Eberle - Responder
Had to use blue wedge tool to wedge open bottom plate from the rim part in order to then use the tip of the blue opening pick under the back plate to then cut the glue. It’s like placing a pie server or knife under the plate once there’s a gap between the rim and the back plate.
Jane - Responder
Be careful, there’s a cable to fingerprint sensor, very close to the edge (see pictures below)… It’s very easy to cut it through with the pick, as I just learned :)
dambig - Responder