Introdução
Use this guide to completely replace your motherboard. Before reattaching the heat sink, be sure to apply a new layer of thermal paste.
O que você precisa
-
-
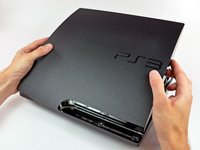
Turn the PS3 over and lay it on its backside.
-
Carefully peel the warranty sticker up off the lower case to reveal a hidden screw cover.
-
-
-
Remove the four 13.3 mm T8 security Torx screws beneath the Blu-ray drive opening. (Some models may only have three screws)
Remove the four 13.3 mm T8 security Torx screws beneath the Blu-ray drive opening.
Can we edit this to say 4 screws?
I made the change from three to four screws, but you're able to edit the guides as well. If you want to edit something, you can click the Edit link on the right side of any guide step, or the Edit link at the top right of the page (sandwiched in-between View and History).
Do you guys have a guide for the PS3 Slim Model 3001A. The fan is different than this model.
3001a is basically same motherboard but cheaper plastic bd drive other than that its exactly the same until you get to the new slim line
Robert -
My PS3 had only three Torx screws. Having four in the diagram was initially confusing. Obviously they made a mid-stream change at some point (mine is several years old now).
I've accidentally removed the ribbon cable from the blu-Ray drive and can not seem to figure out how to reconnect it. Can anyone help?
Take the top off the drive, connect the ribbon to the motherboard then replace the drive sliding the ribbon through the slot on the bottom of the drive and reconnect to the laser.
If the screw has a pin in the center, that means it is a security Torx meant to prevent tampering. To remove this screw, follow the guide I have linked below...
How do u buy the screw driver for these screws
Online at the usual suspects?
Or some hobby stores or places that sell tools will sometimes carry these.
Anyone else's screws for this step need the T7 bit instead of T8?
What is the name of this screwdriver
-
-
-
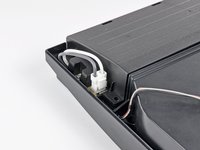
Squeeze the AC inlet connector's locking mechanism and pull straight up to disconnect it from the power supply.
-
-
-
Pull the DC-Out cables straight up to lift their connector up and out of its socket on the power supply.
-
-
-
Remove the two 7.6 mm Phillips screws securing the power supply to the lower case.
Question: if a screw doesn't come out, what do you recommend, without potentially damaging the system, inside and out?
It seems these can be quite tight, but they did come loose with someextra force in my case. They did that thing where it makes cracking sounds, but nothing really breaks. They're just really tight in there. - I just wouldn't recommend taking these out too often.
The screwdrivers on the guide didn't work mine just don't come out any tips model is slim CECH 2001A
Step 8
These screws work as a ground pass through between the motherboard shields and the power supply. My cousin took his PS3 to a repair shop to replace the power supply, they didn’t put the screws back in after that and the PS was shutting down suddenly (no light green or red), put a couple of new screws and it’s being working fine since
Sometime ago i took apart my PS3 out of curiosity, When puting it back together, i messed it up, I stripped one of the PSU screws. Now, i can't take it apart for a paste replacement. Any ideas?
I had the same problem with very tight screws on PS3 power supply. I solved it by purchasing a Screw removal / extractor gripping pliers long nose style , with unique non-slip jaws for quickly extracting damaged / stuck screws. ENGINEER PZ-60 Neji-Saurus,Silver. ( bought mine on Amazon)
These pliers have special grips on tapered end to hold and turn stripped or rusty screws. It took a lot of effort, but screws finally came out using these pliers. A bit of sewing machine oil and prising under the washers with a flat screwdrvers helps too. Failing that, take it to repair shop as they are VERY TIGHT screws on some models of PS3.
I need some advice I have taken apart my PS3 slim unit to clean it. I bought it second hand last year and it is filthy, I am having issues because the screws holding down the power supply are very tight, they are not stripped and I am using the right screwdriver. I don’t want to damage the screws, can anyone help?
-
-
-
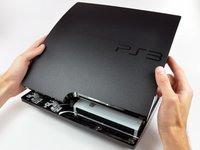
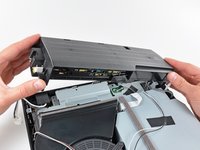
Continue to lift the left edge of the power supply until it lifts off the two metal posts shown in the second picture.
-
Remove the power supply from the PS3, minding any cables that may get caught.
It seems it kind of ends for me here. I can only lift the left side about an inch and then the right side stays down like it’s stuck to something underneath. It feels like I’m bending something. Could something have melted underneath?… It's really stuck, I can't get it to come loose. And I can't see much shining a light into it either. - Any tips?…
Did you undo the screws?
I had the same issue but was able to get it off. The right side (as per the above picture) has two long column like sections that actually goes into the machine. Took me a bit of wiggling and some brute force.
Um, I translated the guide from French to English and the name of the guide was “Food” and the description said “This guide shows you how to replace your diet” The translation is incorrect just to let you know!
Hi! Thanks for you attention! But no worries, the French word “alimentation” means power, food or diet depending the context.
Alright, thanks!
-
-
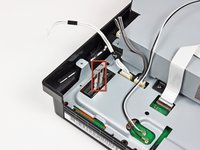
What does the white and black cable?
They are the wifi and Bluetooth antenna connections
-
-
-
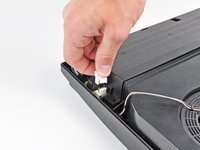
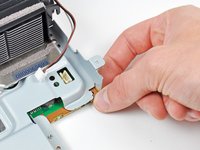
Use the flat end of a spudger or your fingernail to flip up the retaining flap on the Blu-ray ribbon cable socket.
On some models, like the CECH-2501B, there are multiple ribbon cables that connect the Blu-ray drive to the motherboard. The ribbon cable with this particular retaining flap may be found underneath the Blu-ray drive itself. Reattaching that ribbon cable to its socket underneath can be very difficult, but not impossible. it just requires a skilled hand and plenty of patience to get it done.
-
-
-
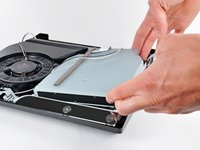
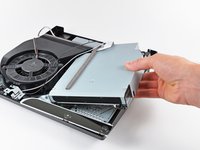
Lift the Blu-ray drive slightly by its right edge to dislodge the control board from its housing.
-
Remove the Blu-ray drive from the PS3.
my cd drive has 3 cables, two by the fan, one right under, i believe i damaged the one on the bottom because it is very difficult to put back in hence the repair. But the photos here dont show the 3 cables, not sure if you have one for this model?
I followed the steps and I successfully removed my disc drive the guide was helpful but I had issues and the ribbon cables on my replacement disc drive were too short after a soddering attempt failed I now need to rebut a disc drive can someone direct me to a proper replacement with the correct size I need it's a ps3 slim 120G please help
Completely different drive in my slim. 3 ribbon cables on the back that pull straight up out of their connectors. And one wide ribbon hidden underneath and almost impossible to get to. After disconnecting the 3 visible cables lift the back of the drive about 3/4" and use a plastic spudger to release the clip on the cable before lifting off the drive. Reinstalling is a nightmare. The cable has a black line to indicate how far to insert into the connector. Get it in there somehow then use the spudger to push the clip down. If it's not level release it and try again and again and again until you get it right. Sony must use some awfully small fingers when they build these ;-)
I had the same issue with the ribon feeding beneath the blu ray player. This video provided a much better solution. It requires dissassembling the blu ray: https://youtu.be/Upy2bTev3M0
My disk drive needs to be replaced. Your step by step is straight forward and are very helpful. At the end you mentioned “If replacing the Blu-ray drive with a new drive, swap the circuit board from your old drive into the new drive”.
Which circuit board? Can your please add a picture of the circuit board you are referring to?
@hh168 There’s now a link in the text of that step, which will take you to a video with detailed instructions for swapping the board.
First I replaced the drive and it would load a disc and see that it was either a game and which game or a BluRay or DVD and which, but I got error codes when trying to play them.
The codes seemed to be tamper coding, and swapping the board seemed to be a good idea.
It went smoothly, but now discs will not feed into the drive.
Please help.
-
-
-
Pull the AC-In cables upward to remove the AC inlet from the lower case.
-
-
-
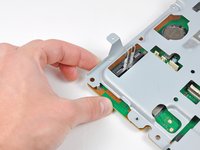
Use the flat end of a spudger to pry both antenna connectors up from their sockets on the motherboard.
-
-
-
Disconnect the DC-In and Blu-ray power cables from the motherboard.
-
-
-
Pull the fan cables straight up to lift the fan connector up and out of its socket on the motherboard.
You have to be very very careful on this step as the connector is very fragile. One wrong move and you can end up with a ripped off connector which wont be repairable.
Source: Followed this guide and ripped off the connector from my PS3
I’ve broken the solder on the fan conn. Any help?
I think I can solder it
I have also ripped off the connector and only realized when I wanted to put together.
ONLY FOR EXPERIENCED ELECTRICIANS!
It is not impossible to clean the removed connector from the panel parts and then glue the connector back on the panel. It depends how much connection is left on the board (you might able to clean a bit of green carefully to increase connection size) with a bit of experience you can solder it back/together again. The power and ground needs better connection since it needs to able to carry the current. The RPM signal has the least connection size on this side of the board but it needs only a bit of connection.
Other possibility to bring from the board other side the 3 fan connection points with some tiny cables but that is more labour intensive and you might need to cut a bit from the metal panel to make space of the cables.
Anyway it is a doable job for an experienced repair person.
-
-
-
Remove the following nine screws holding the motherboard assembly together:
-
Four 14.8 mm shouldered Phillips
-
Five 9.5 mm Phillips
jesus chris what screw driver do i use for the 9.5mm phillips i cant find one anywhere
The PH#1 screwdriver from iFixit's "Manta" driver bit set worked fine for me
Nicholas -
The screws are held on too tightly
The 4 black heatsink screws were easy to remove, but the 5 silver 9.5mm screws were a real pain. I had to carefully apply significant leverage to the top shield and rotate counter-clockwise, then clockwise, and repeat until they come loose. You really have to break them out of the threads holding them in.
-
-
-
Gently press the board away from the top shield assembly near the fan connector and the corner of the board near the wireless sockets.
Had some trouble with this part. The thermal paste on mine was cold and very dry. Gave a loud POP when the first one came loose. The second one frightened me even more lol. And this was after removing the fan first and using a hairdryer on the top side of the heatsink, applying scattered heat to the front and back of the fins. Doubt I unseated the CPU and GPU... But we'll see when I get this monstrosity pieced back together!
-


To reassemble your device, follow these instructions in reverse order.
To reassemble your device, follow these instructions in reverse order.
Cancelar: não concluí este guia.
101 outras pessoas executaram este guia.

10 comentários
do not force the fan cables out , my grey cable broke of and my power supply cable attached to the motherboard, make sure you take the whole white cable rapped with inselation tape to mae sure the chip doesnt brake off . good luck with it
ps rather let a trained professional do it .
my ps3 not work ,i toke my ps3 to a ingner he cannt fix it he tell me there is no electrsety in mother board even that replesment the power supply
can any one help me how can i fix it, and how much the motherboard cost ?
I need a cech-2503b board, where and how can I get one…
I have PS3 SLIM 320GB Console CECH-3004B, but the mainboard is damaged. I have another console CECH-3001A. Can I put the 3001A board into 3004B body ?
Fantastic guide overall! Doesn't cover screw head sizes as well as I'd like, but that for the most part isn't a problem here, as it's mostly just variations of Philips heads. The other concern is the lack of clarification that other people may have models that look quite distinctly different inside, but the guide was still easy enough for me to follow overall.
Don’t even need to bother with the sticker anymore since SONY does not care what you do with them anymore.
Travis Wheeler - Responder