Introdução
Use this guide to remove the back cover assembly on your TicWatch Pro 3 GPS.
You’ll need replacement adhesive to reattach the back cover assembly when reassembling the device. Your device will function normally, but will lose its IP (Ingress Protection) rating.
O que você precisa
-
-
Before starting repairs, take your watch off the charger and power it down.
-
Remove the watch band.
 Pergunte ao FixBot
-
-
-
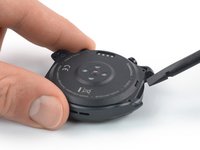
Use a Torx T3 screwdriver to remove the four 4.1 mm-long screws securing the back cover.
-
-
-
-
Apply a heated iOpener to the rear side of the watch for 5 minutes to loosen the adhesive underneath.
-
-
-
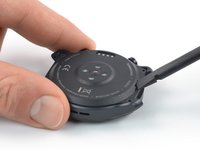
Insert the flat end of a spudger into the microphone opening at the top edge of the back cover.
-
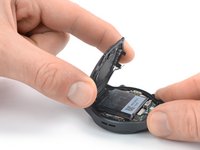
Pry upwards to loosen the back cover assembly. This may require some force.
-
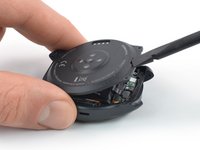
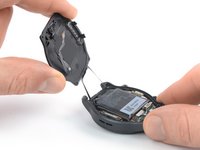
Swing the back cover assembly open by 45 degrees to gain access to the sensor assembly cable.
-
-
-
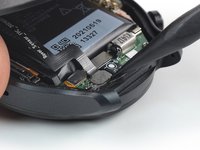
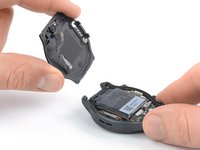
Use a spudger to disconnect the sensor assembly cable by prying the connector straight up from its socket.
-


To reassemble your device, follow these instructions in reverse order.
During reassembly, apply new adhesive where it's necessary after cleaning the relevant areas with isopropyl alcohol (>90%).
Take your e-waste to an R2 or e-Stewards certified recycler.
Repair didn’t go as planned? Try some basic troubleshooting, or ask our TicWatch Pro 3 answers community for help.
Cancelar: não concluí este guia.
3 outras pessoas executaram este guia.


2Comentários do guia
Whelp. I got it open thanks to this guide, but there's nothing I can see that would fix my main/power button not being responsive (thus the watch won't turn on anymore). Thanks anyway!
Heb de batterij van mijn Ticwatch Pro 3 ultra succesvol kunnen vervangen. Ik zou enkel de specialized watch adhesive tape nog moeten hebben voor deze horloge om hem terug waterproof te hebben?