Introdução
Follow this guide to replace a broken or faulty right Joy Con sensor rail on the Nintendo Switch game console.
The Switch uses JIS screws. A JIS 00 driver works best, but you can also use a JIS 000 driver. If you use a Phillips driver, you'll risk stripping the screws.
Note: When you remove the shield plate, you’ll need to replace the thermal compound between the plate and the heatsink. Normal thermal paste isn't designed to bridge large gaps, so you'll need thermal putty or viscous thermal paste.
Note: This guide, and the part we sell, are compatible with the original Nintendo Switch model released in 2017, as well as the newer refreshed model released in 2019 (model numbers HAC-001 and HAC-001(-01), respectively).
O que você precisa
-
-
Press and hold down the small round button on the back of the Joy Con controller.
-
While you hold down the button, slide the controller upward.
 Pergunte ao FixBot
-
-
-
Continue sliding the Joy Con upward until it's completely removed from the console.
-
-
Ferramenta utilizada neste passo:Magnetic Project Mat$19.95
-
Use a Y00 screwdriver to remove the four 6.3 mm-long screws securing the rear panel.
-
-
-
Use a JIS 00 driver to remove the following screws securing the rear panel:
-
One 2.5 mm-long screw on the top edge of the device
-
Two 2.5 mm-long screws on the bottom edge of the device
-
-
-
Use a JIS 00 driver to remove the two 3.8 mm center screws on the sides of the device (one on each side).
-
-
-
Use your finger to flip up the kickstand on the back of the device.
-
If there's a microSD card in the microSD card slot, remove it now before you continue to the next step.
-
-
-
-
Use a JIS 00 driver to remove the 1.6 mm screw in the kickstand well.
-
Close the kickstand.
-
-
-
Open the game card cartridge flap.
-
Lift the rear panel straight up from the bottom of the device and remove it.
-
-
-
Use a JIS 00 driver to remove the 3.1 mm screw securing the microSD card reader to the device.
-
-
Ferramenta utilizada neste passo:Tweezers$4.99
-
Use your fingers or a pair of tweezers to lift the microSD card reader straight up from the device to disconnect and remove it.
-
-
-
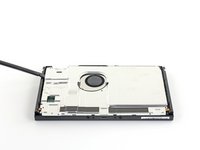
Use a JIS 00 driver to remove the six 3 mm screws securing the shield plate to the device.
-
-
Ferramenta utilizada neste passo:Tweezers$4.99
-
Use your fingers or a pair of tweezers to peel back the piece of foam on the top edge of the device near the fan exhaust port.
-
-
Ferramenta utilizada neste passo:iFixit Thermal Putty$9.95
-
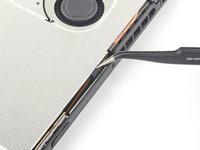
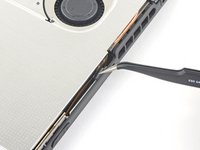
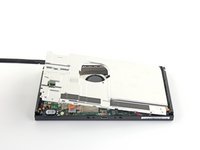
Insert a spudger underneath the shield plate along the edge of the device.
-
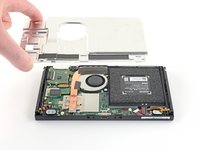
Pry up to lift the shield plate and remove it from the device.
-
During reassembly, if you don't have replacement thermal compound, use the flat end of a spudger to distribute the old compound evenly across the heat pipe, as thick as possible to ensure proper contact. Repeat this process on the shield plate.
-
If you need to replace it, refer to our thermal paste guide to remove the old thermal compound and replace it with an appropriate compound, such as thermal putty or K5 Pro, during reassembly.
-
-
-
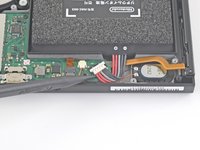
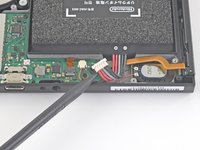
Use the point of a spudger to pry the battery connector straight up and out of its socket on the motherboard.
-
-
-
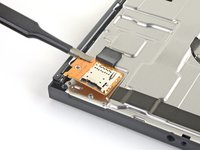
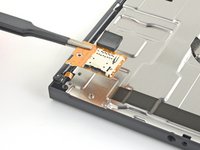
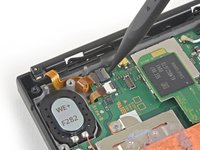
Use a spudger, opening tool, or your fingernail to flip up the small, hinged locking flap on the Joy Con rail data cable's ZIF connector.
-
-
Ferramenta utilizada neste passo:Tweezers$4.99
-
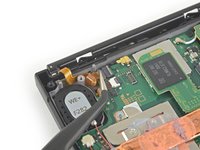
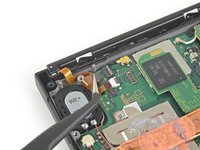
Use a pair of tweezers to slide the Joy Con rail data cable out of its connector on the motherboard.
-
-
-
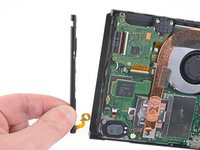
Use a JIS 000 screwdriver or an official iFixit PH 000 driver to remove the four 3.7 mm screws securing the right Joy Con rail to the frame of the device.
-


Compare your new replacement part to the original part. You may need to transfer remaining components or remove adhesive backings from the new part before installing.
To reassemble your device, follow these instructions in reverse order.
Take your e-waste to an R2 or e-Stewards certified recycler.
Repair didn’t go as planned? Try some basic troubleshooting, or ask our Nintendo Switch Answers community for help.
Cancelar: não concluí este guia.
102 outras pessoas executaram este guia.

15Comentários do guia
Would you happen to know how to take out the screws if they’ve been stripped due to corrosion/rust? The back and site plate screws seem to have corroded and started to strip when I tried to unscrew them.
I am running into same problem now. 3 out of 4 back screws are striped
Same issue for me as well, my husband pretty much just brute strengths through them for me until I can get replacement screws. Not the most sophisticated method, but effective.
This was a wonderful guide. Its straight forward, simple to understand, and doesnt pass over any steps large or small. Thank you to your team for what you do for us all.
what can i do if the bracket has snapped off of the consel?
and where could i purchase replacement parts