
Adjusting Singer Brilliance 6180
Introdução
Ir para o passo 1The Singer Brilliance ist a rather cheap computer sewing machine. The design is pretty simple and the needle sometimes happens to be dejusted. Typical issues are a broken needle, broken thread and a knocking sound. If the needle gets adjusted again, the Brilliance may come back to work. For more detailed instructions see the Service Manual.


-
-
The two photos show the correct position of the needle in the needle plate. It must be exactly in the middle of the hole plate on the side and in the sewing direction. (If the needle plate is not shifted.)
-
-
-
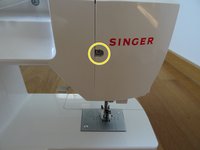
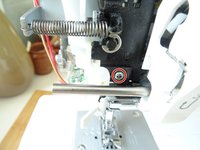
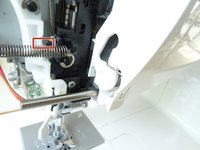
To access the adjustment plate and screw, you need to remove the left cover.
-
Loosen the Phillips screw # 2 on the back a little, it must not be removed.
-
Remove the Phillips # 2 screw on the left side.
-
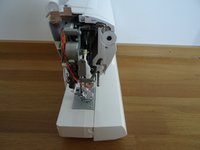
Pull the cover towards the left to remove it.
-
-
-
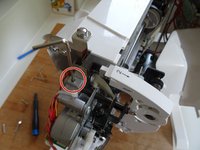
The needle carrier is attached at the top with a 2 mm Allen screw. Loosen the screw to slightly move the cantilever. It's pretty tight the first time, be careful.
-
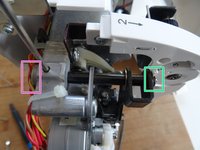
If you tap the front of the axle, the needle moves towards you, the distance between the needle and the looper increases.
-
If you tap on the back of the axle, the needle will move away from you and the distance between the needle and the looper will decrease.
-
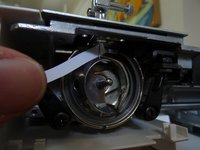
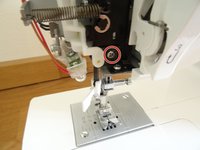
Lower the needle all the way down. You should just be able to slip a piece of paper between the needle and the looper tip. (Picture 3). The needle must be able to slide easily to the left and right when zigzagging.
-
Tighten the Allen screw again.
-
Check that the machine sews cleanly again, especially with zigzag stitches. If all is well, check the lateral displacement and go straight to step 8.
-
-
-
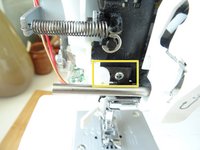
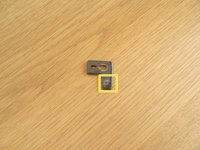
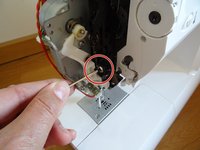
The setting plate is marked yellow in the first picture. It has to be taken out and bent very slightly.
-
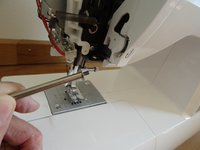
First unscrew the rod for the thread run with a flat screwdriver.
-
The adjustment plate is now accessible.
-
-
-
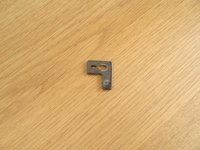
This is what the setting plate looks like. It regulates the position in sewing direction.
-
To adjust, you have to bend the lower part of the plate slightly outwards. Use two pliers to do this.
-
The bending is really minimal. You may have to remove the plate again if the needle isn't yet in the right position.
-
Reinstall the plate and check the position of the needle in sewing direction.
-
-
-
The lateral position of the needle is easier to adjust. A black banjo bolt is used for this purpose. This position is set at the factory and does not normally need to be readjusted.
-
Adjust the screw using a 1.4 mm Allen key. Observe how the lateral position of the needle changes.
-


To reassemble your device, follow these instructions in reverse order.
To reassemble your device, follow these instructions in reverse order.
Cancelar: não concluí este guia.
11 outras pessoas executaram este guia.
Um agradecimento especial a esses tradutores:
100%


Estes tradutores estão nos ajudando a consertar o mundo! Quer contribuir?
Comece a traduzir ›
Gear Up For Future Repairs
Shop all


16Comentários do guia
Hallo Anleitung ist super. Leider näht meine Maschine seither nur noch gerade Stiche. Egal was ich einstelle….was ist schief gelaufen? Kann jmd helfen?
Ja. Wie in den anderen Kommentaren auch schon geschrieben: das Plättchen muss seitlich verschiebbar bleiben, damit die Nadel hin und her wandern kann . Probiere es mit viel Gefühl ganz wenig zurück zu biegen. Man merkt, wie das Plättchen festgeht, wenn man die Schraube anzieht. Das darf halt nicht sein. weiße Hebel muss die Nadel verschieben können. Die Einstellung ist wirklich knifflig, es ist eine zickige Maschine…
VauWeh -
Tausend Dank für die Anleitung!!!
Ich war schon so verzweifelt und wollte mir eine neue Nähmaschine kaufen. (Hatte meine damals bei Lidl gekauft. Garantie und Gewährleistung ist längst abgelaufen und Einschicken erschien mir zu umständlich.)
Und dann das hier…
Sie läuft wieder absolut mittig, Zick-Zack ist auch kein Problem, einfach herrlich!
Viele liebe Grüße
Freut mich sehr, wieder ein sensibles Maschinchen gerettet. Ich habe den Verdacht, dass das passiert, wenn man während des Transports am Stoff zieht und nicht nur die Nadel verbogen wird.
VauWeh -
Guten Tag Ich habe gerade die gleiche Maschine und der Faden kommt nicht mehr hoch . der Greifer Zeitpunkt ist um 9mm nach links verschoben .Bei Bernina, Pfaff, kann man den Greifer mit einer Schraube ,hinter der Maschine lösen und so um ein Zahnrad verstellen.
Bei der Brillianz habe ich nach der Gehäuseöffnung gesehen das am Boden das weisse runde abdeckblättchen zum Greifer einsteller führt.
Mit einem 7mm SWISS-Gryp Nuss -Schraubendreher kann man diese lösen und den Greifer auf die richtige Position stellen ,danach diese Schraube wieder genug anziehen
Ich habe auch den Fehler gemacht und das ganzr Gehäuse geöffnet Gruss Paul Lehmann