Ir para o conteúdo principal

iPhone X Earpiece Speaker Replacement Without Losing Face ID

O que você precisa

  1. iPhone X Earpiece Speaker Replacement Without Losing Face ID, Pentalobe Screws: passo 1, imagem 1 %32
    • Before you begin, discharge your iPhone battery below 25%. A charged lithium-ion battery can catch fire and/or explode if accidentally punctured.

    • Power off your iPhone before beginning disassembly.

    • Remove the two 6.9 mm-long pentalobe screws at the bottom edge of the iPhone.

    • If the screws are stripped or damaged, replace the screws.

    • Opening the iPhone's display will compromise its waterproof seals. Have replacement seals ready before you proceed past this step, or take care to avoid liquid exposure if you reassemble your iPhone without replacing the seals.

  2. iPhone X Earpiece Speaker Replacement Without Losing Face ID, Mark your opening picks: passo 2, imagem 1 %32 iPhone X Earpiece Speaker Replacement Without Losing Face ID, Mark your opening picks: passo 2, imagem 2 %32 iPhone X Earpiece Speaker Replacement Without Losing Face ID, Mark your opening picks: passo 2, imagem 3 %32
    • If inserted too far, an opening pick can damage your device. Follow this step to mark your pick and prevent damage.

    • Measure 3 mm from the tip and mark the opening pick with a permanent marker.

    • You can also mark the other corners of the pick with different measurements.

    • Alternatively, tape a coin to a pick 3 mm from the tip.

  3. iPhone X Earpiece Speaker Replacement Without Losing Face ID, Tape over any cracks: passo 3, imagem 1 %32 iPhone X Earpiece Speaker Replacement Without Losing Face ID, Tape over any cracks: passo 3, imagem 2 %32 iPhone X Earpiece Speaker Replacement Without Losing Face ID, Tape over any cracks: passo 3, imagem 3 %32
    • If your iPhone has a cracked screen, keep further breakage contained and prevent bodily harm during your repair by taping over the glass.

    • Lay overlapping strips of clear packing tape over the iPhone's screen until the whole face is covered.

    • Wear safety glasses to protect your eyes from any glass shaken free during the repair.

    • If you can't get the suction cup to stick in the next few steps, fold a strong piece of tape (such as duct tape) into a handle and lift the screen with that instead.

    • If all else fails, you can superglue the suction cup to the screen.

  4. iPhone X Earpiece Speaker Replacement Without Losing Face ID, Anti-Clamp instructions: passo 4, imagem 1 %32 iPhone X Earpiece Speaker Replacement Without Losing Face ID, Anti-Clamp instructions: passo 4, imagem 2 %32 iPhone X Earpiece Speaker Replacement Without Losing Face ID, Anti-Clamp instructions: passo 4, imagem 3 %32
    Ferramenta utilizada nesse passo:
    Anti-Clamp
    $24.95
    Comprar
    • The next three steps demonstrate the Anti-Clamp, a tool we designed to make the opening procedure easier. If you aren't using the Anti-Clamp, skip down three steps for an alternate method.

    • For complete instructions on how to use the Anti-Clamp, check out this guide.

    • Pull the blue handle backwards to unlock the Anti-Clamp's arms.

    • Slide the arms over either the left or right edge of your iPhone.

    • Position the suction cups near the bottom edge of the iPhone—one on the front, and one on the back.

    • Squeeze the cups together to apply suction to the desired area.

    • If you find that the surface of your iPhone is too slippery for the Anti-Clamp to hold onto, you can use tape to create a grippier surface.

  5. iPhone X Earpiece Speaker Replacement Without Losing Face ID: passo 5, imagem 1 %32 iPhone X Earpiece Speaker Replacement Without Losing Face ID: passo 5, imagem 2 %32 iPhone X Earpiece Speaker Replacement Without Losing Face ID: passo 5, imagem 3 %32
    • Pull the blue handle forward to lock the arms.

    • Turn the handle clockwise 360 degrees or until the cups start to stretch.

    • Make sure the suction cups remain aligned with each other. If they begin to slip out of alignment, loosen the suction cups slightly and realign the arms.

  6. iPhone X Earpiece Speaker Replacement Without Losing Face ID: passo 6, imagem 1 %32 iPhone X Earpiece Speaker Replacement Without Losing Face ID: passo 6, imagem 2 %32 iPhone X Earpiece Speaker Replacement Without Losing Face ID: passo 6, imagem 3 %32
    • Heat an iOpener and thread it through the arms of the Anti-Clamp.

    • You can also use a hair dryer, heat gun, or hot plate—but extreme heat can damage the display and/or internal battery, so proceed with care.

    • Fold the iOpener so it lays on the bottom edge of the iPhone.

    • Wait one minute to give the adhesive a chance to release and present an opening gap.

    • Insert an opening pick under the screen and the plastic bezel, not the screen itself.

    • If the Anti-Clamp doesn't create a sufficient gap, apply more heat to the area and rotate the handle a quarter turn.

    • Don't crank more than a quarter turn at a time, and wait one minute between turns. Let the Anti-Clamp and time do the work for you.

    • Skip the next three steps.

  7. iPhone X Earpiece Speaker Replacement Without Losing Face ID: passo 7, imagem 1 %32
    • Heating the lower edge of the iPhone will help soften the adhesive securing the display, making it easier to open.

    • Use a hairdryer or heat gun or prepare an iOpener and apply it to the lower edge of the iPhone for about a minute in order to soften up the adhesive underneath.

    • If you use a hairdryer or heat gun, do not heat to much because that can result in damaging the screen.

  8. iPhone X Earpiece Speaker Replacement Without Losing Face ID: passo 8, imagem 1 %32 iPhone X Earpiece Speaker Replacement Without Losing Face ID: passo 8, imagem 2 %32
    • If using a single suction handle, apply it to the bottom edge of the phone, while avoiding the curved portion of the glass.

  9. iPhone X Earpiece Speaker Replacement Without Losing Face ID: passo 9, imagem 1 %32 iPhone X Earpiece Speaker Replacement Without Losing Face ID: passo 9, imagem 2 %32 iPhone X Earpiece Speaker Replacement Without Losing Face ID: passo 9, imagem 3 %32
    • Pull up on the suction cup with firm, constant pressure to create a slight gap between the screen and the frame.

    • Insert an opening pick into the gap under the screen's plastic bezel, not the screen itself.

    • The watertight adhesive holding the screen in place is very strong; creating this initial gap takes a significant amount of force. If you're having a hard time opening a gap, apply more heat, and gently rock the screen up and down to weaken the adhesive until you create enough of a gap to insert your tool.

  10. iPhone X Earpiece Speaker Replacement Without Losing Face ID: passo 10, imagem 1 %32 iPhone X Earpiece Speaker Replacement Without Losing Face ID: passo 10, imagem 2 %32 iPhone X Earpiece Speaker Replacement Without Losing Face ID: passo 10, imagem 3 %32
    • Slide the opening pick around the lower left corner and up the left edge of the iPhone, slicing through the adhesive holding the display in place.

    • Don't insert your pick more than 3 mm, as you may damage internal components.

  11. iPhone X Earpiece Speaker Replacement Without Losing Face ID, Screen information: passo 11, imagem 1 %32
    • There are delicate cables along the right edge of your iPhone. Don't insert your pick here, as you may damage the cables.

  12. iPhone X Earpiece Speaker Replacement Without Losing Face ID: passo 12, imagem 1 %32 iPhone X Earpiece Speaker Replacement Without Losing Face ID: passo 12, imagem 2 %32 iPhone X Earpiece Speaker Replacement Without Losing Face ID: passo 12, imagem 3 %32
    • Re-insert your pick at the bottom edge of the iPhone, and slide it up the right side to continue separating the adhesive.

    • Don't insert your pick more than 3 mm, as you may damage the display cables.

  13. iPhone X Earpiece Speaker Replacement Without Losing Face ID: passo 13, imagem 1 %32 iPhone X Earpiece Speaker Replacement Without Losing Face ID: passo 13, imagem 2 %32 iPhone X Earpiece Speaker Replacement Without Losing Face ID: passo 13, imagem 3 %32
    • The top edge of the display is secured with both glue and clips.

    • Slide the opening pick around the top corner of the display, while gently pulling or wiggling the display down in the direction of the Lightning port.

    • The clips will break if you use too much force. Work carefully and be patient.

    • Don't insert your pick more than 3 mm, as you may damage the front panel sensor array.

    • Slide the pick to the opposite corner and cut any remaining adhesive securing the display.

  14. iPhone X Earpiece Speaker Replacement Without Losing Face ID: passo 14, imagem 1 %32
    • Pull on the small nub on the suction cup to remove it from the front panel.

  15. iPhone X Earpiece Speaker Replacement Without Losing Face ID: passo 15, imagem 1 %32 iPhone X Earpiece Speaker Replacement Without Losing Face ID: passo 15, imagem 2 %32 iPhone X Earpiece Speaker Replacement Without Losing Face ID: passo 15, imagem 3 %32
    • Open the iPhone by swinging the display up from the left side, like the back cover of a book.

    • Don't try to fully separate the display yet, as several fragile ribbon cables still connect it to the iPhone's logic board.

    • As pictured, make sure the frame comes off with display and doesn't get stuck in the device.

    • Lean the display against something to keep it propped up while you're working on the phone.

    • During reassembly, lay the display in position, align the clips along the top edge, and carefully press the top edge into place before snapping the rest of the display down. If it doesn't click easily into place, check the condition of the clips around the perimeter of the display and make sure they aren't bent.

  16. iPhone X Earpiece Speaker Replacement Without Losing Face ID, Display Assembly: passo 16, imagem 1 %32
    Ferramenta utilizada nesse passo:
    Magnetic Project Mat
    $19.95
    Comprar
    • Remove five Y000 screws securing the logic board connector bracket, of the following lengths:

    • Three 1.1 mm screws

    • One 3.1 mm screw

    • One 3.7 mm screw

    • Throughout this repair, keep track of each screw and make sure it goes back exactly where it came from to avoid damaging your iPhone.

  17. iPhone X Earpiece Speaker Replacement Without Losing Face ID: passo 17, imagem 1 %32
    • Remove the bracket.

    • The bracket may be lightly adhered in place. Lift gently but firmly to separate it.

    • During reassembly, this is a good point to power on your iPhone and test all functions before you seal the display in place. Be sure to power your iPhone back down completely before you continue working.

  18. iPhone X Earpiece Speaker Replacement Without Losing Face ID: passo 18, imagem 1 %32 iPhone X Earpiece Speaker Replacement Without Losing Face ID: passo 18, imagem 2 %32
    • Use the point of a spudger or a clean fingernail to pry the battery connector up from its socket on the logic board.

    • Try not to damage the black silicone seal surrounding this and other board connections. These seals provide extra protection against water and dust intrusion.

    • Bend the connector slightly away from the logic board to prevent it from accidentally making contact with the socket and providing power to the phone during your repair.

  19. iPhone X Earpiece Speaker Replacement Without Losing Face ID: passo 19, imagem 1 %32 iPhone X Earpiece Speaker Replacement Without Losing Face ID: passo 19, imagem 2 %32
    • Use the point of a spudger or a fingernail to disconnect the front panel sensor assembly connector.

  20. iPhone X Earpiece Speaker Replacement Without Losing Face ID: passo 20, imagem 1 %32 iPhone X Earpiece Speaker Replacement Without Losing Face ID: passo 20, imagem 2 %32
    • Use the point of a spudger or a fingernail to disconnect the OLED panel cable connector.

    • To re-attach press connectors like this one, carefully align and press down on one side until it clicks into place, then repeat on the other side. Do not press down on the middle. If the connector is misaligned, the pins can bend, causing permanent damage.

  21. iPhone X Earpiece Speaker Replacement Without Losing Face ID: passo 21, imagem 1 %32 iPhone X Earpiece Speaker Replacement Without Losing Face ID: passo 21, imagem 2 %32
    • Use the point of a spudger to pry the digitizer cable connector up from its socket.

    • This connector's recessed location makes it tricky to reconnect. Take your time and align it carefully, then gently press it into place with your fingertip—first one side, then the other. You should feel it click into place.

    • If any part of your screen doesn't respond to touch after your repair, disconnect the battery and then re-seat this connector, making sure it clicks fully into place and that there's no dust or other obstruction in the socket.

  22. iPhone X Earpiece Speaker Replacement Without Losing Face ID: passo 22, imagem 1 %32 iPhone X Earpiece Speaker Replacement Without Losing Face ID: passo 22, imagem 2 %32 iPhone X Earpiece Speaker Replacement Without Losing Face ID: passo 22, imagem 3 %32
    • The front panel sensor assembly flex cable is lightly adhered in place.

    • Carefully lift the cable until the adhesive separates.

  23. iPhone X Earpiece Speaker Replacement Without Losing Face ID: passo 23, imagem 1 %32
  24. iPhone X Earpiece Speaker Replacement Without Losing Face ID, Earpiece Speaker: passo 24, imagem 1 %32
    • Remove the 1.2 mm Y000 screw on the back of the display assembly, near the infrared camera port.

  25. iPhone X Earpiece Speaker Replacement Without Losing Face ID: passo 25, imagem 1 %32 iPhone X Earpiece Speaker Replacement Without Losing Face ID: passo 25, imagem 2 %32 iPhone X Earpiece Speaker Replacement Without Losing Face ID: passo 25, imagem 3 %32
    • Beneath the screw you just removed lies a small metal grounding clip. If it didn't already come out along with the screw, remove it now.

    • During reassembly, orient the clip as shown. Hold the clip in position while you install and tighten the screw.

  26. iPhone X Earpiece Speaker Replacement Without Losing Face ID: passo 26, imagem 1 %32
    • Remove two more Y000 screws securing the speaker/sensor assembly:

    • One 1.6 mm screw

    • One 1.3 mm screw

  27. iPhone X Earpiece Speaker Replacement Without Losing Face ID: passo 27, imagem 1 %32 iPhone X Earpiece Speaker Replacement Without Losing Face ID: passo 27, imagem 2 %32
    • The earpiece speaker is lightly adhered in place.

    • Using a spudger, gently pry under the top edge of the speaker assembly, and flip it over—down and away from the top edge of the display.

    • The speaker remains attached via a very thin flex cable. Be careful not to strain or damage the cable.

  28. iPhone X Earpiece Speaker Replacement Without Losing Face ID: passo 28, imagem 1 %32 iPhone X Earpiece Speaker Replacement Without Losing Face ID: passo 28, imagem 2 %32 iPhone X Earpiece Speaker Replacement Without Losing Face ID: passo 28, imagem 3 %32
    • Remove the tape covering the solder points.

  29. iPhone X Earpiece Speaker Replacement Without Losing Face ID: passo 29, imagem 1 %32 iPhone X Earpiece Speaker Replacement Without Losing Face ID: passo 29, imagem 2 %32 iPhone X Earpiece Speaker Replacement Without Losing Face ID: passo 29, imagem 3 %32
    • Apply flux to the two solder points.

  30. iPhone X Earpiece Speaker Replacement Without Losing Face ID: passo 30, imagem 1 %32 iPhone X Earpiece Speaker Replacement Without Losing Face ID: passo 30, imagem 2 %32 iPhone X Earpiece Speaker Replacement Without Losing Face ID: passo 30, imagem 3 %32
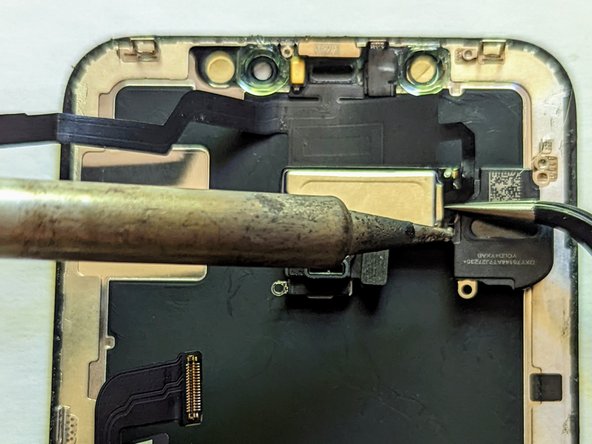
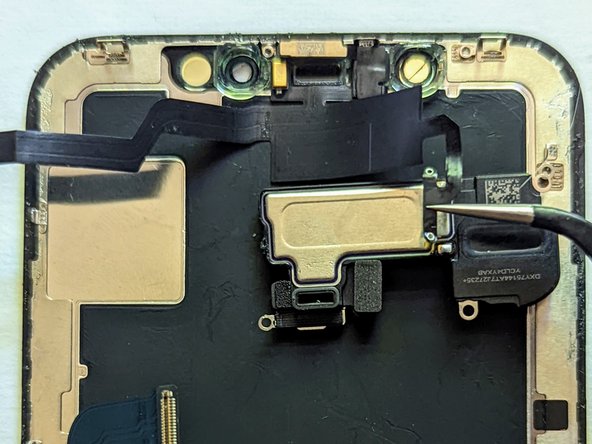
    • While holding the flex cable with a pair of tweezers, apply heat to the first solder pad. As soon as the solder melts, pull the iron away and lift the flex cable to keep it from re-adhering to the earpiece speaker when the solder cools.

    • Repeat for the other solder pad.

  31. iPhone X Earpiece Speaker Replacement Without Losing Face ID: passo 31, imagem 1 %32
    • The earpiece speaker has been removed.

Conclusão

To reassemble your device, follow these instructions in reverse order.

11 outras pessoas executaram este guia.

Jerry Wheeler

Membro desde: 03/21/22

56.157 Reputação

Autoria de 69 guias

Equipe

Oregonians Membro de Oregonians

Community

Membros da 6

Autoria de 176 guias

4 comentários

Awesome!

THis will work for iphone XS? I've had two aftermarket screens put in my XS and los teh face Id after the first new screen. I STILL have my ORIGINAL screen so that means I can fix the face id buy swapping this over??

Jason - Responder

Can Face ID be repaired again after damaged when repairing speaker

1Santiago_gh - Responder

I can't give you a definitive answer because it depends on the kind of damage, but there is a chance it could be repaired. However, those kind of repairs require quite specialized microsoldering expertise that not all repair shops are capable of. Some repairs can be done by moving components from one flex cable to a new one, or in some cases the flex can be repaired if that's what's wrong.

If you're unable to locate a shop that has the expertise to do that kind of repair, then the only other choice you have would be to pay Apple to replace the screen. Their replacements come with the earpiece speaker assembly, and when they do the work they'll pair it to your phone so Face ID will work again. Some people can use the Apple self repair program, but unfortunately the iPhone 12 is the oldest phone they support with the program so that won't work for you.

Jerry Wheeler -

Adicione um comentário

Exibir estatísticas:

Últimas 24 horas: 28

Últimos 7 dias: 210

Últimos 30 dias: 913

Duração total: 20,761