Introdução
The Taptic Engine produces your iPhone's vibration and haptic feedback functions. Use this guide to remove and/or replace the Taptic Engine in your iPhone 7.
This guide instructs you to remove the display assembly; this is intended to prevent damage to the display cables. If you feel comfortable removing the Taptic Engine without putting undue strain on the display cables, you can skip the display removal steps.
O que você precisa
Vídeo de Apresentação
-
-
Power off your iPhone before beginning disassembly.
-
Remove the two 3.4 mm pentalobe screws on the bottom edge of the iPhone.
-
-
-
Measure 3 mm from the tip and mark the opening pick with a permanent marker.
-
-
Ferramenta utilizada neste passo:Clampy - Anti-Clamp$24.95
-
Pull the blue handle backwards to unlock the Anti-Clamp's arms.
-
Slide the arms over either the left or right edge of your iPhone.
-
Position the suction cups near the bottom edge of the iPhone just above the home button—one on the front, and one on the back.
-
Squeeze the cups together to apply suction to the desired area.
-
-
-
Heat an iOpener and thread it through the arms of the Anti-Clamp.
-
Fold the iOpener so it lays on the bottom edge of the iPhone.
-
Wait one minute to give the adhesive a chance to release and present an opening gap.
-
Insert an opening pick into the gap.
-
Skip the next three steps.
-
-
-
Heating the lower edge of the iPhone will help soften the adhesive securing the display, making it easier to open.
-
Use a hairdryer or prepare an iOpener and apply it to the lower edge of the phone for about 90 seconds in order to soften up the adhesive underneath.
-
-
-
Apply a suction cup to the lower half of the front panel, just above the home button.
-
-
-
Ferramenta utilizada neste passo:Tri-point Y000 Screwdriver$5.99
-
Remove four tri-point Y000 screws securing the lower connector bracket, of the following lengths:
-
Three 1.2 mm screws
-
One 2.4 mm screw
-
-
-
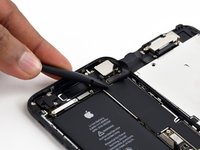
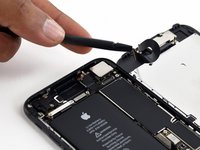
Use a spudger or a fingernail to disconnect the two lower display connectors by prying them straight up from their sockets on the logic board.
-
-
-
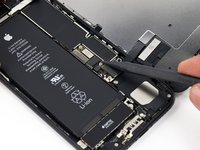
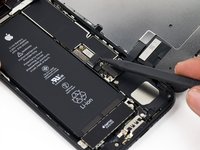
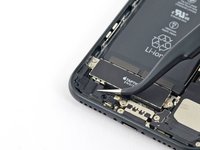
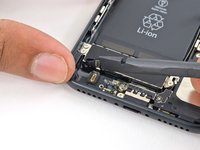
Remove the two 1.9 mm Phillips screws securing the barometric vent to the rear case.
-
-
-
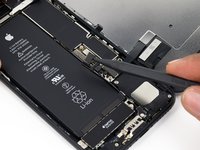
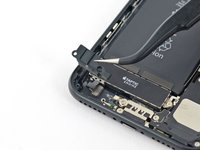
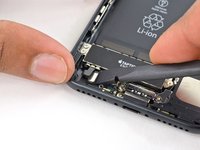
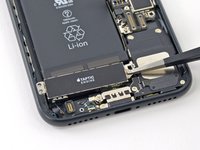
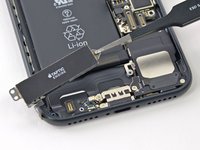
Use the flat end of a spudger to disconnect the Taptic Engine connector from its socket on the logic board.
-


To reassemble your device, follow these instructions in reverse order.
Cancelar: não concluí este guia.
76 outras pessoas executaram este guia.

20Comentários do guia
Good job and prof.
Bravo!!!!!!!!¡!
Thank you for your amazing instruction, it was my first phone repair ever! iPhone is fully functional again!
were can I buy one tapic Engine?
Hi! In our store the Taptic Engine is just called an iPhone 7 Vibrator. It's linked at the top of the guide, or you can find it here.