Introdução
Use this guide to replace the 3.5mm audio jack in an iPad 6 Wi-Fi.
Be very careful when you isolate the battery using a battery blocker. The battery contacts are easily damaged, resulting in irreversible damage to the logic board. If you choose to complete the guide without isolating the battery, avoid using metal tools except when completely necessary (like when removing screws) to prevent shorting the battery and damaging sensitive circuit components.
O que você precisa
-
-
Heat an iOpener and apply it to the left edge of the device for two minutes.
-
-
-
While you're waiting for the adhesive to loosen, note the following areas that are sensitive to prying:
-
Front camera
-
Antennas
-
Display cables
-
-
Ferramenta utilizada neste passo:Clampy - Anti-Clamp$24.95
-
Pull the blue handle backwards to unlock the Anti-Clamp's arms.
-
Place an object under your iPad so it rests level between the suction cups.
-
Position the suction cups near the middle of the left edge—one on the top, and one on the bottom.
-
Hold the bottom of the Anti-Clamp steady and firmly press down on the top cup to apply suction.
-
-
-
Wait one minute to give the adhesive a chance to release and present an opening gap.
-
If your screen isn't getting hot enough, you can use a hair dryer to heat along the left edge of the iPad.
-
Insert an opening pick under the digitizer when the Anti-Clamp creates a large enough gap.
-
Skip the next step.
-
-
-
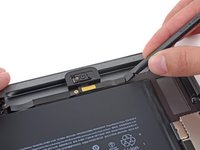
Once the screen is warm to touch, apply a suction handle to the left edge of the screen and as close to the edge as possible.
-
Lift the screen with the suction handle to create a small gap between the digitizer and the frame.
-
Insert an opening pick into the gap between the digitizer and the frame.
I had a screen that was lightly cracked, and when I pulled up on the glass it cracked even further and made a mess of my removal. So, I would recommend taping cracks even if you can get suction so that you don’t induce even more cracks.
I actually had a really badly cracked digitizer. Using the suction cup did nothing but shatter the digitizer more. I intentionally drove a flat head screw driver into the digitizer to reveal the recess in the body where they are showing the opening-pick. Working around the edge, the glass shattered. You still need to be careful at all of spots noted in step 2.
Do not go under the digitizer more than the 1 mm along the sides or 3-4 mm at the corners as shown in step 29 using the flat grey ring around the edge for a reference. Direct all of your tool force into the body to prevent slipping into critical parts.
The antennas at either side of the home button were the trickiest part as they were thin and slightly attached to the digitizer. I would recommend using a plastic tool for these parts if you are having to 'scrape' the glass off of the tabs of the antenna.
-
-
-
Insert a second opening pick into the gap you just created.
-
Slide the pick toward the bottom-left corner of the device to separate the adhesive.
-
Leave the pick in the bottom-left corner to prevent the adhesive from re-sealing.
-
-
-
Heat an iOpener and apply it to the top edge of the device for two minutes.
-
-
-
Rotate the pick around the top-left corner of the device to separate the adhesive.
-
-
-
Slide the opening pick along the top edge of the device, stopping just before you reach the front camera.
-
-
-
Heat an iOpener and apply it to the right edge of the device for two minutes.
-
-
-
Rotate the pick around the top-right corner of the device to separate the adhesive.
-
-
-
Insert a new opening pick and slide it to the middle of the iPad's right edge.
There are sensitive display/digitizer cables no less than five inches from the bottom edge of the iPad. Insert the pick further down than this, or deeper than 1mm beyond this point and you risk irreparably damaging these cables.
Three inches is much too far down this side of the iPad to use picks.
-
-
-
-
Heat an iOpener and apply it to the bottom edge of the device for two minutes.
-
-
-
Slide the bottom-left pick to the bottom-left corner to separate the adhesive.
-
Leave the pick in the bottom-left corner before moving to the next step.
-
-
-
Insert a new opening pick into the gap you just created on the bottom edge of the iPad.
-
Slide the pick over the antenna, stopping just before the home button.
-
Leave the pick to the left of the home button before continuing.
-
-
-
Heat an iOpener and apply it to the right edge of the device for two minutes.
-
-
-
While supporting the digitizer, slide an opening pick between the two display cables to separate the last of the adhesive.
-
-
-
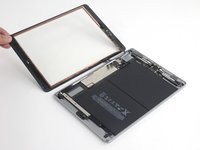
Once all of the adhesive has been separated, open the digitizer like a book and rest it parallel to the iPad.
While reassembling, REALLY make sure the display cables and the home button cable won't be folded / bent while closing the digitizer. I'm not exactly sure what I did, but I broke the home button and touch ID since I bent the home button cable to the point that it broke. These ribbon cables are SUPER fragile.
-
-
-
Remove the four Phillips #00 4.3 mm screws securing the LCD.
Both of the iPad 6th gen models i have seen so for (note they were cellular also) had the LCD secured with a grey silicone kind of adhesive in each corner under the screws. So you can’t just lift the LCD as you normally would after removing screws, it would break. I found you could pick at the corner closest to the rear camera easiest, slightly lift that corner and gently separate the other side next to the headphone jack. Then while supporting the LCD , lever the other end free with a up-and-down motion making slight progress each time.
On my iPad 6, there were small rubber tabs covering the two screws on the front camera side. I carefully held them out of place with tweezers while unscrewing the screws.
-
-
-
Use the flat end of a spudger to pry the LCD out of its recess just enough to grab it with your fingers. There may be glue around the screw holes that needs to be cut with a knife.
-
Flip the iPad LCD like a page in a book, lifting near the camera and turning it over the home button end of the rear case.
-
Lay the LCD on its face to allow access to the display cables.
When you replace the LCD be sure to make sure it is screwed in fully. It is easy not, especially on the cornet where the digitizer cables are. The LCD is very sensitive and if you bend it then it can stop working. I was just pressing the digitized in place at the end of a repair and the screen was covered in white lines.
I have no idea of what the logic board looks like !!!
-
-
-
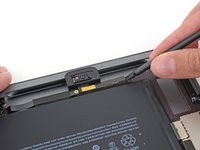
Remove the single 2.3 mm Phillips #000 screw securing the battery connector to the logic board.
-
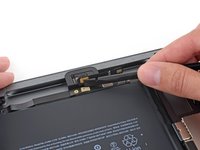
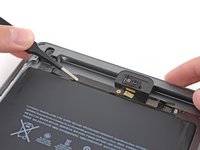
Slide the battery blocker underneath the logic board's battery connector at a 35 degree angle.
-
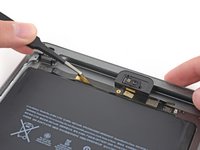
Leave the battery blocker in place as you work.
If you insert a regular pick without a gap then you can damage this connector and will need a new motherboard. If in doubt just insert into the left corner enough to raise it a tiny bit. Arguably, if you are not sure, then it is safer just power off and don’t power back on until everything is fully connected. A photo of how this connector looks with its cover off would really help for people that have not seen this type of battery connector before. You just need to get it to lift a tiny bit, Do not try to slide anything under the contacts….
I bumped this darn thing several times, it was twisted and skewed making me freak out but the iPad still works. I am thinking you should pull it out and put the screw back in right after the LCD is removed. Then use it again just before putting the LCD screen back in. The pick is sticking out there waitng to be be bumped.
Hi Robin,
Unfortunately, there is no easy way to pull the battery connector out of the logic board. If you try to pry this connector off, you will irreparably damage it. The easiest solution is to insert the battery blocker in-between to cut the power.
The battery isolation pick or battery blocker is an outdated way of isolating the battery, as you risk damaging the battery pins underneath the logic board.
So what is the new method?
This is my question as well. Seems like this phrase contradicts the instructions. Confusing. Any reply?
We are currently working on a better isolation procedure! In the meantime, I’ve updated the warning to hopefully clarify the issue.
Why do you need to “To reduce the risk of a short”? There does not seem to by any risk of a “short” in this process. I can see other reasons for disconnecting the battery. I am an electrical engineer so I would appreciate a professional grade answer to this question.
I’ll give it a shot!
When you remove the screw, it doesn’t disconnect the battery, as the connector uses spring contacts to touch the battery pads.
If you leave the battery connected, it leaves the logic board energized. As there are many exposed traces and SMT components on the logic board, there is a chance that you accidentally bridge a trace with a metal tool, resulting damage. In addition, the display connector contains tiny pins, and the pinout is such that if you pry the connector from an energized logic board, there is a chance that a voltage rail pin may accidentally touch something it shouldn’t, blowing out the backlight circuitry.
My battery was dead when i did the repair. Did not really need to perform this step
Take a waterproof playing card, cut out the shape of the battery blocker and slide that under. Battery blocked and pins not at risk of damage. Got that from a YouTube video made by a microsolder repair tech fixing the damage caused by jamming a blocker in between the contacts.
Thanks for the tip Melody! I’ve updated the instructions to include the playing card method.
I could not for the life of me get the playing card in there, but my iPad was turned off, so I decided to ‘risk’ a short, instead of potentially damaging the battery connectors by jamming the card in there as hard as possible. My repair went fine, no short, however I realized AFTER closing everything up that I forgot to put the battery screw back in. Really hoping this doesn’t become an issue long term, because I don’t want to pry this brand new screen off just to put the battery in.
Let us know! I wasn't able to use the screw again after removing the battery blocker. Now my iPad turns off and on every so many minutes and when it restarts it's 1% and then shows actual charge.
When you come to screw this back together, do not overestimate how little force it takes to strip the thread on this #000 screw. I did, and I now I can't screw this back down and have the problem where the iPad restarts every 3 mins 20 sec after you turn it on due to a poor connection here. I've used card to pack this out so the LCD puts a little clamping force on the terminal once you screw it back in, but it's not really enough so the iPad still suddenly restarts occasionally.
I use a small screwdriver and pry underneath that brown bracket from the top edge by the camera (with the elongated metal cover removed of course) all the way before the battery, then lift up just enough for me to unhinged the battery out of the secure post. I don't know why Apple has to go through ALL THIS just to connect the battery since there is a small screw AND ADHESIVE securing it anyway. Nonetheless the whole job (replacing the lcd screen and battery was a major pain in the neck!
-
-
-
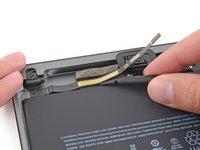
Remove the three 1.4 mm Phillips #000 screws from the display cable bracket.
I believe these are also Phillips #00, not Phillips #000.
I lost a 1.4mm screw where can I buy these small screws and how big are they? 1.4mm x? flared or flat head
-
-
-
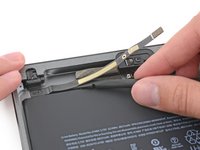
Remove any tape covering the home button ribbon cable connector.
-
-
-
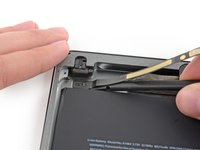
Use the flat end of a spudger to flip the tab on the home button ribbon cable ZIF connector upward.
-
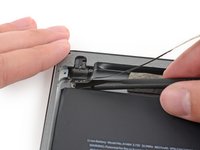
Carefully pull the home button ribbon cable straight out of the ZIF connector.
I'm confused about the home flex cable connector required for the 6th generation iPad. It was my understanding that this model required an 18 pin connector. But these excellent pictures clearly show a 14 pin connector, just like the one for the first generation iPad Air AKA the iPad 5. I know this is not the primary focus of this guide, but can anyone clarify this for me?
I did the whole repair but this part is the problem HELP !!! I unlocked it but it took me 1 hour to carefully pull out the HOME BUTTON RIBBON CABLE. It finally came out with tweezers but now I CAN'T GET IT BACK IN and as a result my touch I.D. won't activate. It seems there was a tiny bit of black tape overlapping the connector on the ribbon which I carefully cut off exposing only the connector on the ribbon itself but how the heck does it slide in before you lock it. It seems easy on Youtube videos but mine just doesn't slide in with hand or with tweezers. OR in fact is there another connector that controls the TOUCH I.D. ???
Failed this step- broke the connector. If I try this again, I'd be inclined try to remove the home button from the front panel without unplugging it. Everything else seems to work fine.
I too failed this step. Needed some up close pics of how this works. Now what do I do the connector on the board is broken?
-
-
-
Use a the flat end of a spudger or a fingernail to carefully pop the two digitizer cable connectors straight up from their sockets.
Where can I get a good used motherboard for a A1954 iPad 6 gen everywhere I look, there sold out ?...
-
-
-
Carefully peel the home button ribbon cable up off of the adhesive holding it to the rear case.
If you can make sure to not pull on the home button side, i would leave out this step. i replaced two displays so far, on the first i removed it, but left it connected on the second attempt. worked like a charm
-
-
Ferramenta utilizada neste passo:Polyimide Tape$9.99
-
Remove the front panel assembly.
-
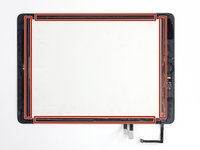
If you experience "ghost" or "phantom" touch input issues with your new display, this can be resolved by adding a layer of very thin insulating tape, such as Kapton (polyimide) tape, to the highlighted areas on the back of the panel. iFixit panels come with the proper insulation, and should not require the addition of any tape.
-
-
-
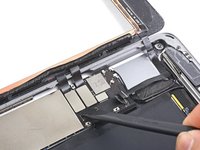
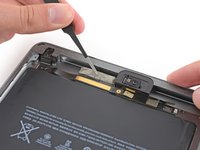
Remove the three 1.4 mm Phillips #000 screws securing the upper component cable bracket.
-
-
-
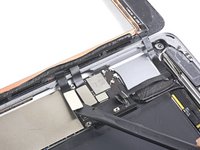
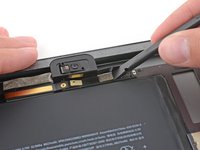
Use the flat end of a spudger to disconnect the front-facing camera connector from the logic board.
-
Fold the front-facing camera cable out of the way.
-
-
-
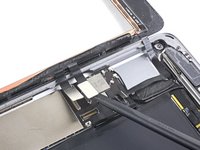
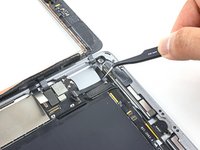
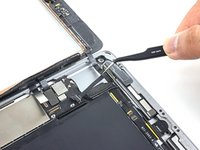
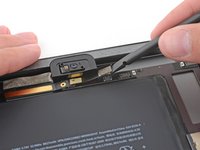
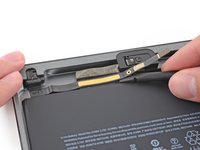
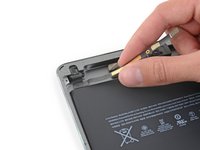
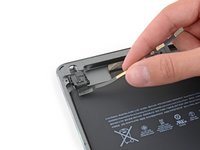
Use the flat end of a spudger to lift the headphone jack cable connector straight up from its socket on the logic board.
The headphone jack connector might be taped to the ribbon cable below it. You will have to gently remove a small pad covering the connector and then peel back the tape.
-


To reassemble your device, follow these instructions in reverse order.
To reassemble your device, follow these instructions in reverse order.
Cancelar: não concluí este guia.
5 outras pessoas executaram este guia.


2Comentários do guia
So is the iPad Air/ iPad 5 headphone jack flex cables compatible with the 6th gen 2018 model? That part is listed here but on the actual description on the part page, it doesn’t mention the 6th gen as compatible.
Yes, the iPad Air/iPad 5 headphone jack is compatible with the iPad 6th gen.