Introdução
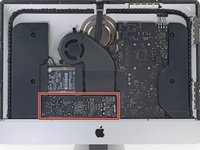
Use this guide to install or replace RAM.
O que você precisa
-
Ferramenta utilizada neste passo:iMac Intel 21.5" Cardboard Service Wedge$4.99
-
-
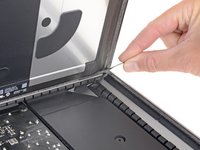
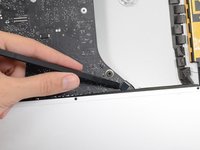
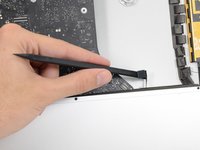
Starting on the left of the display, near the power button, insert the iMac Opening Tool into the gap between the glass panel and the rear enclosure.
A thin razor blade works well, but be careful to angle the sharp edge AWAY from the glass. Whatever tool you use you can easily scratch the paint on the back of the glass, which will show up when you look at he reassembled Mac on an angle later.
This was a great guide!
-
-
Ferramenta utilizada neste passo:Plastic Cards$2.99
-
Starting from the top right corner of the iMac, wedge a plastic card between the display and frame.
So sorry. Thanks for that caution.
Using suction cups (the ones that were made for removing the magnetic front glass on the 2011 and earlier iMacs) work well too. Place one in each top corner, while the Mac is lying face up on a table, and gently pull and it will separate the display from the main body. You might need to do a little more slicing around the edges if you did not get all the way through the first time with the roller. Then you can lift the display up at an angle to disconnect the cables.
This was a great idea, worked well for me. Thanks!
Florin -
-
-
-
With both plastic cards inserted as shown near the corners, gently twist the cards sideways to increase the gap between display and case.
-
Begin to lift the top of the display up from the frame.
-
-
-
While holding the display up with one hand, use the other hand to unplug the display power cable. Make sure that you pull the cable out from the plastic tab, and not by pulling on the color wires.
-
-
-
Lift the display up to a near-vertical position.
-
-
-
-
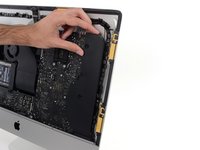
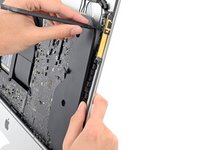
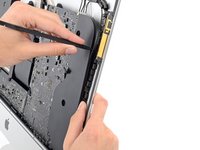
Grasp the small tab at the end of one of the bottom edge display adhesive strips and pull the adhesive toward the top of the iMac to remove it.
-
Repeat this step with the other adhesive strip and remove it.
The roller tool for slicing open the display works great for this step. Get in there like using the card and roll across the bottom to slice through the remaining adhesive.
-
-
-
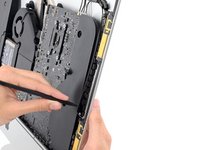
Lift the display up from the frame and remove it from the iMac.
-
It may be necessary to slowly lift from one side, to peel against the remaining adhesive.
After removing the display, I also removed the 3 screws for the processor fan, disconnected the power connector for it and set the fan shroud aside. Disconnecting the remaining cable (similar style to 1 of the cables for the display) that is in the way of the RAM chips is all that's left to do. I was then able to access and quickly remove the two Apple-provided RAM chips, and replace them with 3rd party RAM. Turning the iMac on its side, so that it's in a position where you're physically putting the RAM chips DOWNWARD into their respective slots is the best way to go about uninstalling and reinstalling the chips. Using a narrow but long'ish plastic spudger tool is the best way to defeat the spring-tabs which hold the RAM chips in place. After removing the LCD display, changing the RAM is about a 10 minute process!! And I'd SURE prefer not to remove all the parts and risk damage to the iMac via the standard procedure listed. As per usual, take your time and work gently :-)
Teardown the whole machine just to change RAM? While preparing to comment on this procedure I just noticed the comment made by Mitch K above. I ran pretty much the same procedure that he describes this afternoon (steps 1-23, 43-45, and step 55). Then I swapped out the original 2x4GB RAM chips for 2x8GB chips by reaching behind the logic board, releasing the spring retaining clips one chip at a time (starting with the chip further away from the logic board), pivoting the RAM towards the back of the machine, and then carefully sliding it out of the slot. I easily slid in the new chips and then pivoted them to lock them down. No hassle, no time lost. As Mitch K states above, not only is this “shortcut” method much quicker and easier, but it provides less risk of damaging cables, sockets and other delicate components during a total teardown. Why mess with the power supply board just to change RAM? I do not advise to follow the current iFixit.com procedure written by Sam Lionheart, regardless of user skill-level.
THAT sounds one !&&* of a lot easier than the full tear down. I wonder if there’s a video of the process described by Mitch K? Adding that to these verbal instructions would really help relieve the apprehension and anxiety around the process! I do sometimes find the additional warnings, though appreciated from a “safety first” perspective, are somewhat overstated. It’s been a very long time since I shorted out RAM, or fried a PCB, or broke a connector, regardless of how finicky, fragile or awkwardly designed and positioned. I may have WANTED to break something, and the air might be blue for a few seconds, but inevitably, things go back together, the start button gets pressed, the startup chime sounds, and we’re in business. Practice DOES make as close to perfect we are likely to get.
Mitch has the exact method that works a treat. You don’t need to follow steps 24-37 and also 40-63. Step 51 is the step to remove the camera cable and is needed. Steps 38 and 39 are for the Fan. That is all that is needed. Done quite a few like this.
Be careful not to drop the RAM down the back of the logic board!
By NOT removing all the other stuff you can avoid either damaging it or forgetting to plug in a cable.
I just trued this shortcut and it was not successful. I was not able to seat both RAM chips with this shortcut, and managed to slightly damage one of the retainer clips. I simply could not manipulate the chips into and out of the slots effectively without taking everything apart as described in the full set of steps.. I ended up retracing my steps and following the entire procedure, carefully, and that worked without incident. So, bottomline, it is definitely more work to follow all the steps but from my experience, it is decidedly safer. Your mileage may, of course, vary. It was successful in the end, and I swapped out the hard drive with an ssd during the same procedure and my machine is very, very much faster.
I have completed by following the Mitch K post and it is much easier than stripping down the whole thing, just be aware that to remove and replace the ram chips means working in a tight space, you need slim fingers and don’t be tempted to use force, take your time.
Well, I have slim fingers, but they are 60 years old, and they don’t work like they used to! LOL.
Agree with Mitch K’s procedure. The only added tip I would throw in is to use two 45 degree tweezers with their plastic covers still installed to easily pop loose the RAM. I couldn’t get the plastic spudger tool to work myself, but the tweezers easily reach the RAM clips. Just make sure the plastic covers are installed and you won’t be in danger of scratching or shorting anything out.
So thankful I discovered these comments. Saved me a TON of time! Thank you!!
These comments were very useful. Thank you. I just needed to modify a pair of tweezers to allow me to seat the new RAM more easily. The ifixit screwdriver wasn't able to turn some of the screws as they were installed too tightly, and I didn't want to wait to order and reveive a pair of right angled Torx screwdrivers that would give me more leverage to get those boards off.
-
-
-
Remove the following five Phillips screws holding the lower support bracket in place:
-
Four 3.2 mm screws
-
One 1.7 mm screw
-
-
-
Remove the lower support bracket from the iMac enclosure.
Of all the parts of this entire procedure, replacing this one piece is the hardest part! The screws are tiny and they just don’t seem to want to grab the support piece. Also it seems to perform no function which is also annoying.
I left mine out. LOL
Line up the screw holes and press on the bracket from the back to help the screws grab. If your fingers are too big, press with the flat side of your spudger. As long as there’s no gap between the bracket and the iMac’s frame, the screws should grab easily.
I put it in at a slight angle lining up the right hand side holes, screwed in the two screws and gently pressed my finger behind it on the rest
If you only want to replace the HD and RAM, take a big shortcut and leave the logic board in, as well as all the parts needed to remove it (speaker, power supply etc). Once the display is removed, just take out the fan and the top two logic board screw. There is than sufficient space to gently remove and insert the two ram modules. HD can easily be replaced with an SSD by just removing the HD mounting brackets...
Voces mudaram de modelo iMac, desta foto para proxima, esse modelo desta foto nao tem slot nvme. O da proxima foto sim. Voces me fizeram comprar un nvme por engano...
-
-
-
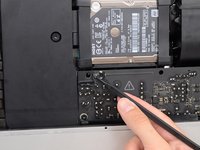
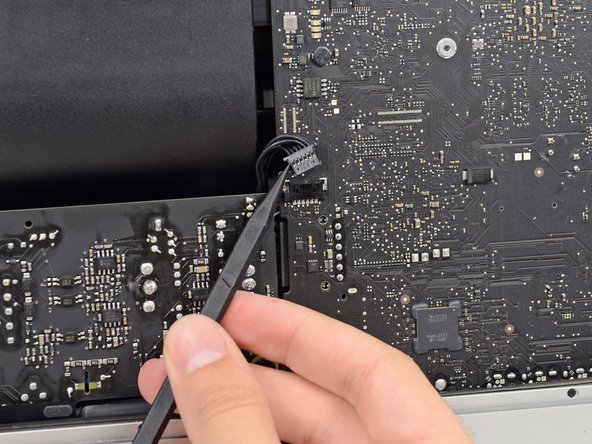
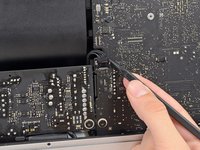
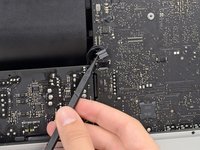
Use a spudger to loosen the right speaker cable's connector from its socket on the logic board.
-
Pull the connector downwards to remove it from its socket.
I highly recommend doing steps 27 and 28 first and then pull out the cable. It will give you more room on the right side of the cable to work with making this step that much easier.
The two corners of the connector are latches that need to be pushed toward the center of the connector to release. This is easily done with the pointed end of the spudger. Once the two corner latches are released, the connector comes apart easily.
-
-
-
Remove the following screws securing the hard drive bracket to the rear enclosure:
-
Two 21 mm T10 Torx screws from the left-hand hard drive bracket.
-
One 9 mm T10 Torx screw.
-
One 27 mm T10 Torx screw.
Pay attention to this photo and where the fan is. It is 180° from where the previous step shows it is oriented to you.
-
-
-
Use the tip of a spudger to push each side of the power button cable connector and gently "walk" it out of its socket.
-
-
-
Remove the two 7.2 mm T10 screws securing the power supply to the rear enclosure.
What if these are too tight to remove?
Hi Rafael,
Be very careful not to strip these screws. Use a new, accurate T10 bit and a driver with good leverage to loosen these screws.
They are T9 in my iMac
They were T8 screws on my machine.
-
-
-
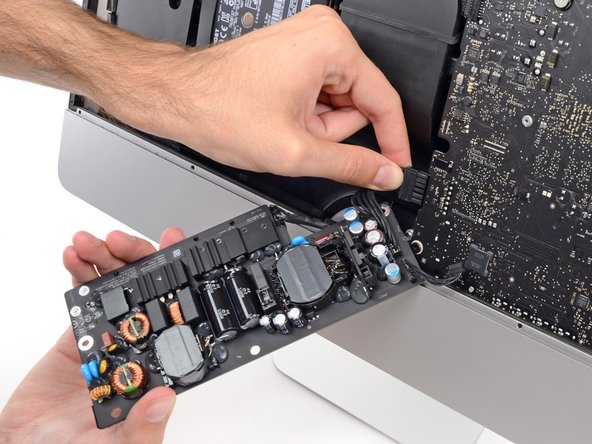
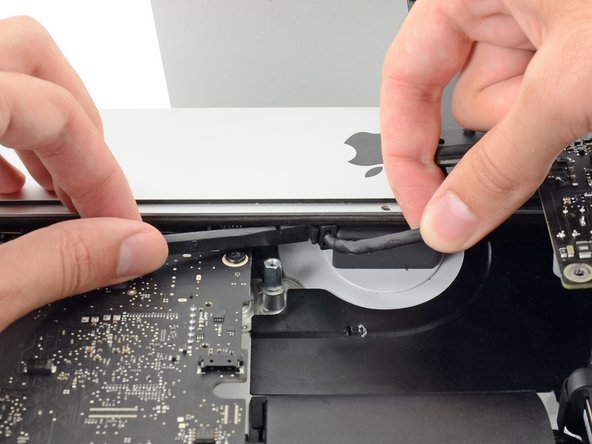
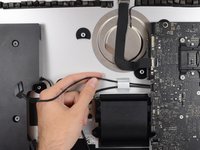
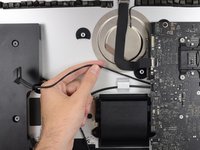
Squeeze the DC power cable connector tab and pull it straight out of its socket on the back of the logic board.
what happens if you damage the power socket on the logic board?
The tab is on the bottom of the connector. You can’t see it. Squeeze the bottom of the connector close to the cables to properly release tab. Pulling straight out is important.
This step might be easier if you do the next step first (step 41) and then come back to this step.
I loosened the logic board attached to the power supply board. I then could easily remove the 2 power cables.
In the photo above, the index finger is shown squeezing the connector locking tab. Do this while using the flat end of a spudger to release the latch. Once the connector is moved about an eigth of an inch the latch is released and the connector should come out freely.
-
-
-
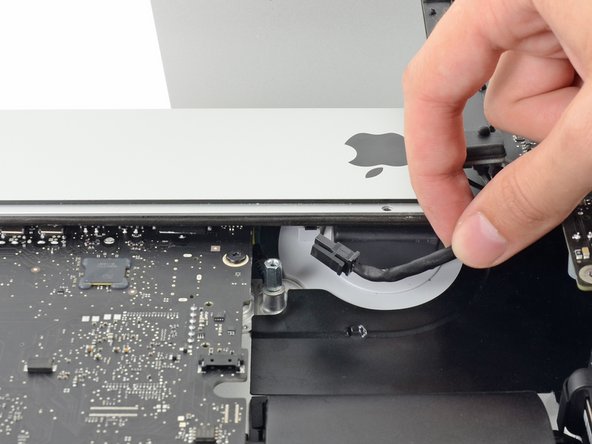
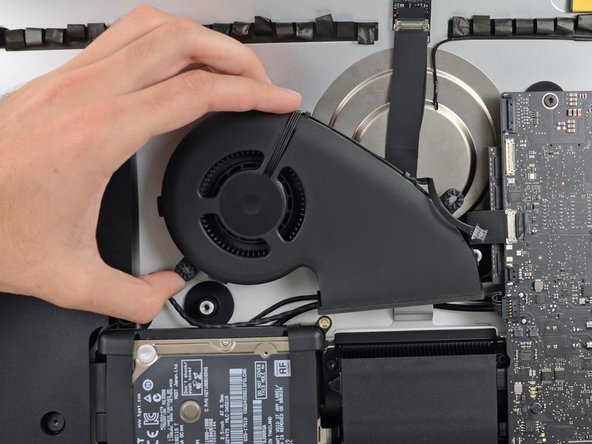
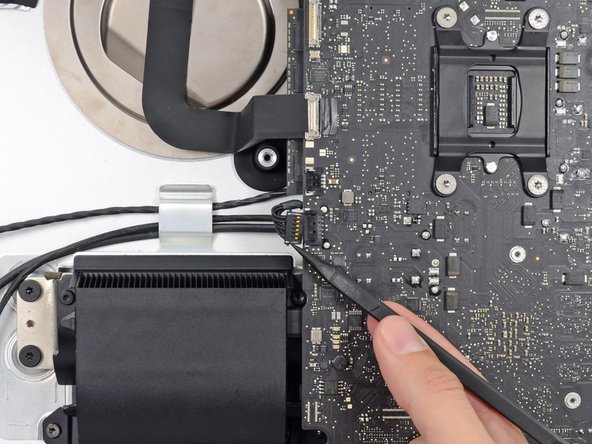
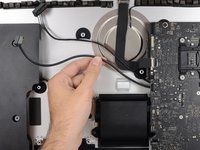
Gently pull the fan cable connector straight away from its socket on the logic board.
I don’t like to pull on wires as shown in the photos above. I used my index fingernail on the top corner of the connector and the pointed end of a spudger on the bottom corner to pull the connector straight out of its socket.
-
-
-
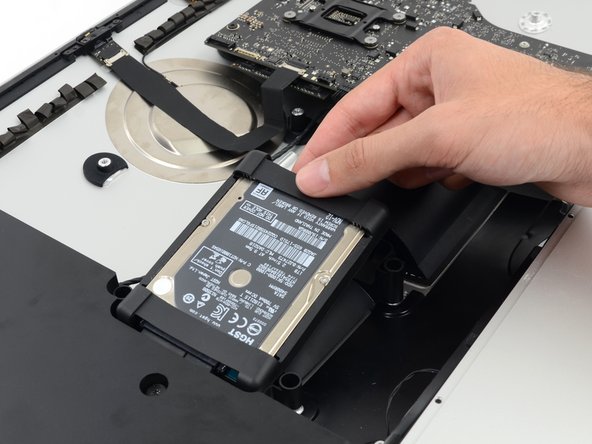
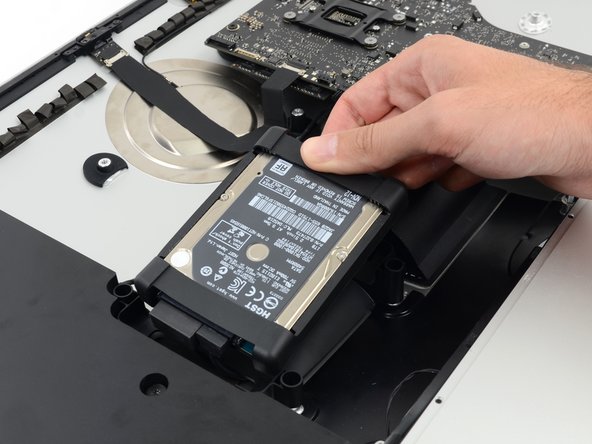
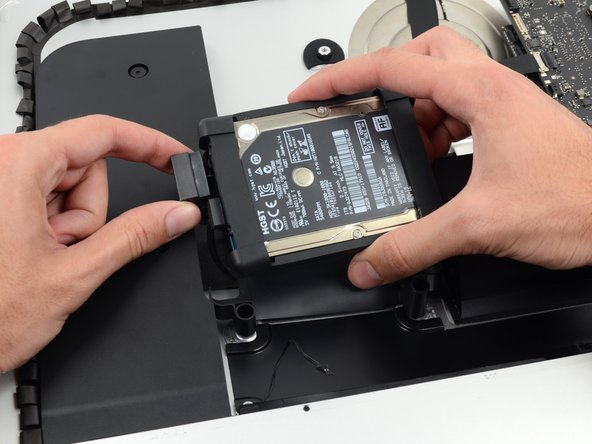
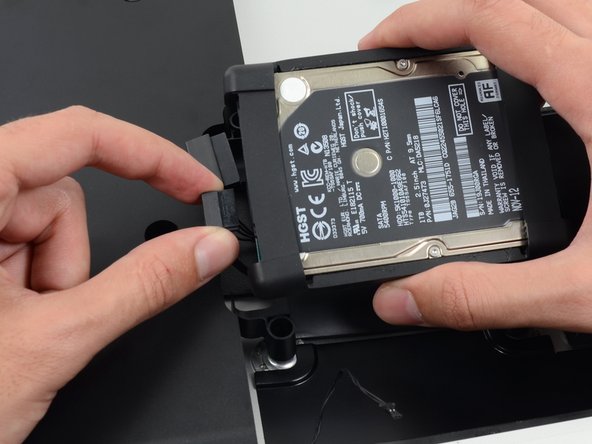
Lift the hard drive from the edge nearest the logic board and pull it slightly out of its recess.
-
-
-
Remove the single 7.2 mm T10 screw securing the hard drive tray to the rear enclosure.
-
-
-
Remove the hard drive tray from the rear enclosure.
Cables are routed through the backside of the tray. Take a picture for reassembly.
-
-
-
Push on each side of the left speaker cable connector with the tip of a spudger and gently "walk" it out of its socket.
As noted in the right speaker cable section, the two corners of the connector are latches that need to be pushed toward the center of the connector to release. This is easily done with the pointed end of the spudger. Once the two corner latches are released, the connector comes apart easily.
-
-
-
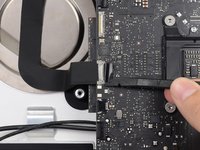
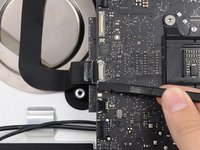
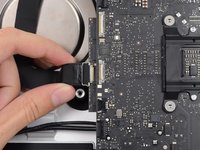
Use the flat edge of a spudger to flip up the metal retaining bracket on the iSight camera cable connector.
-
Pull the iSight camera cable straight out of its socket on the logic board.
-
-
-
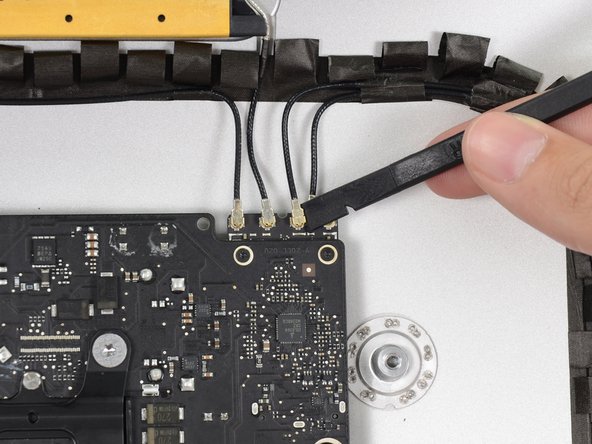
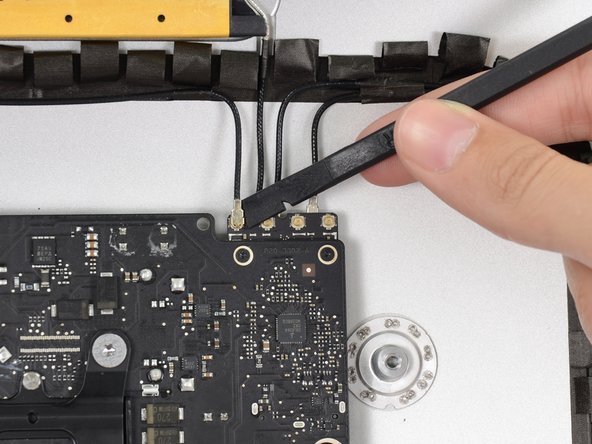
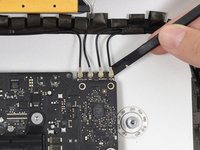
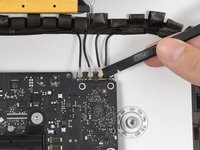
Use the flat edge of a spudger to disconnect each of the four antenna connectors from the AirPort/Bluetooth card.
I broke off one of the antenna connectors when I took off the antenna wires, but the new 802.11ac card is working:) I seems the way to take off the wires is lifting it up from the wire side. In hindsight I just wasn´t careful enough.
how do I check a working logic board
If you have a pair of angled tweezers, they work well for grabbing under the connector so that you aren’t pulling on the wire. The head of the T10 screwdriver works well for pressing them back on.
iMac 2017 EMC 3069 this has the antenna brackets with two T5
-
-
-
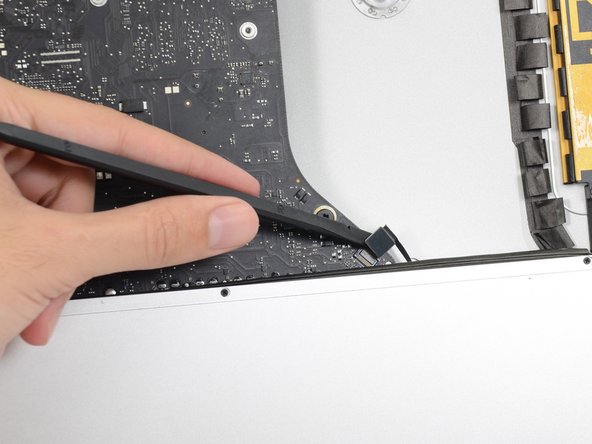
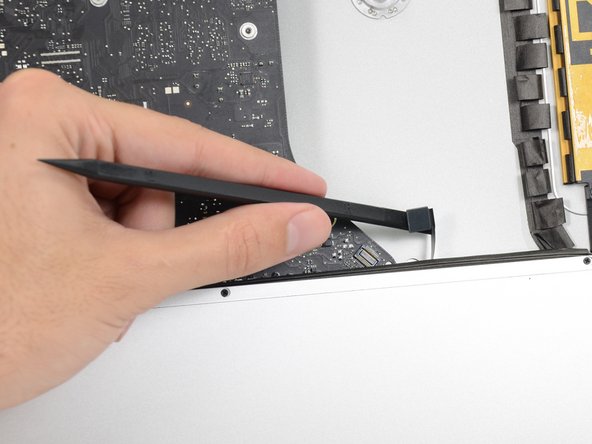
Use the flat edge of a spudger to pry the headphone jack cable connector from its socket on the logic board.
Unlike the rest of the connectors on the logic board, this one lifts up away from the board rather than to the side. That “Push the cable slightly to the right.” notation is after the connector is free.
-
-
-
Remove the following screws securing the exhaust duct to the rear enclosure:
-
Two 6.3 mm T8 screws
-
Two 4.7 mm T8 screws
Weirdly, these screws didn’t work with my T8 driver. Not with T6 or T10.
Every other screw (to this point) has been fine. Hmm.
??? The T8 worked fine for me. Not sure what the difference would be.
Fare molta attenzione alla vite in fondo a destra, è facile (soprattutto se la punta del proprio cacciavite non è magnetizzata) che la vite si perda sotto alla Logic board. Se la punta del cacciavite non è magnetizzata consiglio o di utilizzare un magnete esterno o di utilizzare delle pinze mentre si svita la vite in modo da non incorrere in questo problema.
-
-
-
Remove the four 7.2 mm T10 screws securing the logic board to the rear enclosure.
When reinstalling the logic board, install four screws loose. Insert thumb drives into the back in all slots to ensure alignment. Once aligned, then tighten screws.
On some models there is a tiny microphone cable connector, just above the lower left logic board screw. Remove by carefully pulling straight down. There is also a piece of insulating plastic w/adhesive on top of the screw which can be pulled off prior to removal. Save and reuse with the same screw on installation.
-
-
-
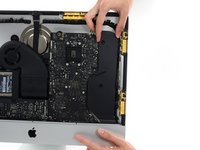
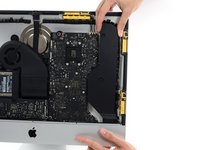
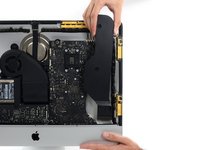
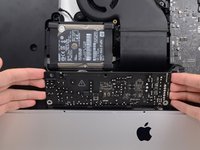
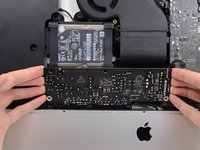
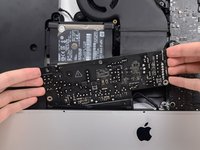
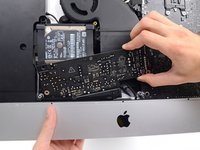
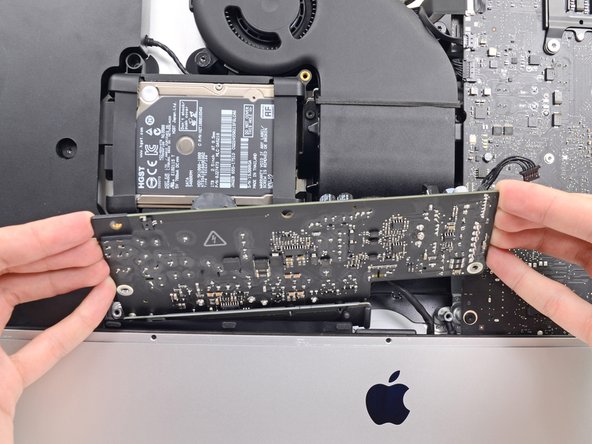
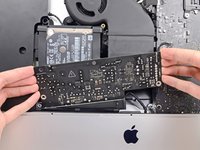
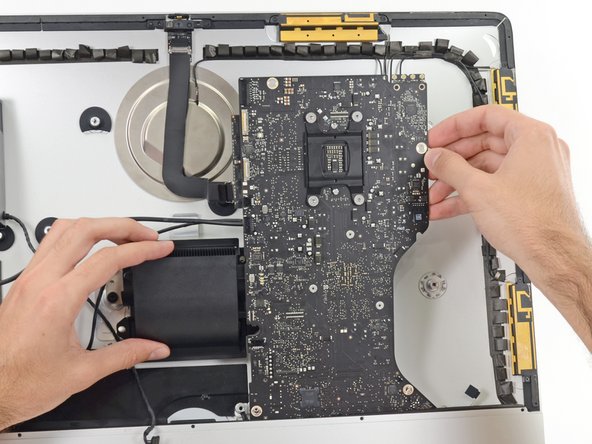
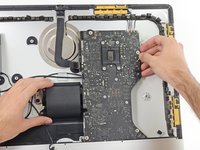
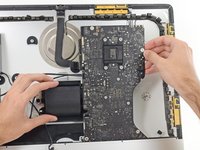
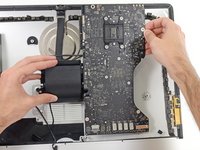
Tilt the top of the logic board away from the rear enclosure.
-
Lift the logic board straight up and out of the iMac.
When inserting the logic board back, pay attention of the position of the I/O connectors. When it is back in place, put a USB / Thunderbolt cable into the connectors to ensure the perfect alignment.
This is fantastic advice. I used a combination of USB and display port plugs to ensure proper alignment and help keep the logic board steady while i screwed it back in. Thank you!!
kazoodac -
ive gotten this far and i still have one question, i’m replacing my HDD With A SSD should i also remove the original Blade drive ? and run exclusively off the ssd, ? i wasn’t 100 on whether or not i was getting the fusion set up so i’m not in possession of a upgraded blade, so i though this was a good question id hadn’t seen asked.
-
-
-
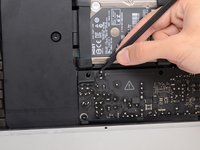
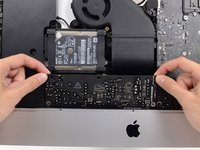
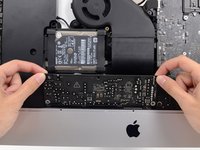
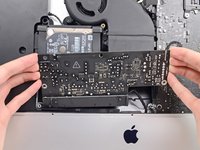
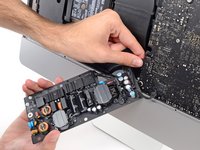
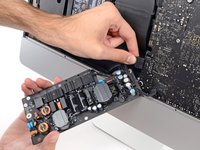
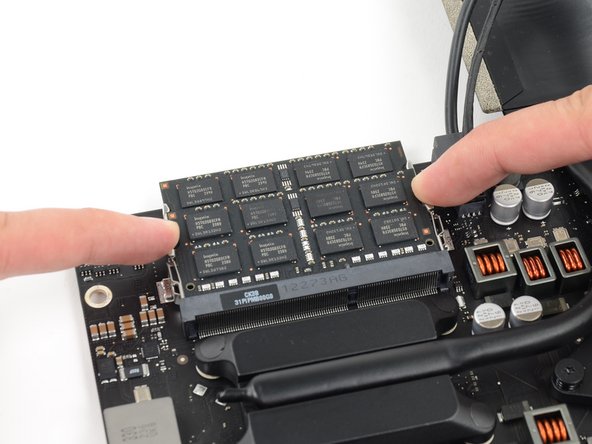
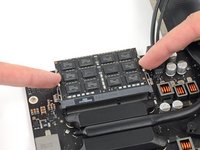
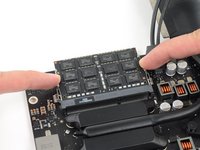
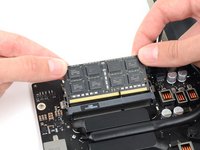
Release the tabs on each side of the RAM module by simultaneously pushing each tab away.
-
Grab the top left and right corners of the RAM module and carefully pull it straight out of its socket.
This would also be a good time to replace the CMOS 2032 coin battery while you have access.
Update on logic board alignment - use two USB plugs one in each end of the connectors through the back to be sure alignment is good before tightening screws.
hi, I changed RAM and HDD to SSD , but after (Avengers) reassemble ,I get 3 bips and it doesnt boot, yeah!
I'm gonna be troubleshooting , and that means doing it all over again.
Having done other models repair, I find the interior design super messy, as parts have barely enough place to get in and out. (power supply, Logic board)
What order of trial would you recommend ? RAM (that would be the longest) ? connections?
Thanks
-


To reassemble your device, follow these instructions in reverse and use our Adhesive Strips Guide to reattach the display glass.
To reassemble your device, follow these instructions in reverse and use our Adhesive Strips Guide to reattach the display glass.
Cancelar: não concluí este guia.
141 outras pessoas executaram este guia.


18 comentários
I used the iMac Opening Tool just as shown starting in step 2 to separate the tape. DISASTER! The screen cracked! I used the tool slowly and carefully and despite this, the screen cracked. I should have simply used a guitar pick. That said, I decided to see if I could upgrade the 8GB RAM to 16GB RAM WITHOUT removing the logic board all performing all of these steps. I found I could simply remove the FAN assembly as shown in step 43. This makes enough room to reach behind the logic board and unclip the 2 memory modules. I installed 2 8GB modules (1600MHz DDR3L SO-DIMM PC12800 204 Pin) without much trouble. I used a plastic stick to reach behind the logic board and unclip the existing memory modules, then carefully inserted the new ones and clipped them into place. This is much easier than performing all of these steps.
Hi There, I am interested in going in and upgrading my RAM to 16. Did you do all the steps ups to 43? Remove the power supply? Did you remove the hard Drive? I take it you had to do step 53 as well and remove the iSight camera cable first? I may try it your way, I hate to have to unplug 98% of everything to do this. Thanks for the tip.
I added extra RAM by following step 1-23, then skipping to do just 41-43 and then reach the RAM from the back of the logic board. It was difficult to reach but possible.
Mikael -
Wow, thanks. That was much easier. I unscrewed the corner Torx screw holding the mobo down for just a touch of flex.
Used a couple of screw drivers to pull the tabs out
It helps if you have done a bunch of memory upgrades so you have a feel for how to get the chips in.
cyadmark -
Thanks for the tips here.I used a guitar pick and some credit cards as suggested, and to worked fine. I also followed Mikael’s suggestion :
“I added extra RAM by following step 1-23, then skipping to do just 41-43 and then reach the RAM from the back of the logic board. It was difficult to reach but possible.”
which worked fine for me too. Thanks for the suggestion. Have ordered tools & adhesive from ifixit anyway cos the site & its community showed me how to do it all anyway
The step by step instruction worked pretty good! Thank you very much for this help!
One interesting issue I had was that the battery on the logic board was empty.. the result of this was that the iMac hadn´t booted any more. An alarm signal with 1 beep every 5 seconds came. At the beginning I thought that the RAM wasn´t installed correctly, but the cause was a low PR2032 battery.. all in all I am really happy that it works now with a new battery. I wish you also much success!
Upgraded to 16Gb using this guide - perfect result. Wasn't able to get the iMac opening tool so made do with guitar picks and plastic cards to separate the screen from the chassis, totally adequate. Patience and attention to detail is essential to complete the job. Many thanks for the comprehensive guide and tool recommendations. Recommended.
Upgraded my iMac 21.5 inches Late 2012 to 16 GB using the iFixit Pizza-Roller. It worked fine. Absolutely important not to pinch the tool.
The only time I had to modify the procedure was at step 42. I could not reach the power connectors so I left them in place. After removing the logic board I could disconnect the power supply without a problem. Reinstalling the power supply is a little tricky as well.
I had left the iMac overnight with the power cable disconnected and the display loosened, just slightly opened. This asserted me that there was no charge left and that the glued stripes had time to dry up. The residue stripes were easy to remove.
Finally it saved me a lot of money as I got the RAM-modules for just 143€ - compared to an online offer of 380 US$ from Apple for the whole procedure, including the RAM modules.
Thank you iFixit for that great video.
Thank you, iMacs are not obvious. Would have been a real pain having to find out by myself.
Great guide, kudos! Upgraded an old iMac 21.5 late-2012: RAM (from original 2x4GB to 2x8GB by Crucial) and hard drive (from 1TB 5400rpm to 1TB SSD MX500 by Crucial).Catalina sings!
I strongly suggest getting the strip-kit with the iFixit pizza-roller as it was extremely effective on cutting trough the adhesive (I had started with another tool , like a newerTech from iSesamo, and it partially tore the film on the back of the display). The pizza-roller may seem flimsy but it is thin enough to get in between the screen and the chassis groove: just be gentle and follow the directions in the guide; it will last for other repairs.
I used the service wedge and found it very helpful to hold the iMac in position; although IMHO it’s a little pricey accessory (a piece of high-density foam) and wish ifixit could review their markup on that. You can do without: the purpose of the wedge is clear just looking at the guide, if you can find effective alternative ways to reach the same result you will save some bucks.
Model Name: iMac
Model Identifier: iMac16,2
Processor Name: Quad-Core Intel Core i7
Processor Speed: 3.3 GHz
Number of Processors: 1
Total Number of Cores: 4
L2 Cache (per Core): 256 KB
L3 Cache: 6 MB
Hyper-Threading Technology: Enabled
Memory: 16 GB
Boot ROM Version: 233.0.0.0.0
SMC Version (system): 2.32f21
Serial Number (system): D25TG0ZVGG7F
Hardware UUID: 2704D41C-922D-50D7-A2D1-5409F7EADC5A
I can’t upgrade ram my version not
I would like change ram form 16 to 32 g
and hardware to SSD 1 tr
and video card to AMD OR RANDOM but
But I don't know what works for my device??!
Bonjour à tous, j'ai suivi ce tutoriel pour une modification du hdd et ram. Tout c'est bien passé (merci au rédacteur) seulement il est plus pratique dans la partie basse de l'iMac de retirer la barre de grips fixée (5 petites vis cruciformes) pour dégager et repositionner l'alimentation et l'enceinte droite. En espérant que cela serve à d'autres.
After working on two computers with this guide may I add a few things:
- remove the old adhesive on both sides (screen and casing) just after opening. You can already put the new strips on the casing but keep the adhesive covers on the other side
- I would always remove the logic board instead of working with screwdrivers behind. The risk of damaging something would be too high for me and it doesn’t take ages and isn’t too hard
- if you have no magnetic screwdriver and a hard time getting the screws for the air duct in, use a tad of hand cream or similar on the screwdriver. That should make the screw stick if you have slow movements
- always try the computer before you glue the screen back on after finishing! The first time I did glue everything together just to learn that the RAM was faulty. And it is much harder to re-open new adhesive strips.
All in all a superb guide, making a complicated repair quite simple.
Not necessary to remove the Power Supply board (that is disconnect it completely.Being careful to not scratch the aluminum (tape it) you can go through to the logic board replacement. while I am doing the ram upgrade, also doing a SSD for the 3.5’… would like to know what size the blade SSD i s it seems that an upgrade to this would then give me 2 hard drives (not going to do the fusion again, an SSD is faster. Thanks! Don’t forget to use canned air and blow out the dirt in the fan, fins and the bottom air vents across the case.
Have to thank the poster who said the RAM can be added by removing fan. Much easier than the rest of the steps. Take your time , turn the iMac sideways so you can see what you are doing. Much easier than what I dreaded.
Nice tutorial, well explained as always !
I wonder if anyone had tried 16GBx2 of DDR3 and not DDR3L (or if 8GBx2 in DDR3 and not DDR3L would work assuming you also change the CPU to a I7-3770 ?
Cheers
I have (21.5 inch, mid 2017, 2.3 ghz) base model same as this but not 4k. How much max ram can I install in my iMac??
Narendra Verma - Responder
This guide contains many extra steps for what should be a straight forward, simple parts replacement without disturbing more than the display, left hand speaker and removal of 4 logic board screws for play. Nothing else except for the left hand speaker wire & iSight cable from logic board, the lower support bracket and loosening the speaker so as to move it around a bit.
For the ram, I bent a pair of cheap tweezers long ago supplied with these replacement kits to the perfect angle for holding, locating and inserting the ram into the slots under the logic bd after moving each retainer w/spudger and popping out the old. Pay attention to the orientation of the ram when removing/inserting the ram! An automotive mirror is handy along with a small flashlight for closeups. Once the ram is aligned properly substitute your fingers for the tweezers, ease it into the slot, push up & engage! Reinstall screws and all else. I have done this job successfully this way countless times. For a tweezers pic contact me!
Ross Elkins - Responder
Additionally, if a blade is present, I install the OSx system on the blade and everything else, apps and home folders on the new SSD. You get the very fast boot off of the blade and the full ssd for all else!
Ross Elkins - Responder