Introdução
If your Lenovo T420 has keyboard or thermal issues, this guide will show you how to replace the keyboard and gain partial fan access.
Guide notes
- If you are removing the keyboard for fan access, being too close or using too much air can damage the fan. If the damage is particularly severe the system will give you a fan error and shut off to protect the processor (and dGPU, if equipped). If the system says Fan error when it is rebooted, the fan is damaged and will need to be replaced in order for the system to boot. Use caution if you suspect the fan is failing prior to cleaning the heatsink. The fan in the author's system was rattling before cleaning and it has not happened since. If the fan ends up getting damaged, this is NOT your fault; all you did was reveal a hidden failure.
- If you are replacing the keyboard, check the Lenovo HMM to determine what keyboard you need. This can also be found on the back of your old keyboard as well. I am not referencing a part because every country uses a different FRU.
- While this is not a hard repair, you may wish to sort your screws. Multiple screw types are used.
- Watch the ground on the chassis by the RAM door, especially if it has been serviced before. This can get in the way or come loose from the chassis. If this happens push it back into place. It will eventually come out again, so the only cure is to replace the lower chassis.
O que você precisa
-
Ferramenta utilizada neste passo:Essential Electronics Toolkit$29.95
-
If you are interested in a refurbished kit stock levels change frequently but can be found here.
 Pergunte ao FixBot
-
-
-
Unlock the latch locking the battery in the laptop.
-
NOTE: To remove the battery, the tab must be held in to avoid having the lock reinitiate inside the laptop.
-
-
-
-
After unlocking the battery, remove the battery from the reverse way it is installed to remove it from the laptop.
-
-
-
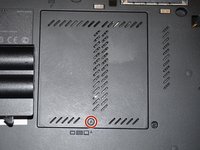
Loosen the screw in red (Phillips #2). This screw stays captive in the bottom RAM door cover, and does not need to be removed.
-
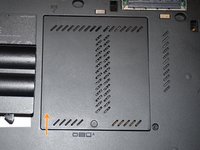
Pull the cover up with a fingernail or a nonmarring pry tool.
-
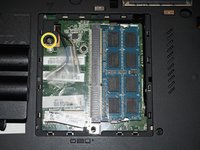
Remove the screw retaining the keyboard.
-
-
-
Open the laptop.
-
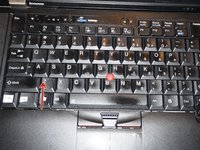
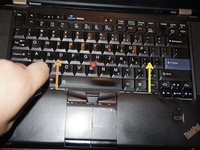
To remove the keyboard, release the keyboard hooks using a plastic pry tool.
-
Once the keyboard is loose, remove it from the chassis.
-
-
-
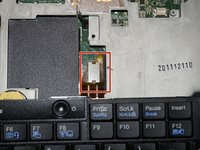
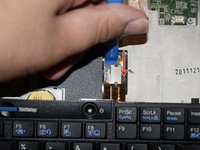
Disconnect the keyboard from the motherboard. Use a plastic pry tool for this step.
-


Cancelar: não concluí este guia.
9 outras pessoas executaram este guia.

3Comentários do guia
Excellent guide, I like the detail specifying screw bits
replacing the key went good but can’t get in because of password. need help
I love how simply disassemby are in those old ThinkPads <3