Ir para o conteúdo principal

Steam Deck OLED Screen Replacement

O que você precisa

  1. Steam Deck OLED Screen Replacement, Prepare your Steam Deck for disassembly: passo 1, imagem 1 %32 Steam Deck OLED Screen Replacement, Prepare your Steam Deck for disassembly: passo 1, imagem 2 %32
    • Turn on your Steam Deck and allow the battery to discharge below 25% before starting your repairs, as a charged lithium-ion polymer battery can be dangerous if accidentally punctured.

    • As an extra precaution, Valve recommends putting your Steam Deck into battery storage mode within the BIOS before starting any internal repairs. Read how to do that here.

    • Power down your Steam Deck and unplug any cables.

  2. Steam Deck OLED Screen Replacement, Mark your opening picks: passo 2, imagem 1 %32 Steam Deck OLED Screen Replacement, Mark your opening picks: passo 2, imagem 2 %32 Steam Deck OLED Screen Replacement, Mark your opening picks: passo 2, imagem 3 %32
    • If inserted too far, an opening pick can damage your device. Follow this step to mark your pick and prevent damage.

    • Measure 3 mm from the tip and mark the opening pick with a permanent marker.

    • You can also mark the other corners of the pick with different measurements.

    • Alternatively, tape a coin to a pick 3 mm from the tip.

  3. Steam Deck OLED Screen Replacement, Heat the top edge screen adhesive: passo 3, imagem 1 %32
    • Prepare an iOpener and apply it to the top edge of the screen for one minute.

    • You may also use a hair dryer or heat gun, but be careful not to overheat the device, as the screen, battery, and plastic frame are all susceptible to heat damage.

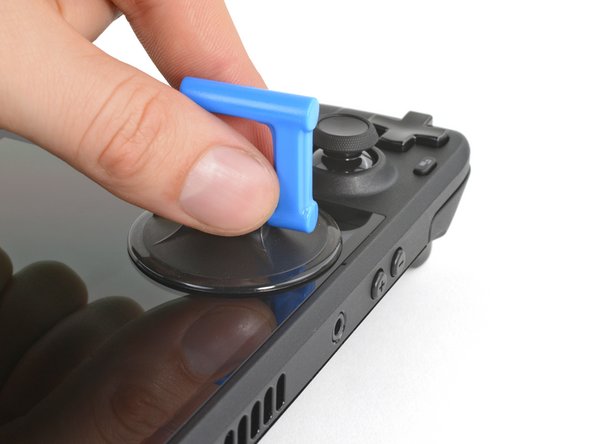
  4. Steam Deck OLED Screen Replacement, Apply a suction handle: passo 4, imagem 1 %32 Steam Deck OLED Screen Replacement, Apply a suction handle: passo 4, imagem 2 %32
    • Apply a suction handle to the top left corner of the screen, as close to the top edge as possible.

    • If your display is badly cracked, cover it with a layer of clear packing tape to help the suction cup adhere. Alternatively, you can pull using very strong tape instead of a suction cup. If all else fails, try supergluing the suction cup to the broken screen.

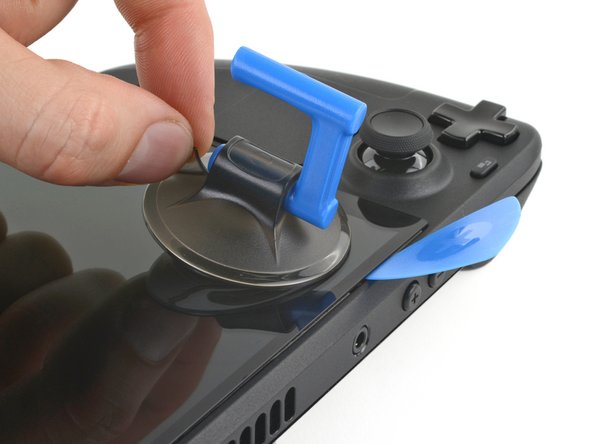
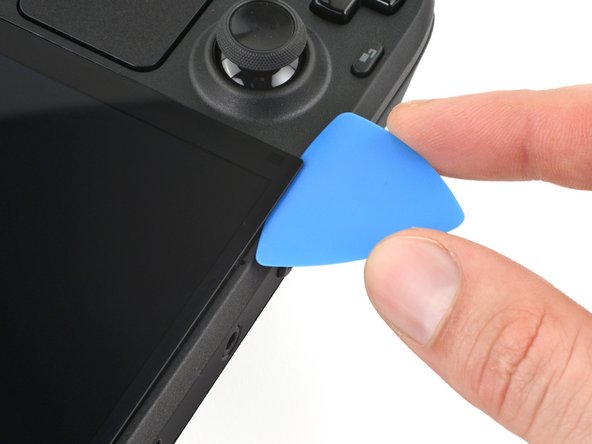
  5. Steam Deck OLED Screen Replacement, Insert an opening pick: passo 5, imagem 1 %32 Steam Deck OLED Screen Replacement, Insert an opening pick: passo 5, imagem 2 %32 Steam Deck OLED Screen Replacement, Insert an opening pick: passo 5, imagem 3 %32
    • Pull up on the suction handle with a strong, steady force to create a gap between the screen and the frame.

    • Insert the tip of an opening pick into the gap.

    • Don't insert your pick deeper than 3 mm (~1/8 of an inch) to avoid damaging the screen panel, ambient light sensor, or sensor cable.

  6. Steam Deck OLED Screen Replacement, Remove the suction handle: passo 6, imagem 1 %32 Steam Deck OLED Screen Replacement, Remove the suction handle: passo 6, imagem 2 %32
    • Pull up on the nub on the back of the suction handle to remove it from the screen.

  7. Steam Deck OLED Screen Replacement, Screen information: passo 7, imagem 1 %32 Steam Deck OLED Screen Replacement, Screen information: passo 7, imagem 2 %32 Steam Deck OLED Screen Replacement, Screen information: passo 7, imagem 3 %32
    • As you slice through the adhesive securing the screen, note the following:

    • Along the top and bottom edges, don't insert your pick deeper than 3 mm (~1/8 of an inch) to avoid damaging the sensors, sensors cable, or screen cable.

    • Along the left and right edges, don't insert your pick deeper than 5 mm (~1/5 of an inch) to avoid damaging the screen panel.

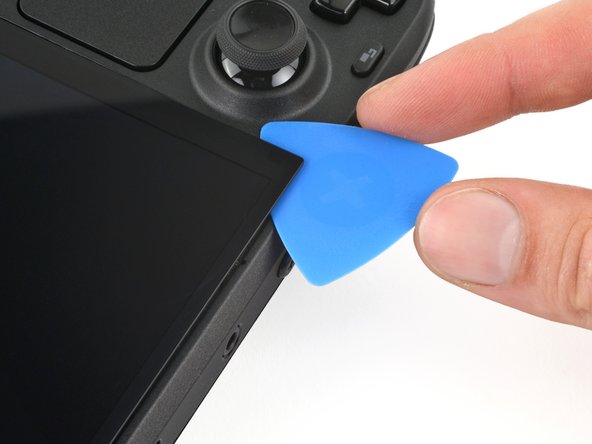
  8. Steam Deck OLED Screen Replacement, Reposition the pick: passo 8, imagem 1 %32 Steam Deck OLED Screen Replacement, Reposition the pick: passo 8, imagem 2 %32 Steam Deck OLED Screen Replacement, Reposition the pick: passo 8, imagem 3 %32
    • Rotate the pick so its flat edge is between the screen and frame.

    • Leave this pick inserted to prevent the adhesive from resealing.

  9. Steam Deck OLED Screen Replacement, Separate the top edge adhesive: passo 9, imagem 1 %32 Steam Deck OLED Screen Replacement, Separate the top edge adhesive: passo 9, imagem 2 %32 Steam Deck OLED Screen Replacement, Separate the top edge adhesive: passo 9, imagem 3 %32
    • Don't insert your pick deeper than 3 mm (~1/8 of an inch) along the top edge.

    • Insert another pick in the top left corner.

    • Slide the pick toward the power button to separate the adhesive securing the top edge of the screen.

  10. Steam Deck OLED Screen Replacement, Reposition the pick: passo 10, imagem 1 %32 Steam Deck OLED Screen Replacement, Reposition the pick: passo 10, imagem 2 %32 Steam Deck OLED Screen Replacement, Reposition the pick: passo 10, imagem 3 %32
    • Rotate the pick so its flat edge is between the screen and frame.

    • Leave this pick inserted to prevent the adhesive from resealing.

  11. Steam Deck OLED Screen Replacement, Heat the right edge screen adhesive: passo 11, imagem 1 %32
    • Heat the right edge of the screen for one minute.

  12. Steam Deck OLED Screen Replacement, Separate the right edge adhesive: passo 12, imagem 1 %32 Steam Deck OLED Screen Replacement, Separate the right edge adhesive: passo 12, imagem 2 %32
    • Don't insert your pick deeper than 5 mm (~1/5 of an inch) along the right edge.

    • Insert another pick just below the right thumbstick.

    • Slide the pick to the bottom right corner to separate the right edge adhesive.

    • Leave the pick inserted to prevent the adhesive from resealing.

  13. Steam Deck OLED Screen Replacement, Heat the bottom edge adhesive: passo 13, imagem 1 %32
    • Heat the bottom edge of the screen for one minute.

  14. Steam Deck OLED Screen Replacement, Separate the bottom edge adhesive: passo 14, imagem 1 %32 Steam Deck OLED Screen Replacement, Separate the bottom edge adhesive: passo 14, imagem 2 %32 Steam Deck OLED Screen Replacement, Separate the bottom edge adhesive: passo 14, imagem 3 %32
    • Don't insert your pick deeper than 3 mm (~1/8 of an inch) along the bottom edge.

    • Insert another pick in bottom right corner along the bottom edge.

    • Slide the pick to the bottom left corner to separate the bottom edge adhesive.

    • Leave the pick inserted to prevent the adhesive from resealing.

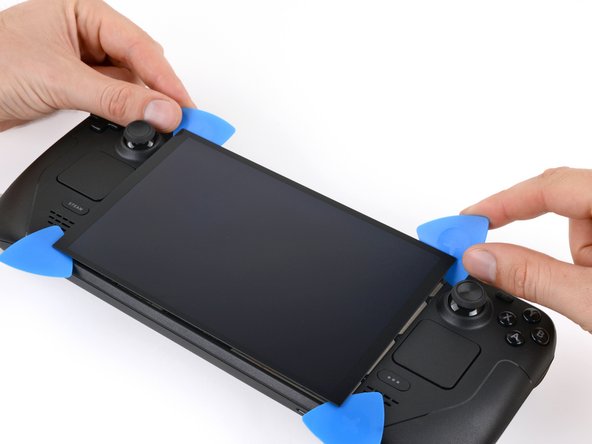
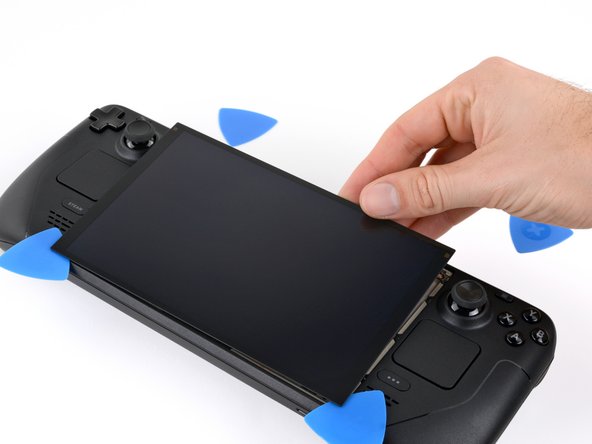
  15. Steam Deck OLED Screen Replacement, Lift the top edge of the screen: passo 15, imagem 1 %32 Steam Deck OLED Screen Replacement, Lift the top edge of the screen: passo 15, imagem 2 %32 Steam Deck OLED Screen Replacement, Lift the top edge of the screen: passo 15, imagem 3 %32
    • Grip the two picks along the top edge.

    • Pry up to lift the top edge of the screen away from the frame until you can grab it.

    • If the screen feels stuck, go back around the perimeter and check for missed sections of adhesive. If you're using a hair dryer, use it to lightly heat the stuck sections of adhesive.

  16. Steam Deck OLED Screen Replacement, Flip the screen over: passo 16, imagem 1 %32 Steam Deck OLED Screen Replacement, Flip the screen over: passo 16, imagem 2 %32 Steam Deck OLED Screen Replacement, Flip the screen over: passo 16, imagem 3 %32
    • Be gentle with the screen, as straining its cable may damage the socket on the motherboard.

    • Flip the screen over the bottom edge of the frame.

    • Prop up the screen with a small box or book roughly 2.5 cm (~1 inch) thick.

    • If you don't have a box or book nearby, hold the screen in this position for the next two steps.

  17. Steam Deck OLED Screen Replacement, Unlatch the screen connector: passo 17, imagem 1 %32 Steam Deck OLED Screen Replacement, Unlatch the screen connector: passo 17, imagem 2 %32
    • Use the point of a spudger or a clean fingernail to flip up the locking flap on the outside edge of the screen ZIF connector.

    • Don't touch any of the small surface-mounted components around the connector.

  18. Steam Deck OLED Screen Replacement, Disconnect the screen: passo 18, imagem 1 %32 Steam Deck OLED Screen Replacement, Disconnect the screen: passo 18, imagem 2 %32
    Ferramenta utilizada nesse passo:
    Tweezers
    $4.99
    Comprar
    • Use tweezers or your fingers to grip the screen cable pull tab and slide the cable straight out of its socket to disconnect it.

  19. Steam Deck OLED Screen Replacement, Remove the screen: passo 19, imagem 1 %32
Conclusão

To reapply adhesive and install your screen, follow this guide.

Take your e-waste to an R2 or e-Stewards certified recycler.

Repair didn’t go as planned? Try some basic troubleshooting, or ask our Steam Deck OLED answers community for help.

Uma outra pessoa concluiu este guia.

Clay Eickemeyer

Membro desde: 09/19/22

67.001 Reputação

Autoria de 453 guias

Equipe

iFixit Membro de iFixit

Staff

Membros da 136

Autoria de 17.303 guias

0 comentários

Adicione um comentário

Exibir estatísticas:

Últimas 24 horas: 27

Últimos 7 dias: 296

Últimos 30 dias: 1,227

Duração total: 4,130