Esta versão pode conter edições incorretas. Mude para o último instantâneo verificado.
O que você precisa
-
Este passo não foi traduzido. Ajude a traduzi-lo
-
Insert a SIM card opening tool, SIM eject bit, or a paperclip into the small hole on the top edge of the phone.
-
Press in the opening tool to eject the tray.
-
Remove the SIM/SD card combo tray from the phone.
-
-
Este passo não foi traduzido. Ajude a traduzi-lo
-
Heat an iOpener and apply it to a long edge of the phone for about two minutes.
-
-
Este passo não foi traduzido. Ajude a traduzi-lo
-
Once the back panel is warm to the touch, apply a suction cup as close to the heated edge of the phone as you can while avoiding the curved edge.
-
Lift on the suction cup and insert an opening pick under the rear glass.
-
-
Este passo não foi traduzido. Ajude a traduzi-lo
-
Once you have the pick firmly inserted into the glass, reheat and reapply the iOpener to soften the adhesive.
-
-
Este passo não foi traduzido. Ajude a traduzi-lo
-
Slide the opening pick up along the side of the phone, separating the adhesive.
-
Leave the pick in place and grab a second pick as you proceed to the next step. Leaving the pick inserted can help prevent the glue you just separated from re-adhering.
-
-
Este passo não foi traduzido. Ajude a traduzi-lo
-
Repeat the previous heating and cutting procedure for the remaining three sides of the phone.
-
Leave an opening pick on each side as you continue to the next to prevent the adhesive from resealing.
-
-
Este passo não foi traduzido. Ajude a traduzi-lo
-
Use tweezers to peel away any remaining adhesive from the phone's chassis. Then clean the adhesion areas with high concentration isopropyl alcohol (at least 90%) and a lint-free cloth to prep the surface for the new adhesive.
-
Peel the adhesive backing off of the new rear glass, carefully line up one edge of the glass against the phone chassis, and firmly press the glass onto the phone.
-
-
Este passo não foi traduzido. Ajude a traduzi-lo
-
Use the small notch on the lower left of the upper antenna to pry it out of the phone.
-
Remove the upper antenna.
-
-
Este passo não foi traduzido. Ajude a traduzi-lo
-
Lift and remove the wireless charging coil from the phone.
-
-
-
Este passo não foi traduzido. Ajude a traduzi-lo
-
Use the flat end of a spudger to disconnect the battery connector.
-
-
Este passo não foi traduzido. Ajude a traduzi-lo
-
Use the flat end of a spudger to disconnect the display cable.
-
-
Este passo não foi traduzido. Ajude a traduzi-lo
-
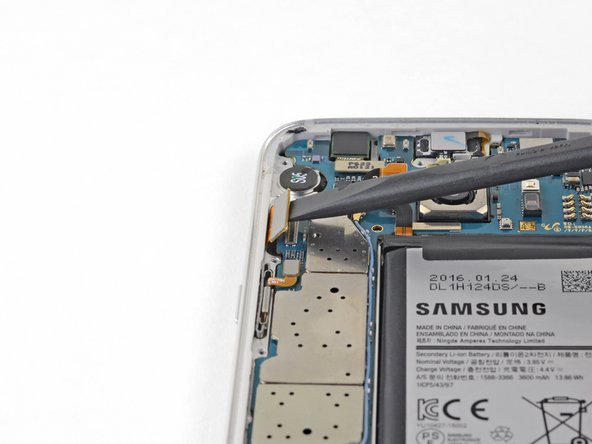
Use the pointed end of a spudger to disconnect the power button cable.
-
-
Este passo não foi traduzido. Ajude a traduzi-lo
-
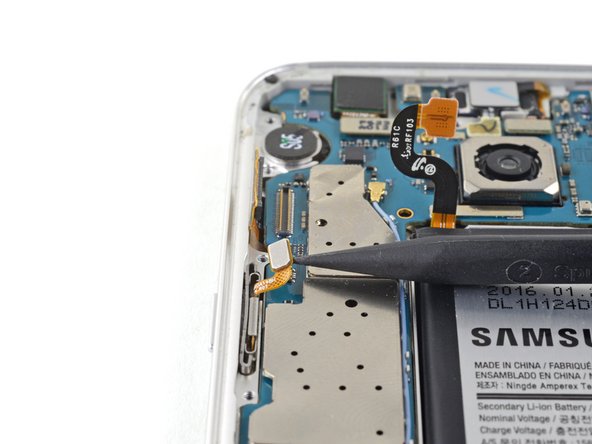
Use the pointed end of a spudger to disconnect the red and white antenna cables.
-
-
Este passo não foi traduzido. Ajude a traduzi-lo
-
Use the flat end of a spudger to disconnect the home button connector.
-
-
Este passo não foi traduzido. Ajude a traduzi-lo
-
Use the pointed end of a spudger to disconnect the front-facing sensory array cables.
-
-
Este passo não foi traduzido. Ajude a traduzi-lo
-
Use a pointed end of a spudger to disconnect the volume button cable.
-
-
Este passo não foi traduzido. Ajude a traduzi-lo
-
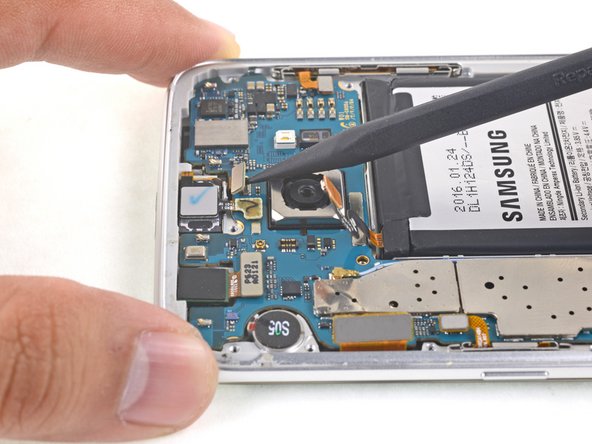
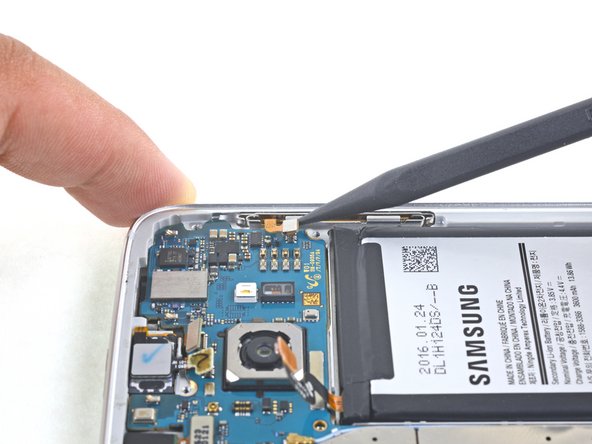
Use the flat end of a spudger to gently pry the motherboard up.
-
Grip the edges of the motherboard and hinge it up slowly, using the spudger to push cables out of its path.
-
-
Este passo não foi traduzido. Ajude a traduzi-lo
-
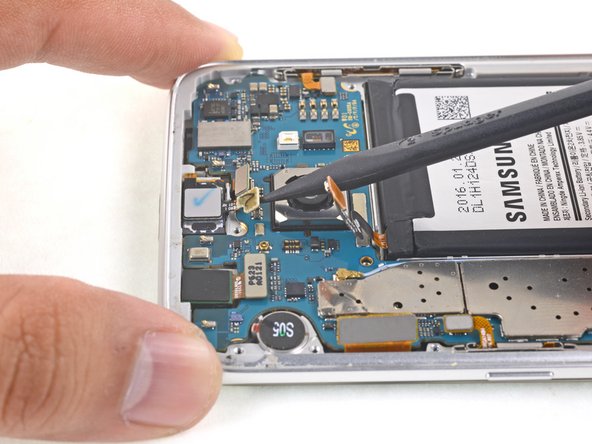
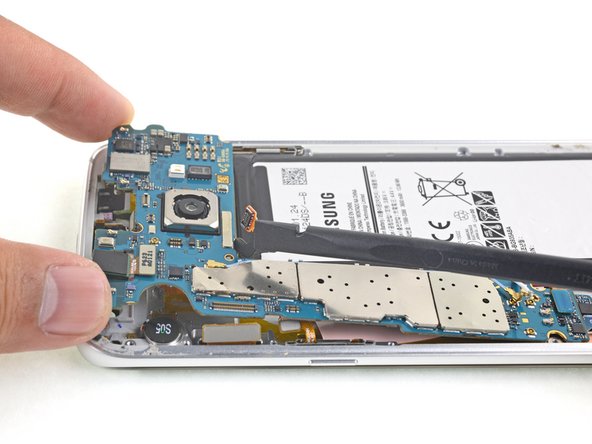
Use the flat end of the spudger to disconnect the daughterboard ribbon cable from the underside of the motherboard.
-
Remove the motherboard.
-
-
Este passo não foi traduzido. Ajude a traduzi-lo
-
Heat an iOpener and apply it to top edge of the display.
-
-
Este passo não foi traduzido. Ajude a traduzi-lo
-
The display assembly edges are secured by strips of very strong foam adhesive.
-
Strong double-sided tape covers the entire copper surface.
-
The capacitive buttons are adhered to the display and are very easy to tear. They must be reused for the repair.
-
-
Este passo não foi traduzido. Ajude a traduzi-lo
-
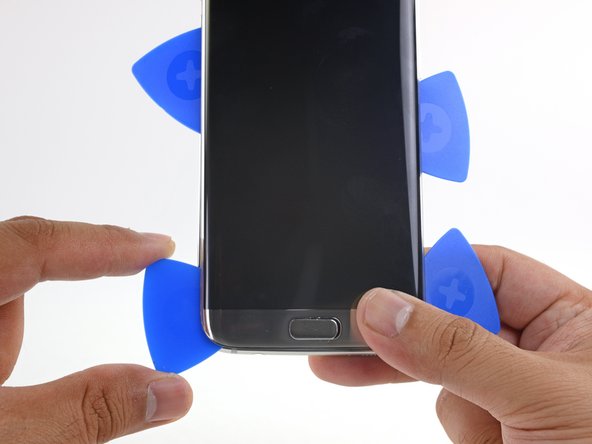
Once the edge is warm, apply a suction cup as close to the top edge as possible without overlapping the speaker grill.
-
Lift on the suction cup to create a small gap underneath the top edge of the display.
-
Insert an opening pick into the gap. Take care not to insert it more than 0.25 inches in.
-
-
Este passo não foi traduzido. Ajude a traduzi-lo
-
With the opening pick in place, apply a heated iOpener to the top edge once more in order to soften the adhesive.
-
-
Este passo não foi traduzido. Ajude a traduzi-lo
-
Slide the opening pick along the top edge of the display taking care not to push deeper than 0.25 inches.
-
Leave the pick on the top edge the prevent the adhesive from resealing.
-
-
Este passo não foi traduzido. Ajude a traduzi-lo
-
Repeat the previous heating and cutting procedure for the long edges of the phone. Do not cut the bottom edge yet.
-
Leave an opening pick on each edge as you continue to the next to prevent the adhesive from resealing.
-
-
Este passo não foi traduzido. Ajude a traduzi-lo
-
Insert an opening pick in the bottom right corner.
-
Push the pick in slowly. Try to leverage the pick's cutting edge upward so that it slides against the back of the display.
-
Once the pick has cut through the adhesive in the right corner, leave it in place to prevent the adhesive from resealing.
-
-
Este passo não foi traduzido. Ajude a traduzi-lo
-
Insert an opening pick in the bottom left corner.
-
Push the pick in slowly. Try to leverage the pick's cutting edge upward so that it slides against the back of the display.
-
Once the pick has cut through the adhesive in the left corner, leave it in place to prevent the adhesive from resealing.
-
-
Este passo não foi traduzido. Ajude a traduzi-lo
-
Use the opening picks to slice through adhesive around the home button and any other remaining adhesive.
-
Open the phone slightly, starting at the edge opposite the display cable.
-
-
Este passo não foi traduzido. Ajude a traduzi-lo
-
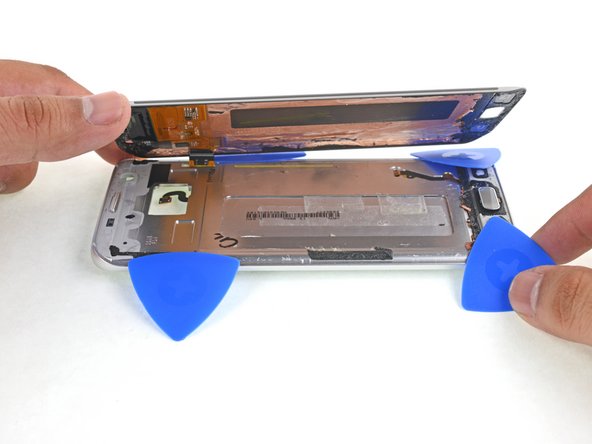
Lift the display assembly away from the midframe, carefully threading the display cable through the hole in the midframe.
-
Remove the display assembly.
-
-
Este passo não foi traduzido. Ajude a traduzi-lo
-
After removing all traces of glue and glass from the frame, clean the adhesion areas with 90% (or higher) isopropyl alcohol and a lint-free cloth or coffee filter. Swipe in one direction only, not back and forth.
-


Cancelar: não concluí este guia.
127 outras pessoas executaram este guia.


38 comentários
Excellent guide, really enjoyed following the instructions. A job well done :-D
There is no fool proof method. Apply liberal amounts of heat. Be careful when slicing near the corners. If your back has micro-fractures already, chances are your back will crack along the fracture.
No matter how long I try to heat the back panel with an iOpener, I cannot seem to get the glue warm enough… Any advice on how to better unglue this thing?
Hi Jérémie,
The glue is pretty strong on this phone. You can try using a heat gun if you have one, or a hair dryer. You can also try the bottom edge instead of the long edge- sometimes the glue is not as strong there.