Ir para o conteúdo principal

Samsung Galaxy S7 Battery Replacement

O que você precisa

Vídeo de Apresentação

  1. Samsung Galaxy S7 Battery Replacement, Rear Glass: passo 1, imagem 1 %32
    • Opening your phone will compromise its waterproof seals. Have replacement adhesive ready before you proceed, or take care to avoid liquid exposure if you reassemble your phone without replacing the adhesive.

    • Apply a heated iOpener to a long edge of the phone for about two minutes.

    • You may need to reheat and reapply the iOpener several times to get the phone warm enough. Follow the iOpener instructions to avoid overheating.

    • A hair dryer, heat gun, or hot plate may also be used, but be careful not to overheat the phone—the OLED display and internal battery are both susceptible to heat damage.

  2. Samsung Galaxy S7 Battery Replacement: passo 2, imagem 1 %32 Samsung Galaxy S7 Battery Replacement: passo 2, imagem 2 %32 Samsung Galaxy S7 Battery Replacement: passo 2, imagem 3 %32
    • When the back panel is warm to the touch, apply a suction cup as close to the heated edge of the phone as you can while avoiding the curved edge.

    • The suction cup will not make a good seal on the curved portion of the glass.

    • If the phone's back cover is cracked, the suction cup may not stick. Try lifting it with strong tape, or superglue the suction cup in place and allow it to cure so you can proceed.

    • Lift on the suction cup and insert an opening pick under the rear glass.

    • The rear glass can break if you use too much force or attempt to pry with metal tools.

    • Due to the curved glass, you will be pushing up, rather than inserting parallel to the plane of the phone.

    • If you have trouble, apply more heat to further soften the adhesive, and try again. The adhesive cools very fast, so you may need to heat it repeatedly.

    • Optionally, once the pick is inserted, you can add a few drops of isopropyl alcohol into the gap to help weaken the adhesive in the following steps.

  3. Samsung Galaxy S7 Battery Replacement: passo 3, imagem 1 %32
    • Once you have the pick firmly inserted into the glass, reheat and reapply the iOpener to soften the adhesive.

  4. Samsung Galaxy S7 Battery Replacement: passo 4, imagem 1 %32 Samsung Galaxy S7 Battery Replacement: passo 4, imagem 2 %32
    • Slide the opening pick down along the side of the phone, separating the adhesive.

    • Go slowly so that the tip doesn't slip out of the seam. If sliding becomes difficult, reheat and reapply the iOpener.

    • Leave the pick in place and grab a second pick as you proceed to the next step. Leaving the pick inserted can help prevent the glue you just separated from re-adhering.

  5. Samsung Galaxy S7 Battery Replacement: passo 5, imagem 1 %32 Samsung Galaxy S7 Battery Replacement: passo 5, imagem 2 %32 Samsung Galaxy S7 Battery Replacement: passo 5, imagem 3 %32
    • Repeat the previous heating and cutting procedure for the remaining three sides of the phone.

    • Leave an opening pick in each edge of the phone as you continue to the next to prevent the adhesive from resealing.

  6. Samsung Galaxy S7 Battery Replacement: passo 6, imagem 1 %32 Samsung Galaxy S7 Battery Replacement: passo 6, imagem 2 %32
    • Lift the glass and remove it from the phone.

  7. Samsung Galaxy S7 Battery Replacement: passo 7, imagem 1 %32 Samsung Galaxy S7 Battery Replacement: passo 7, imagem 2 %32
    • To reinstall the back cover with a custom-cut adhesive strip, follow this guide.

    • If you're cleaning the midframe surface with isopropyl alcohol, be careful not to get any alcohol on the wireless charging coil. The coil coating will break down if it contacts alcohol.

    • Be sure to turn on your phone and test your repair before installing new adhesive and resealing the phone.

    • If desired, you may reinstall the back cover without replacing the adhesive. Remove any large chunks of adhesive that might prevent the back cover from sitting down flush. After installation, heat the back cover and apply pressure to secure it. It won't be waterproof, but the glue is usually more than strong enough to hold.

  8. Samsung Galaxy S7 Battery Replacement, Loudspeaker Assembly: passo 8, imagem 1 %32
    • Remove the twelve 3.5 mm Phillips screws.

  9. Samsung Galaxy S7 Battery Replacement: passo 9, imagem 1 %32 Samsung Galaxy S7 Battery Replacement: passo 9, imagem 2 %32 Samsung Galaxy S7 Battery Replacement: passo 9, imagem 3 %32
    • Insert the tip of a spudger into the small notch on the left side of the antenna assembly, and pry the assembly up and out of the frame.

    • Remove the antenna assembly.

  10. Samsung Galaxy S7 Battery Replacement: passo 10, imagem 1 %32 Samsung Galaxy S7 Battery Replacement: passo 10, imagem 2 %32
    • Use the flat end of a spudger to lift the charging coil assembly out of the phone.

  11. Samsung Galaxy S7 Battery Replacement: passo 11, imagem 1 %32 Samsung Galaxy S7 Battery Replacement: passo 11, imagem 2 %32
    • Use the flat end of a spudger to pry up and remove the loudspeaker assembly.

  12. Samsung Galaxy S7 Battery Replacement, Battery Connector: passo 12, imagem 1 %32 Samsung Galaxy S7 Battery Replacement, Battery Connector: passo 12, imagem 2 %32
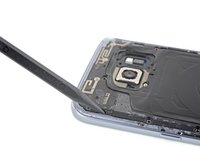
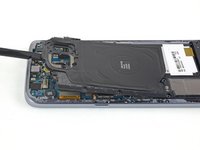
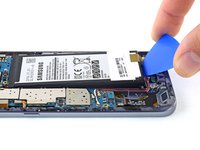
    • Use the flat end of a spudger to disconnect the battery connector.
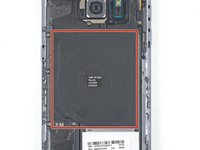
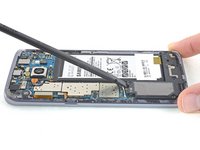
  13. Samsung Galaxy S7 Battery Replacement, Battery: passo 13, imagem 1 %32
    • Apply some high concentration (>90%) isopropyl alcohol under each corner of the battery and allow it to penetrate for several minutes to help weaken the adhesive.

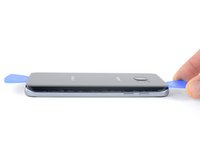
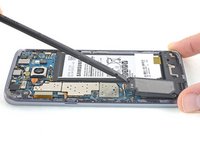
    • Alternatively, prepare an iOpener and apply it directly to the battery.

    • Apply the iOpener for at least a minute to soften the battery adhesive.

  14. Samsung Galaxy S7 Battery Replacement: passo 14, imagem 1 %32 Samsung Galaxy S7 Battery Replacement: passo 14, imagem 2 %32
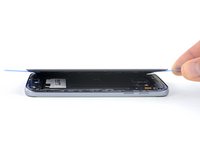
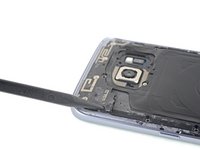
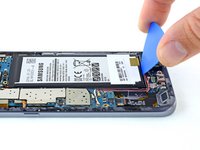
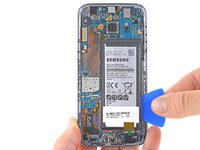
    • Use an opening pick to pry up the battery from the bottom.

    • Do not use excessive force or pry at the battery with metal tools.

    • You will be prying against the case directly above the daughterboard and antenna cables. Pry carefully to avoid damaging either of these components.

    • You may need to reheat and reapply the iOpener repeatedly to further soften the adhesive. The adhesive is tough and it may take a few tries to get the pick started under the battery.

    • Try your best not to deform the battery during this process. Soft-shell lithium-ion batteries can leak dangerous chemicals, catch fire, or even explode if damaged.

  15. Samsung Galaxy S7 Battery Replacement: passo 15, imagem 1 %32 Samsung Galaxy S7 Battery Replacement: passo 15, imagem 2 %32 Samsung Galaxy S7 Battery Replacement: passo 15, imagem 3 %32
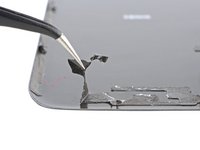
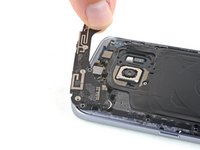
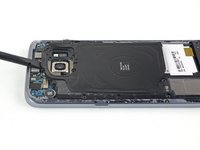
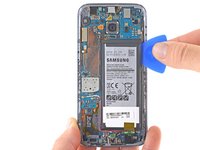
    • Slide an opening pick up the side of the battery to break apart any remaining adhesive.

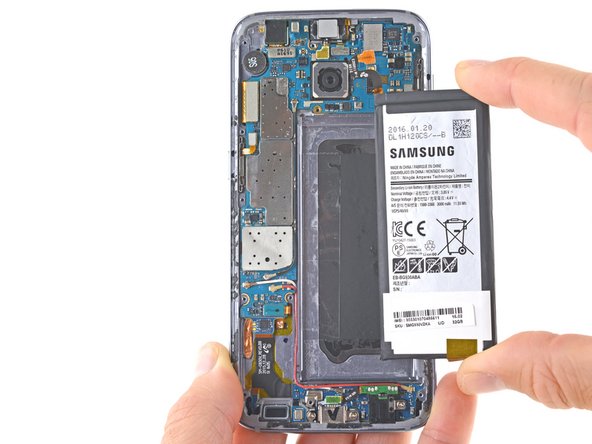
    • Lift the battery out of the case.

    • Do not reuse the battery after it has been removed, as doing so is a potential safety hazard. Replace it with a new battery.

    • To install a new battery and adhesive, follow this guide.

Conclusão

To reassemble your device, apply adhesive to the back glass and follow these instructions in reverse order.

After completing this guide, calibrate your newly-installed battery.

254 outras pessoas executaram este guia.

Sam Goldheart

Membro desde: 10/18/12

465.299 Reputação

Autoria de 538 guias

Equipe

iFixit Membro de iFixit

Staff

Membros da 136

Autoria de 16.578 guias

57 comentários

After this is it still waterproof?

Edgar Rodríguez García - Responder

In theory, if you applied the replacement adhesive 100% correctly, it will retain its water resistant properties. However, I would never deliberately expose any device to water, as you can never be completely sure that all the seals are perfectly intact.

Jacob Pratt -

That is actually covered in the video. Did you actually watch it? If water resistant is important to you then what you would do is purchase new gasket material so that after you have opened up the phone and removed all the existing gasket you would apply the new gasket and then finish up and re-seal your phone. As to how water resistant it is after re-sealing the phone all depends on how careful you are and how exact your work is.

marketing major -

Sooooooooo why exactly did Samsung make it impossible to open the phone?

Dan Laemmerhirt - Responder

Because screws are unsightly :P… and repairing your old phone makes you not want to buy a new phone.

Jacob Pratt -

Adicione um comentário

Exibir estatísticas:

Últimas 24 horas: 42

Últimos 7 dias: 393

Últimos 30 dias: 1,643

Duração total: 433,585