Esta versão pode conter edições incorretas. Mude para o último instantâneo verificado.
O que você precisa
-
-
Desligue o seu iPhone antes de começar a desmontagem.
-
Remova os dois parafusos pentalobe de 3,9 mm de ambos os lados do conector Lightning.
-
-
-
Se o vidro de seu visor estiver rachado, mantenha as rachaduras sob controle e evite danos corporais durante o reparo cobrindo o vidro com fita adesiva.
-
Coloque tiras sobrepostas de fita adesiva transparente sobre a tela do iPhone até que toda a superfície fique coberta.
-
-
-
Independente da ferramenta que você use, você precisa puxar para cima com segurança o visor inteiro.
-
Se o vidro começar a se separar do plástico, como mostra a primeira figura, passe uma ferramenta de abertura de plástico por entre a moldura de plástico e o corpo metálico do fone para liberar os clipes metálicos da estrutura.
-
-
-
Puxe a pega azul para trás para destravar os braços do Anti-Clamp.
-
Deslize os braços pela borda esquerda ou direita do seu iPhone.
-
Posicione as ventosas próximo à borda inferior do iPhone, diretamente acima do botão home - uma pela dianteira e a outra pela traseira.
-
Aperte as ventosas uma contra a outra para aplicar sucção na área desejada.
-
-
-
Se você não tiver um Anti-Clamp, use uma ventosa de sucção simples para erguer o painel dianteiro:
-
Pressione uma ventosa de sucção sobre a tela, imediatamente acima do botão home.
-
-
-
Enquanto segura o iPhone com uma mão, puxe para cima pela ventosa de sucção para separar ligeiramente a extremidade com o botão home do painel dianteiro da estrutura traseira.
-
Com uma ferramenta de abertura de plástico, comece a fazer alavanca para baixo nas bordas da estrutura traseira, afastando-as do conjunto do painel dianteiro, enquanto puxa para cima com a ventosa de sucção.
-
-
-
Abra o fone apenas o bastante para revelar o suporte metálico que cobre o cabo do botão home.
-
Somente o conjunto do botão home original poderá permitir o uso da funcionalidade da identificação por toque. Se você romper o cabo, a instalação de um novo botão home apenas restaurará as funções normais do botão home, mas não os recursos de identificação por toque.
-
Com a ponta pontiaguda de uma espátula, empurre o suporte, liberando-o e remova-o com uma pinça.
-
-
-
-
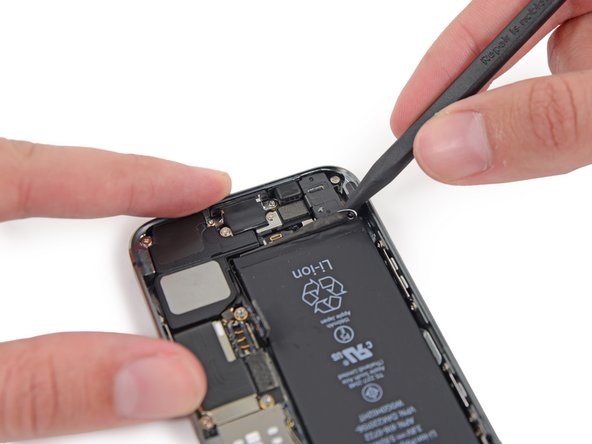
Use a ponta pontiaguda de uma espátula para fazer alavanca e separar o conector do cabo do botão home de seu soquete.
-
-
-
Uma vez solto o conector, puxe a ponta com o botão home do conjunto, afastando-o da estrutura traseira, usando a parte superior do fone como uma dobradiça.
-
Abra o visor a um ângulo de 90º e apoie-o em algo para deixá-lo de pé enquanto você executa os trabalhos no fone.
-
Engate uma fita de borracha para manter o visor no lugar com segurança enquanto executa os trabalhos. Isso evita que os cabos do visor sejam submetidos a uma tensão imprópria.
-
-
Este passo não foi traduzido. Ajude a traduzi-lo
-
Run the tip of a spudger between the battery and the headphone jack to unfold the battery adhesive tab.
-
-
Este passo não foi traduzido. Ajude a traduzi-lo
-
Pull the battery adhesive tab away from the phone.
-
Cut the black battery adhesive tab between the two white adhesive strips, separating them.
-
-
Este passo não foi traduzido. Ajude a traduzi-lo
-
Slowly pull one of the battery adhesive strips away from the battery, toward the bottom of the iPhone. Pull the white portion of the strip when possible, the black tab may fall off.
-
Pull steadily, maintaining constant tension on the strip as it slips out from between the battery and the rear case. For best results, pull the strip at a 60º angle or less.
-
Be careful not to snag it on any of the other internal iPhone components.
-
-
Este passo não foi traduzido. Ajude a traduzi-lo
-
Repeat for the second strip.
-
If you removed both strips successfully, skip the next step.
-
Wait about one minute for the alcohol solution to weaken the adhesive. Use the flat end of a spudger to gently lift the battery.
-
-
Este passo não foi traduzido. Ajude a traduzi-lo
-
Thread the floss or string behind the upper battery corners, bring the ends together, wrap them around a folded cloth, and pull evenly.
-
-
Este passo não foi traduzido. Ajude a traduzi-lo
-
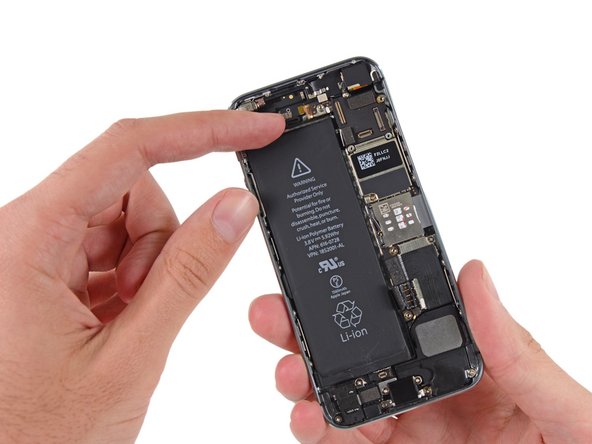
Pull the battery out of the rear case.
-
Adhere the battery, disconnect it, and continue reassembling your device.
-


Cancelar: não concluí este guia.
2077 outras pessoas executaram este guia.


224 comentários
If the adhesive breaks without releasing, and you need to use a spudger or similiar to remove the battery, be VERY careful not to damage the Upper Component Cable.
This should've been included in the repair guide, as the adhesive tabs seemed designed to break. My phone is now in worse shape than it was and I'm facing what seems to be an extremely difficult repair, which I will probably not undertake.
A couple of additional pointers might be helpful...
1: I did not get all of the adhesive out from under the battery. As a result, I bent the heck out of the battery & ordered a new one, not trusting a bent one. A mention of whether it would be safe would be nice.
2: I found it impossible to get the clip from step 7 back on. I left it off. If there's a trick to this, it would be nice to have that extra instruction with the reassembly instructions, rather than "reverse order."
3: While this is always a good idea, in the process of trying to get something done, it's easy to forget that you need to remember which screws go back where, especially the 3 different-sized screws from step 10. What an evil thing Apple did there! I laid the bracket upside-down on a piece of tape, and oriented the screws around it so I'd know where they go back upon reassembly a week later. A suggestion of doing something like this might be helpful.
4: I love my iFixit toolkits! But including a pair of tweezers in it would be helpful.
2. I found this piece "snapped" into place reasonably easily, but I was careful to get the orientation correct & make sure the edge against the battery pull was "in under" (for lack of a better term) and not trying to squash the battery pull down.
Hope this helps.
Dave -
1. With regards to the bent battery, you were right to replace it. LiOn Batteries are very dangerous when the cells inside are compromised. Even though the good ones have circuit breakers built in to prevent fire, they can fail. A LiOn battery - even a small one in an iPhone - can go "high order" and cause a fire that is next to impossible to extinguish. A brief search on YouTube for Lithium Ion Battery fires will quickly convince even the skeptical.
2. The way I keep track of screws... Get a complete set of all colors of Sharpie pens. When disassembling, I touch the screw head with the same color pen as the circle in the iFixit Guide. Then when reassembling I know where the green, orange, red, & blue screws go!
Pete H -