Introdução
This repair guide was authored by the iFixit staff and hasn’t been endorsed by Google. Learn more about our repair guides here.
Use this guide to remove your Pixel’s screen—either to replace it, or get it out of the way so you can make repairs to other components.
Warning: Because of the strong adhesive securing the display, minimal clearance for inserting your tools, and high heat required, there's a good chance of accidentally damaging the display during this procedure. If you're replacing a broken display, then you don't have to worry—but for all other repairs, work very carefully, and be prepared to replace the display afterward.
O que você precisa
-
-
Turn off the device.
-
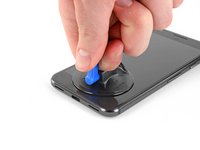
Prepare an iOpener to heat the edges of the display and soften the adhesive underneath. Alternatively, you may use a heat gun or a hair dryer.
 Pergunte ao FixBot
-
-
-
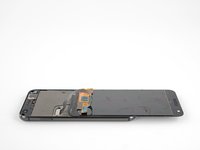
For reference, the back of the display panel is shown at left. Note the narrow clearance between the side of the display unit and the OLED panel. (The bezels indicate this spacing on the front.)
-
-
Ferramenta utilizada neste passo:Suction Handle$2.95
-
Use a suction handle to pull up on the display and create a slight gap between the display and the phone's chassis.
-
You may need to apply more heat if this doesn't come up. Don't be impatient, this will take time. Once you can gently insert a tool in the gap, move on to the next step.
-
-
-
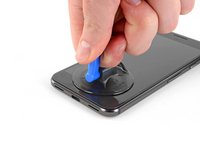
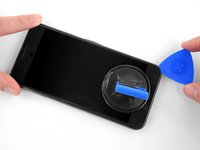
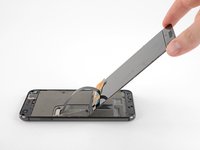
Insert an opening pick or a playing card into the gap between the chassis and the display assembly.
-
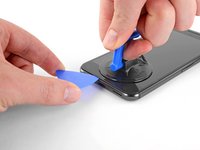
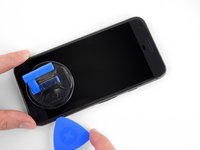
Begin to slide the opening pick around the edge of the display, cutting through the adhesive that secures it.
-
-
-
-
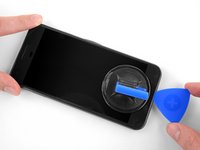
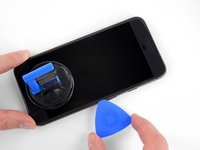
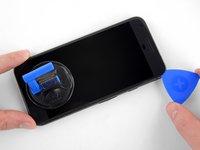
Continue carefully separating the adhesive around the rest of the device.
-
-
Ferramenta utilizada neste passo:iFixit Opening Picks (Set of 6)$4.95
-
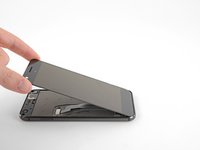
With the adhesive cut, slowly lift the display up from the top (the side with the speaker-grille cutout), carefully flip it over vertically toward the bottom of the device, and rest it on its face, as shown.
-
-
Ferramenta utilizada neste passo:Magnetic Project Mat$19.95
-
Use a T5 Torx driver to remove the two black 3.5 mm T5 screws securing the display cable connector bracket.
-
-
Ferramenta utilizada neste passo:Tweezers$4.99
-
Use tweezers to remove the bracket that holds the display connector in place.
-
This is just a piece of metal, and should come up very easily. (The cable is removed in the next step.)
-
-
-
Use a spudger to pry up the display cable connector, freeing the display.
-


Compare your new replacement part to the original part—you may need to transfer remaining components or remove adhesive backings from the new part before installing.
To reassemble your device, follow the above steps in reverse order.
Take your e-waste to an R2 or e-Stewards certified recycler.
Repair didn’t go as planned? Check out our Answers community for troubleshooting help.
Cancelar: não concluí este guia.
59 outras pessoas executaram este guia.

19Comentários do guia
hey, is the replacement screen meant to have adhesive on it already?
No, it does not. Just replaced my screen. The residual adhesive is good enough to keep it on temporarily, but I’m going to a local repair shop to grab something better.
It’s also best to, if you haven’t already, look at your replacement part to get a feeling of how far you can go with the guitar pick or pry tool. It’s around 1/16th of an inch on the sides so you don’t want to go too far in and damage the display
Honestly, this felt easier than what the guide advised, definitely invest in the ifixit opening kit, made this a breeze. Hardest part was just scrapping the leftover residue off after removing the cracked screen.
You can use any adhesive for screen replacements for this screen. I personally used a double-sided tape 2 mm wide. The replacement screen does not usually come with the fabric covering the phone speakers, so make sure to transfer it from your old screen.