Introdução
Use este guia para substituir o seu conjunto do painel dianteiro. O painel dianteiro não é separável do LCD. Um novo conjunto do painel dianteiro fornecerá um novo painel de vidro frontal, digitizer e LCD.
Se você os comprou separadamente, tome cuidado ao colar o LCD ao digitizer, pois toda a superfície do LCD é coberta com cola. Assim que ele aderir ao LCD, você não conseguirá removê-lo.
O que você precisa
-
-
Com a pistola de ar quente ajustada na potência "baixa", comece a aquecer a parte inferior do Touch perto do botão home.
 Pergunte ao FixBot
-
-
-
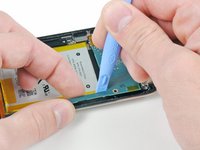
Insira a ponta de uma Ferramenta de abertura entre o painel de vidro frontal e o bisel de plástico próximo ao botão home.
-
Faça alavanca na borda inferior do painel frontal para cima, tomando cuidado para não dobrar o vidro excessivamente.
-
-
-
Quando houver espaço suficiente para segurar a borda inferior do painel frontal, levante-o para longe do corpo do Touch para remover o adesivo ao longo das bordas esquerda e direita.
-
-
-
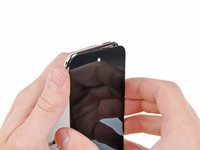
Puxe cuidadosamente a parte superior do conjunto do painel dianteiro para longe do adesivo que o prende ao Touch, cuidando do cabo curto do digitizer que conecta os dois componentes.
-
-
-
Remova os oito parafusos Phillips #00 a seguir:
-
Um parafuso Phillips de 3,5 mm
-
Dois parafusos Phillips de 3,0 mm
-
Um parafuso Phillips de 2,3 mm
-
Um parafuso Phillips de 2,4 mm
-
Três parafusos Phillips de 2,0 mm
-
-
-
-
Use a ponta de uma Ferramenta de abertura para elevar a tampa de aço da câmera traseira.
-
Remova a tampa de aço do iPod.
-
-
-
Insira a borda de uma Ferramenta de abertura sob a placa intermediária de aço perto do canto inferior esquerdo do Touch.
-
Faça alavanca lentamente para cima para separar a placa do adesivo que a prende à caixa interna de plástico.
-
Se a placa ainda estiver presa à placa lógica, reaqueça a área para soltar o adesivo, então separe lentamente a placa da placa lógica usando a Ferramenta de abertura.
-
Existe um cabo plano fino e frágil embaixo da placa. Ao erguer a placa, tenha muito cuidado para não rasgar o cabo.
-
-
-
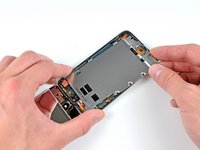
Incline levemente a placa central de aço para soltá-la da estrutura traseira.
-
Levante a placa central de aço da estrutura traseira e descole a fita de cobre grudada na câmera traseira.
-
-
-
Remova os três parafusos a seguir próximos à borda superior da placa lógica:
-
Um parafuso Phillips de 2,0 mm
-
Dois parafusos Phillips de 2,3 mm
-
-
-
Use a ponta de uma Ferramenta de abertura para levantar a câmera traseira levemente, mas não a remova do chassi traseiro.
-
-
-
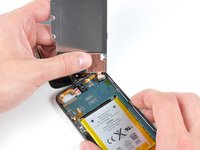
Use uma Ferramenta de abertura para elevar levemente a borda da placa lógica ao lado da bateria, o suficiente para segurá-la com a outra mão.
-
Tenha muito cuidado para não elevar demais, já que o cabo plano do controle de volume ainda está conectado e rasgará muito facilmente.
-
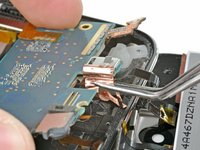
Enquanto eleva delicadamente a placa lógica com uma mão, use uma Ferramenta de abertura para elevar a placa lógica perto da fita de cobre na borda superior da placa lógica.
-
A placa lógica estará devidamente elevada quando o último conector do conjunto do display tiver ultrapassado a borda superior da carcaça traseira.
-
-
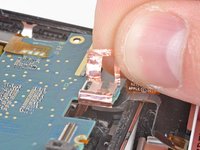
Ferramenta utilizada neste passo:Tweezers$4.99
-
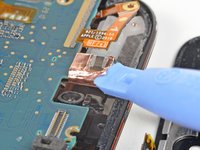
Use a ponta de uma Ferramenta de abertura de iPod para começar a descolar a fita de cobre enrolada ao redor do conector, perto do centro da borda superior da placa lógica.
-
Continue descolando a fita até que ela esteja totalmente solta da placa lógica.
-
-
-
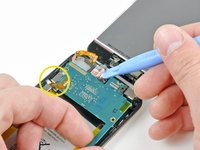
Use a ponta da Ferramenta de abertura do iPod para desconectar o conector do soquete na placa lógica.
-
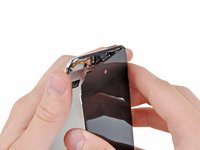
Remova o conjunto do painel dianteiro do Touch.
-
Remova o máximo do adesivo antigo que conseguir e, em seguida, aplique novas tiras adesivas nos locais apropriados.
-
Você também precisará transferir a placa metálica que fica sobre a câmera frontal e as janelas dos sensores. Você pode fazer isso usando uma pistola de ar quente ou um secador de cabelo.
-
Verifique duas vezes se o cabo plano não está preso entre o LCD e a placa metálica. Dobre-o sobre si mesmo para que ele não fique preso. Se o cabo plano for prensado, você poderá ter uma tela branca que não pode ser consertada, pois as trilhas do cabo plano foram danificadas.
-


Para a remontagem de seu dispositivo, siga estas instruções na ordem inversa.
Cancelar: não concluí este guia.
1065 outras pessoas executaram este guia.
Um agradecimento especial a esses tradutores:
100%


Estes tradutores estão nos ajudando a consertar o mundo! Quer contribuir?
Comece a traduzir ›

84Comentários do guia
When installing the new panel, it can be quite hard to get the connector onto the board with only one set of hands. You will need to use a second person to hold the iPod and the new front panel in such a way that the connector lines up, then use your tweezers to press the new connector in place. It's pretty much impossible to do with only one person...
will the glass be as it was for before ones
like i heard that the glass will come out after some days
or it will not fix very easily
can u guide me please
This one works great . http://stores.ebay.com/Electronic-Florid...
ah ha, yes, a bit of practice is needed for sure on this, I have done quite a few now and that is by far the most frustrating part.
Biggest fear here is ripping the volume controller flex on the logic board, seen with the 4 pads top left of photo, i have had two rip on me and it's a real nuisance to change out the volume control flex. You can ignore step 10 really as you can still perform the operation without detaching the camera.
Dave - Where did you get a replacement volume controller flex? I can't seem to find much of anything on the subject.