Ir para o conteúdo principal

Esta versão pode conter edições incorretas. Mude para o último instantâneo verificado.

O que você precisa

  1. , Parafusos Pentalobe: passo 1, imagem 1 %32
    • Desligue seu iPhone antes de começar a desmontá-lo.

    • Remova os dois parafusos Pentalobe 3,6 mm dispostos ao lado do conector Lightning.

  2. , Instruções com o Anti-Clamp: passo 2, imagem 1 %32 , Instruções com o Anti-Clamp: passo 2, imagem 2 %32 , Instruções com o Anti-Clamp: passo 2, imagem 3 %32
    • As próximas duas etapas demonstram o Anti-Clamp, uma ferramenta que projetamos para facilitar o procedimento de abertura. Se não estiver usando o Anti-Clamp, pule três etapas para um método alternativo.

    • Para obter instruções completas sobre como usar o Anti-Clamp, consulte este guia.

    • Puxe a pega azul para trás para destravar os braços do Anti-Clamp.

    • Deslize os braços pela borda esquerda ou direita do seu iPhone.

    • Posicione as ventosas próximo à borda inferior do iPhone, diretamente acima do botão home - uma pela dianteira e a outra pela traseira.

    • Aperte as ventosas uma contra a outra para aplicar sucção na área desejada.

    • Se você achar que a superfície do seu iPhone é muito escorregadia para o Anti-Clamp se prender, você pode usar fita para deixar a superfície mais aderente.

  3. : passo 3, imagem 1 %32 : passo 3, imagem 2 %32 : passo 3, imagem 3 %32
    • Puxe a pega azul para a frente para travar os braços.

    • Gire a pega 360 graus no sentido horário até que as ventosas comecem a se esticar.

    • Certifique-se de que as ventosas permaneçam alinhadas uma com a outra. Se elas começarem a ficar desalinhadas, solte um pouco as ventosas e realinhe os braços.

    • Insira uma palheta de abertura sob a tela quando o Anti-Clamp tiver formado um vão grande o suficiente.

    • Se o Anti-Clamp não formar espaço suficiente, gire a pega um quarto de volta.

    • Não gire a pega mais do que um quarto de volta de cada vez e espere alguns segundos entre cada volta. Deixe que o Anti-Clamp e o tempo façam o trabalho por você.

    • Pule as próximas três etapas.

  4. , Conjunto painel dianteiro: passo 4, imagem 1 %32
    • Caso você não tenha uma iSclack, use somente uma ventosa de sucção para levantar o painel dianteiro:

    • Pressione uma ventosa de sucção contra a tela, na área diretamente acima do botão home.

    • Certifique-se de que a ventosa de sucção foi pressionada com segurança à tela, para alcançar uma perfeita aderência.

  5. : passo 5, imagem 1 %32
    • Enquanto pressiona o iPhone para baixo com uma mão, puxe a ventosa de sucção para cima, de modo a separar suavemente o conjunto painel dianteiro da estrutura traseira do dispositivo.

    • Use o tempo que for necessário e empregue força firme e constantemente. O ajuste do conjunto do display é mais apertado do que na maioria dos dispositivos.

    • Usando uma ferramenta de abertura de plástico, comece a mover vagarosamente a estrutura traseira do dispositivo para baixo enquanto continua puxando para cima o conjunto do display com a ventosa, até separá-los um do outro.

    • Existem diversos clipes segurando o conjunto painel dianteiro à estrutura traseira do dispositivo. Assim, você provavelmente precisará combinar o uso de uma ventosa e de uma ferramenta de abertura de plástico para liberar o conjunto painel dianteiro.

  6. : passo 6, imagem 1 %32 : passo 6, imagem 2 %32
    • Puxe o bico de plástico para liberar o vácuo da ventosa.

    • Remova a ventosa de sucção do conjunto do display.

  7. : passo 7, imagem 1 %32 : passo 7, imagem 2 %32 : passo 7, imagem 3 %32
    • Usando a parte superior do telefone como uma dobradiça, abra o iPhone, pivotando a extremidade do botão home do conjunto painel dianteiro e separando-a da estrutura traseira.

    • Diversos clipes ao longo das bordas superiores do painel dianteiro formam uma dobradiça parcial.

    • Durante a remontagem, alinhe os clipes localizados logo abaixo da borda superior da parte inferior do dispositivo. Então, deslize o painel dianteiro para cima até que sua borda superior fique nivelada com a da estrutura traseira.

  8. : passo 8, imagem 1 %32 : passo 8, imagem 2 %32 : passo 8, imagem 3 %32
    • Abra o display a um ângulo de cerca de 90º e apoie-o em algo que o sustente enquanto você está trabalhando no telefone.

    • Em uma emergência, uma lata de bebida ainda não aberta pode ser uma boa ajuda.

    • Engate uma faixa de elástico para fixar seguramente o display enquanto você trabalha. Isso previne uma tensão indevida nos cabos do display.

  9. : passo 9, imagem 1 %32
    • Remova os seguintes parafusos Phillips do tipo #00 do suporte do conector da bateria:

    • Um parafuso de 2,2 mm

    • Um parafuso de 3,2 mm

  10. : passo 10, imagem 1 %32
    • Remova o suporte metálico do conector da bateria do iPhone.

  11. : passo 11, imagem 1 %32
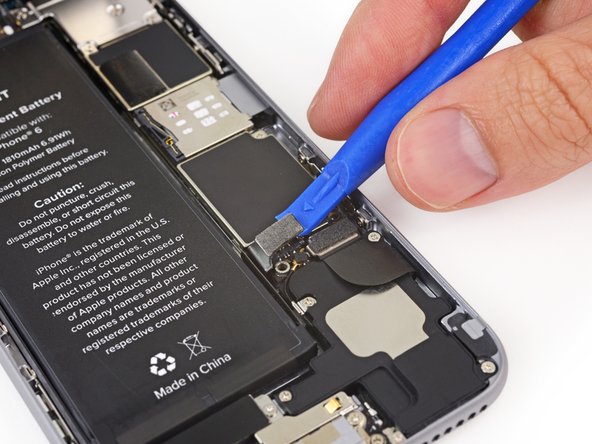
    • Use uma ferramenta de abertura de plástico para desprender cuidadosamente o conector da bateria do seu soquete na placa lógica.

    • Tome cuidado para desprender somente o conector da bateria, e não o soquete da placa lógica. Se você fizer alavanca no soquete da placa lógica, você poderá deteriorar completamente o conector.

  12. : passo 12, imagem 1 %32
    • Remova os seguintes cinco parafusos Phillips que seguram o suporte para o cabo do conjunto painel dianteiro:

    • Três parafusos 1,2 mm

    • Um parafuso 1,7 mm

    • Um parafuso 3,1 mm

    • O posicionamento incorreto desses parafusos durante a remontagem causará danos permanentes à placa lógica de seu iPhone.

  13. : passo 13, imagem 1 %32
    • Remova o suporte para o cabo do conjunto painel dianteiro da placa lógica.

  14. : passo 14, imagem 1 %32 : passo 14, imagem 2 %32
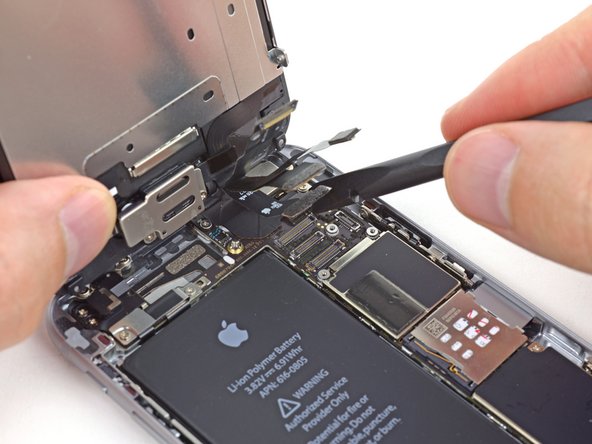
    • Nos quatro passos seguintes, tome cuidado para fazer alavanca somente nos conectores dos cabos e não nos seus soquetes, localizados na placa lógica.

    • Use a ponta plana de uma espátula para desconectar a câmera frontal e o conector do cabo do sensor.

  15. : passo 15, imagem 1 %32 : passo 15, imagem 2 %32
    • Use a ponta plana de uma espátula para desconectar o conector do cabo do botão home.

  16. : passo 16, imagem 1 %32 : passo 16, imagem 2 %32
    • Use a ponta fina de uma espátula para desconectar o conector do cabo de dados do display.

    • Ao montar de novo seu telefone, o cabo de dados do display pode se desprender de seu conector. Isso pode causar linhas brancas ou uma tela preta ao ligar seu telefone. Se isso acontecer, simplesmente reconecte o cabo e faça power cycle no seu telefone. A melhor forma de fazer power cycle é desconectar e reconectar o conector da bateria.

  17. : passo 17, imagem 1 %32 : passo 17, imagem 2 %32
    • Use a ponta fina de uma espátula para desconectar o conector do cabo do digitalizador.

    • Ao reconectar o cabo do digitalizador, não pressione no centro do conector. Pressione uma extremidade do conector e então pressione a extremidade oposta. Se você pressionar no centro do conector, o componente pode dobrar e isso pode causar danos ao digitalizador.

  18. : passo 18, imagem 1 %32
    • Separe o conjunto painel dianteiro da estrutura traseira do dispositivo.

  19. Este passo não foi traduzido. Ajude a traduzi-lo

    : passo 19, imagem 1 %32 : passo 19, imagem 2 %32
    • Insert a SIM card eject tool or a paperclip into the small hole in the SIM card tray.

    • Press to eject the tray.

    • This may require a significant amount of force.

  20. Este passo não foi traduzido. Ajude a traduzi-lo

    : passo 20, imagem 1 %32
    • Remove the SIM card tray assembly from the iPhone.

    • When reinserting the SIM card, ensure that it is in the proper orientation relative to the tray.

  21. Este passo não foi traduzido. Ajude a traduzi-lo

    : passo 21, imagem 1 %32 : passo 21, imagem 2 %32
    • Use the flat end of a spudger to disconnect the Lightning connector assembly cable and fold it out of the way of the speaker.

  22. Este passo não foi traduzido. Ajude a traduzi-lo

    : passo 22, imagem 1 %32 : passo 22, imagem 2 %32
    • Use the point of a spudger to lift the antenna cable connector up off of its socket on the logic board.

  23. Este passo não foi traduzido. Ajude a traduzi-lo

    : passo 23, imagem 1 %32
    • Remove the following Phillips screws from the upper cable bracket:

    • One 2.9 mm screw

    • One 2.2 mm screw

  24. Este passo não foi traduzido. Ajude a traduzi-lo

    : passo 24, imagem 1 %32 : passo 24, imagem 2 %32
    • Remove the upper cable bracket from the iPhone.

  25. Este passo não foi traduzido. Ajude a traduzi-lo

    : passo 25, imagem 1 %32 : passo 25, imagem 2 %32 : passo 25, imagem 3 %32
    • When disconnecting the following connectors, only pry up on the connector, not the socket on the logic board or you risk permanent damage.

    • Use the flat end of a spudger to lift the power button and flash assembly cable connector up off of its socket.

    • Lift the volume control cable connector up out of its socket on the logic board.

  26. Este passo não foi traduzido. Ajude a traduzi-lo

    : passo 26, imagem 1 %32
    • Remove the following four Phillips screws from the Wi-Fi antenna:

    • One 1.5 mm screw

    • One 1.4 mm screw

    • Two 2.1 mm screws

  27. Este passo não foi traduzido. Ajude a traduzi-lo

    : passo 27, imagem 1 %32 : passo 27, imagem 2 %32
    • Remove the Wi-Fi antenna from the iPhone.

    • Be careful not to touch any metal to metal contact points with your bare fingers—use tweezers or gloves. Finger oils may disrupt conductivity. If you do touch any of these components, clean them with a degreaser like windex or isopropyl alcohol before reassembly.

  28. Este passo não foi traduzido. Ajude a traduzi-lo

    : passo 28, imagem 1 %32
    • Remove the two 1.6 mm Phillips screws from the grounding bracket.

  29. Este passo não foi traduzido. Ajude a traduzi-lo

    : passo 29, imagem 1 %32 : passo 29, imagem 2 %32
    • Remove the grounding bracket from the iPhone.

  30. Este passo não foi traduzido. Ajude a traduzi-lo

    : passo 30, imagem 1 %32 : passo 30, imagem 2 %32
    • Remove the following Phillips screws securing the angled logic board bracket.

    • One 2.6 mm screw

    • One 1.3 mm screw, located horizontally in the upper sidewall of the iPhone.

  31. Este passo não foi traduzido. Ajude a traduzi-lo

    : passo 31, imagem 1 %32 : passo 31, imagem 2 %32
    • Remove the angled logic board bracket.

  32. Este passo não foi traduzido. Ajude a traduzi-lo

    : passo 32, imagem 1 %32
    • Remove the single 1.2 mm Phillips screw securing the antenna interconnect cable to the logic board.

  33. Este passo não foi traduzido. Ajude a traduzi-lo

    : passo 33, imagem 1 %32 : passo 33, imagem 2 %32
    • Use the point of a spudger to fold the antenna interconnect cable up out of the way of the logic board.

  34. Este passo não foi traduzido. Ajude a traduzi-lo

    : passo 34, imagem 1 %32 : passo 34, imagem 2 %32 : passo 34, imagem 3 %32
    • Use the flat end of a spudger to lift the camera cable connector straight up out of its socket on the logic board.

    • Be sure to only pry on the connector not the socket itself or you can cause permanent damage to the logic board.

    • Fold the camera cable up out of the way of the logic board.

  35. Este passo não foi traduzido. Ajude a traduzi-lo

    : passo 35, imagem 1 %32
    Ferramenta utilizada nesse passo:
    Standoff Screwdriver for iPhones
    $5.49
    Comprar
    • Remove the following screws securing the logic board to the rear case:

    • Two 1.9 mm Phillips screws

    • One 2.3 mm standoff screw

    • Standoff screws are best removed using a standoff screwdriver or bit.

    • In a pinch, a small flathead screwdriver will do the job—but use extra caution to ensure it doesn't slip and damage surrounding components.

  36. Este passo não foi traduzido. Ajude a traduzi-lo

    : passo 36, imagem 1 %32 : passo 36, imagem 2 %32
    • Use the flat end of a spudger to lift the battery connector end of the logic board up slightly, just enough to grab with your fingers.

    • Insert the spudger near the metal shields below the SIM card tray to avoid damaging any chips or sockets.

  37. Este passo não foi traduzido. Ajude a traduzi-lo

    : passo 37, imagem 1 %32 : passo 37, imagem 2 %32 : passo 37, imagem 3 %32
    • Lift the battery connector end of the logic board and pull it up and out of the rear case.

    • Be careful not to snag the logic board on any cables.

  38. Este passo não foi traduzido. Ajude a traduzi-lo

    : passo 38, imagem 1 %32
    • Peel back the first battery adhesive tab from the bottom right edge of the battery.

    • Use your fingers or blunt tweezers, and be extra careful when working near the battery—puncturing a lithium-ion battery can release dangerous chemicals and cause a fire.

  39. Este passo não foi traduzido. Ajude a traduzi-lo

    : passo 39, imagem 1 %32 : passo 39, imagem 2 %32 : passo 39, imagem 3 %32
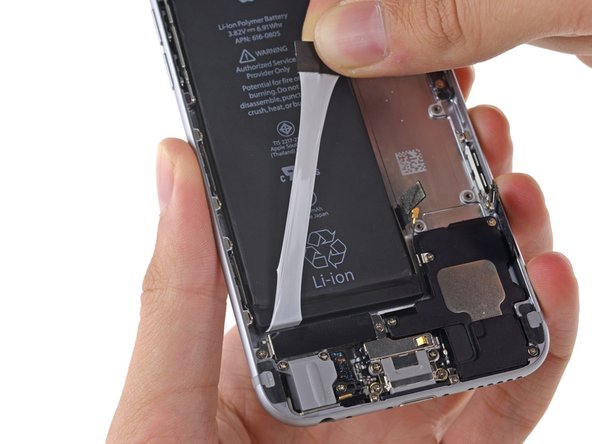
    • Gently pull the battery adhesive tab away from the battery, toward the bottom of the iPhone.

    • Try not to pull against the battery or the lower components, or you may rip the adhesive strip.

    • Continue pulling, allowing the strip to slowly slip out from between the battery and the rear case. When you feel increased resistance from the strip, stop pulling and continue with the next step.

    • If the battery adhesive tabs break off at any point during the removal process, use your fingers or blunt tweezers to retrieve the remaining length of adhesive, and continue pulling.

    • If one of the adhesive strips breaks under the battery during this procedure, and cannot be retrieved, remove the remaining strip, and then proceed to Step 44.

  40. Este passo não foi traduzido. Ajude a traduzi-lo

    : passo 40, imagem 1 %32 : passo 40, imagem 2 %32 : passo 40, imagem 3 %32
    • When you feel increased resistance from the adhesive strip, pull it gently around the lower right corner of the battery.

    • Continue pulling the adhesive tab upward and away from the right edge of the battery, allowing it to slowly slide out from between the battery and the rear case, until the strip comes free from the iPhone.

    • Don't allow the adhesive strip to snag on the battery connector, or it may tear or break off.

  41. Este passo não foi traduzido. Ajude a traduzi-lo

    : passo 41, imagem 1 %32 : passo 41, imagem 2 %32
    • Peel back the second battery adhesive tab from the bottom left edge of the battery.

    • Again, gently pull the battery adhesive tab upward and away from the battery, allowing the adhesive strip to slowly slide out from between the battery and the rear case.

    • Continue pulling the adhesive tab until you feel increased resistance, and then stop.

  42. Este passo não foi traduzido. Ajude a traduzi-lo

    : passo 42, imagem 1 %32
    • When you feel increased resistance from the adhesive strip, pull it gently around the lower left corner of the battery.

    • Don't allow the adhesive strip to snag on the corner of the battery, or it may tear or break off.

    • Continue pulling the adhesive tab upward and away from the left edge of the battery, allowing it to slowly slide out from between the battery and the rear case, until the strip comes free from the iPhone.

    • If you removed both adhesive strips successfully, skip the next two steps and continue on Step 46.

    • If either of the adhesive strips broke off underneath the battery and could not be retrieved, continue with the next step below.

  43. Este passo não foi traduzido. Ajude a traduzi-lo

    : passo 43, imagem 1 %32
    • If any of the adhesive strips broke off and the battery remains stuck to the rear case, prepare an iOpener or use a hair dryer to heat the rear case directly behind the battery.

  44. Este passo não foi traduzido. Ajude a traduzi-lo

    : passo 44, imagem 1 %32
    Ferramenta utilizada nesse passo:
    Plastic Cards
    $2.99
    Comprar
    • Insert a plastic card under the logic board edge of the battery.

    • Be careful to keep the card as flat as possible to avoid bending the battery, which may damage it and cause it to release dangerous chemicals.

    • Press the card in at several points if necessary to break up the adhesive behind the battery.

  45. Este passo não foi traduzido. Ajude a traduzi-lo

    : passo 45, imagem 1 %32
    • After peeling or prying out all adhesive, remove the battery from the iPhone.

    • When reinstalling the battery, refer to this guide to replace your battery's adhesive strips.

  46. Este passo não foi traduzido. Ajude a traduzi-lo

    : passo 46, imagem 1 %32 : passo 46, imagem 2 %32
    • Remove any tape covering the upper left rear-facing camera screw.

  47. Este passo não foi traduzido. Ajude a traduzi-lo

    : passo 47, imagem 1 %32
    • Remove the following Phillips #00 screws from the rear-facing camera bracket:

    • One 1.5 mm screw

    • One 2.1 mm screw

  48. Este passo não foi traduzido. Ajude a traduzi-lo

    : passo 48, imagem 1 %32 : passo 48, imagem 2 %32
    • Remove the rear-facing camera bracket.

  49. Este passo não foi traduzido. Ajude a traduzi-lo

    : passo 49, imagem 1 %32 : passo 49, imagem 2 %32
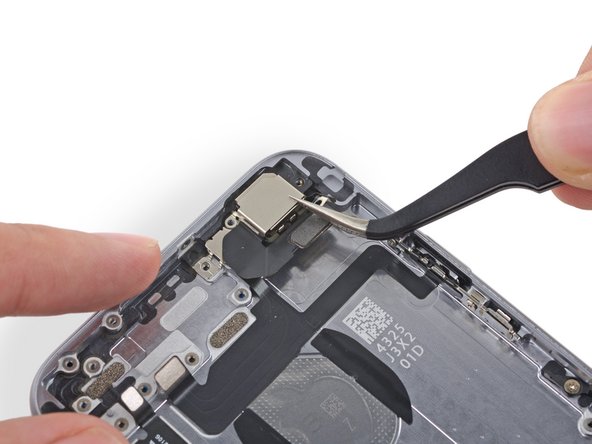
    • Carefully remove the antenna interconnect cable from the rear case.

  50. Este passo não foi traduzido. Ajude a traduzi-lo

    : passo 50, imagem 1 %32 : passo 50, imagem 2 %32
    • Remove the rear-facing camera from the iPhone.

  51. Este passo não foi traduzido. Ajude a traduzi-lo

    : passo 51, imagem 1 %32
    • Remove the single 1.2 mm Phillips #00 screw securing the flash bracket.

  52. Este passo não foi traduzido. Ajude a traduzi-lo

    : passo 52, imagem 1 %32 : passo 52, imagem 2 %32
    • Remove the flash bracket from the rear case.

  53. Este passo não foi traduzido. Ajude a traduzi-lo

    : passo 53, imagem 1 %32
    • Remove the two 2.2 mm Phillips #00 screws from the power button bracket.

  54. Este passo não foi traduzido. Ajude a traduzi-lo

    : passo 54, imagem 1 %32 : passo 54, imagem 2 %32 : passo 54, imagem 3 %32
    • Use the point of a spudger to gently push the flash and microphone modules up out of their respective holes in the rear case.

    • If you encounter significant adhesive, use tweezers to peel the components up from the rear case.

  55. Este passo não foi traduzido. Ajude a traduzi-lo

    : passo 55, imagem 1 %32 : passo 55, imagem 2 %32 : passo 55, imagem 3 %32
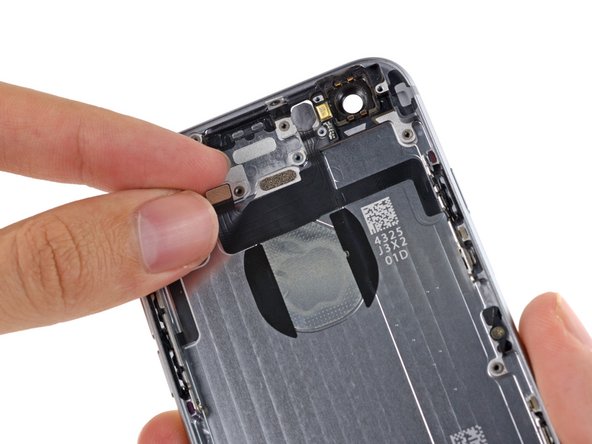
    • Begin to peel the flash/microphone/power button assembly cable up from the rear case starting from the connector end.

    • Continue to peel the cable up, being particularly careful of the narrow component ends of the cable.

    • Remove the flash/microphone/power button assembly cable from the phone.

Linha de Chegada

84 outras pessoas executaram este guia.

Sam Goldheart

Membro desde: 10/18/12

465.762 Reputação

Autoria de 538 guias

Equipe

iFixit Membro de iFixit

Staff

Membros da 135

Autoria de 16.817 guias

11 comentários

Thanks! This is helpful!

Luke L - Responder

This helped out a lot, couldn't find a good enough photo on how the power button was put back on its mount.

alexkasper16 - Responder

Took me 2.5 hours to complete this. Had a hard time getting the factory cable connector off the power button. Used some 3M Double Sided Adhesive tape- 2mm width, Black color to hold the new replacement cable connector in place on the power button. An IFIXIT video showing how to install the connector onto the power switch would be a big help. Had to use a You-Tube video to complete that step. Also, a good reminder to ensure all your connector cables are clear when reinstalling the logic board. You definitely don't want to pinch any of them. Follow the directions carefully and patience is a must! Wasn't that hard for my first time replacing this flex cable.

ronjon40 - Responder

PRO TIP Order a part that already has the metal bracket attached for a few cents more and save yourself the hassle. I buy all my parts on eBay because of their awesome buyer protection and sellers always want to keep a good rating.

ForumHermit - Responder

I think I got a broken cable. Can someone help me with that?

It looks like this: https://drive.google.com/drive/folders/1...

Is it broken and can I fix it? Or is this normal and what to do?

Katrin - Responder

Adicione um comentário

Exibir estatísticas:

Últimas 24 horas: 1

Últimos 7 dias: 18

Últimos 30 dias: 77

Duração total: 78,561