Introdução
Luckily, replacing the battery on the iPhone 4 requires minimal disassembly. If your battery is swollen, take appropriate precautions.
For optimal performance, after completing this guide, calibrate your newly installed battery: Charge it to 100% and keep charging it for at least two more hours. Then use your iPhone until it shuts off due to low battery. Finally, charge it uninterrupted to 100%.
O que você precisa
-
-
Power off your iPhone before beginning disassembly.
-
Your phone's rear cover may have two #000 Phillips screws or Apple's 5-Point "Pentalobe" screws. Check which screws you have, and ensure you also have the correct screwdriver in order to remove them.
-
Remove the two 3.6 mm Pentalobe or Phillips #000 screws next to the dock connector.
 Pergunte ao FixBot
-
-
-
-
Pinch the rear panel with your fingers, and lift it away from the iPhone. Alternatively, use a Small Suction Cup .
-
-
-
Remove the single 1.5 mm Phillips screw securing the battery connector to the logic board (if present).
-
-
-
Use the edge of a plastic opening tool to gently pry the battery connector up from its socket on the logic board.
-
Remove the metal clip covering the antenna connector.
-
-
-
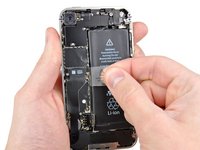
Pull up on the exposed clear plastic tab to peel the battery off the adhesive securing it to the iPhone.
-
If there's any alcohol solution remaining in the phone, carefully wipe it off or allow it to air dry before installing your new battery.
-
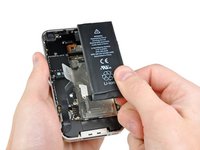
Remove the battery.
-
Before reassembly, clean metal-to-metal contact points with a de-greaser such as windex. The oils from your fingers have the potential to cause wireless interference issues.
-
Perform a hard reset after reassembly. This can prevent several issues and simplify troubleshooting.
-


Compare your new replacement part to the original part—you may need to transfer remaining components or remove adhesive backings from the new part before installing.
To reassemble your device, follow the above steps in reverse order.
Take your e-waste to an R2 or e-Stewards certified recycler.
Repair didn’t go as planned? Check out our Answers community for troubleshooting help.
Cancelar: não concluí este guia.
441 outras pessoas executaram este guia.

12Comentários do guia
I actually had the plastic tab break off when I was trying to remove the battery. Any advice?
Na Aula,diz pra vc coloca álcool isopropílico 90% pra enfraquecer a cola do.
The plastic opening tools were amazing flimsy- the tips broke off both of them while trying to get the battery out.
The adhesive attaching the battery was very strong and the pull tab actually ripped, though it did not come off.
When I replace my battery for a new one it says accesory not permited or something like that, and I tried with every single battery I found (iphone 4 GSM, Iphone 4s..) is there something I could do? is the battery of iphone 4 CDMA Verizon different from others?
I have a Verizon iPhone 4. Got it the first day Verizon started selling them over 2 years ago. Followed the guide. Completed the task in 10 mins. The battery adhesive must have weakened some. Did not need to use pull tab at all. Just the pry tool along the outer side of battery as mentioned by other users. Thanks ifixit!! Saved me a contract slot. With a family of 4, that is a big savings.