Esta versão pode conter edições incorretas. Mude para o último instantâneo verificado.
O que você precisa
-
-
Encha uma panela ou frigideira com água suficiente para submergir completamente um iOpener.
-
Aqueça a água até ferver. Desligue o fogo.
-
Coloque um iOpener na água quente por 2 a 3 minutos. Certifique-se de que o iOpener esteja totalmente submerso na água.
-
Use um pegador para retirar o iOpener aquecido da água quente.
-
Seque bem o iOpener com uma toalha.
-
Sua bolsa térmica iOpener está pronta para o uso! Se precisar reaquecer o iOpener, aqueça a água até ferver, desligue o fogo e coloque o iOpener na água por 2 a 3 minutos.
-
-
Este passo não foi traduzido. Ajude a traduzi-lo
-
If your display glass is cracked, keep further breakage contained and prevent bodily harm during your repair by taping the glass.
-
Lay overlapping strips of clear packing tape over the iPad's display until the whole face is covered.
-
Do your best to follow the rest of the guide as described. However, once the glass is broken, it will likely continue to crack as you work, and you may need to use a metal prying tool to scoop the glass out.
-
-
Este passo não foi traduzido. Ajude a traduzi-lo
-
Handling it by the tabs on either end, place a heated iOpener over the top edge of the iPad.
-
Let the iOpener sit on the iPad for two minutes to soften the adhesive securing the front panel to the rest of the iPad.
-
-
Este passo não foi traduzido. Ajude a traduzi-lo
-
As you follow the directions, take special care to avoid prying in the following areas:
-
Home Button
-
Front Facing Camera
-
Main Camera
-
-
Este passo não foi traduzido. Ajude a traduzi-lo
-
Elevate the iPad enough for the Anti-Clamp's arms to rest above and below the screen.
-
Pull the blue handle towards the hinge to disengage opening mode.
-
Position the suction cups near the top edge of the iPad—one on the front, and one on the back.
-
Push down on the cups to apply suction to the desired area.
-
-
Este passo não foi traduzido. Ajude a traduzi-lo
-
Push the blue handle away from the hinge to engage opening mode.
-
Turn the handle clockwise until you see the cups start to stretch.
-
Wait one minute to give the adhesive a chance to release and present an opening gap.
-
Insert an opening pick under the screen when the Anti-Clamp creates a large enough gap.
-
Skip the next two steps.
-
-
Este passo não foi traduzido. Ajude a traduzi-lo
-
Place a suction cup over the iPad's front-facing camera and press down to create a seal.
-
-
Este passo não foi traduzido. Ajude a traduzi-lo
-
Firmly pull up on the suction cup to create a small gap between the front panel and the rear case.
-
Once you've opened a sufficient gap, insert an opening pick into the gap to prevent the adhesive from resealing.
-
-
Este passo não foi traduzido. Ajude a traduzi-lo
-
Slide the pick along the edge of the display, towards the headphone jack.
-
If there is still a considerable amount of resistance when sliding the opening pick, repeat the iOpener heating procedure and apply additional heat.
-
-
Este passo não foi traduzido. Ajude a traduzi-lo
-
Insert a second opening pick by the front-facing camera.
-
-
Este passo não foi traduzido. Ajude a traduzi-lo
-
Slide the second pick along the top edge of the iPad, towards the Sleep/Wake Button.
-
-
Este passo não foi traduzido. Ajude a traduzi-lo
-
Bring the right opening pick down and around the top right corner of the iPad.
-
-
Este passo não foi traduzido. Ajude a traduzi-lo
-
Bring the left opening pick around the top left corner of the tablet.
-
-
Este passo não foi traduzido. Ajude a traduzi-lo
-
Reheat the iOpener and lay it over the right edge of the display to loosen the adhesive underneath.
-
-
Este passo não foi traduzido. Ajude a traduzi-lo
-
Slide the right opening pick roughly halfway down the display.
-
-
Este passo não foi traduzido. Ajude a traduzi-lo
-
Reheat the iOpener and apply heat to the left side of the iPad.
-
-
Este passo não foi traduzido. Ajude a traduzi-lo
-
Slide the left-hand opening pick about halfway down the edge of the display.
-
-
Este passo não foi traduzido. Ajude a traduzi-lo
-
Slide the opposite opening pick down to the bottom right corner of the iPad.
-
-
-
Este passo não foi traduzido. Ajude a traduzi-lo
-
Slide the left-hand opening pick down the edge of the display until you reach the corner.
-
-
Este passo não foi traduzido. Ajude a traduzi-lo
-
Use the iOpener to apply heat to the bottom edge of the iPad.
-
-
Este passo não foi traduzido. Ajude a traduzi-lo
-
Bring the right-hand opening pick around the bottom corner of the iPad.
-
-
Este passo não foi traduzido. Ajude a traduzi-lo
-
Remove the right-hand opening pick at the bottom of the iPad.
-
-
Este passo não foi traduzido. Ajude a traduzi-lo
-
Slide the left-hand opening pick along the bottom edge of the display, then remove it from the bottom right corner of the iPad.
-
-
Este passo não foi traduzido. Ajude a traduzi-lo
-
Twist the remaining pick by the front-facing camera to separate the top edge of the display assembly from the rear case.
-
-
Este passo não foi traduzido. Ajude a traduzi-lo
-
Continue lifting the display assembly from the front-facing camera side.
-
Pull the display slightly away from the bottom edge to completely separate it from the rear case.
-
Keep lifting until the display assembly is roughly perpendicular to the body of the iPad.
-
-
Este passo não foi traduzido. Ajude a traduzi-lo
-
Remove the single 1.8 mm Phillips screw securing the battery terminals to their contacts on the logic board.
-
-
Este passo não foi traduzido. Ajude a traduzi-lo
-
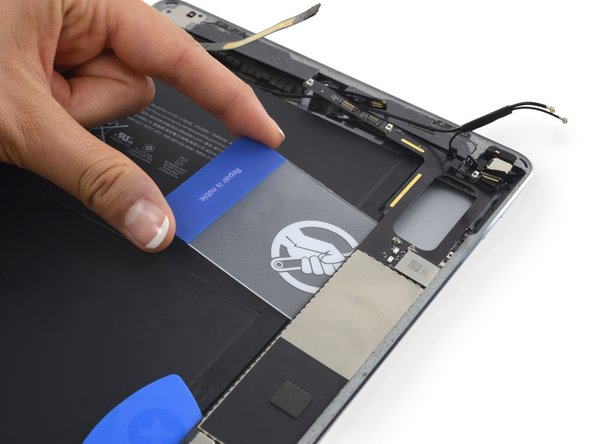
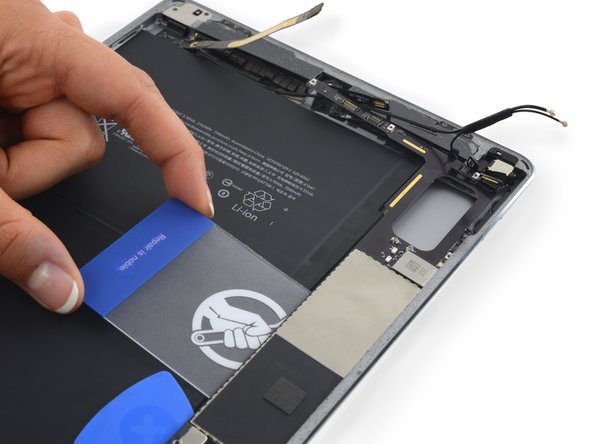
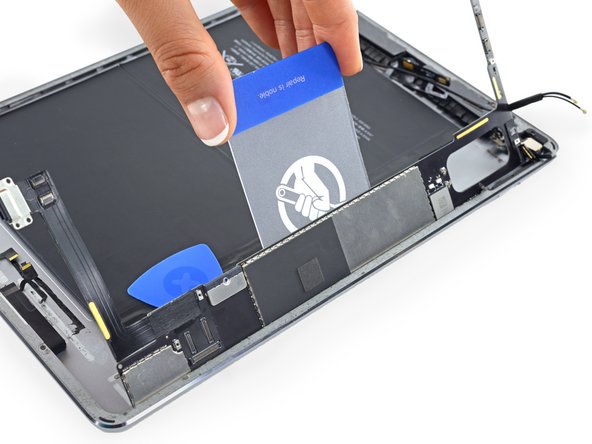
Slide a battery isolation pick underneath the battery connector area of the logic board, and leave it in place while you work.
-
Alternatively, make a battery blocker using a playing card and slide it underneath the logic board connector to disconnect the battery.
-
-
Este passo não foi traduzido. Ajude a traduzi-lo
-
Remove the three 1.3mm Phillips screws from the display cable bracket.
-
Remove the bracket.
-
-
Este passo não foi traduzido. Ajude a traduzi-lo
-
Disconnect the display data connector from its socket on the logic board.
-
-
Este passo não foi traduzido. Ajude a traduzi-lo
-
Disconnect the two remaining digitizer cables underneath the display data cable.
-
-
Este passo não foi traduzido. Ajude a traduzi-lo
-
Remove the front panel assembly from the rear case.
-
-
Este passo não foi traduzido. Ajude a traduzi-lo
-
Remove the following four Phillips screws securing the upper component cable bracket to the tablet.
-
Two 1.6 mm
-
Two 1.3 mm
-
Slide the upper component cable bracket out from under the protective flaps and remove it from the iPad.
-
-
Este passo não foi traduzido. Ajude a traduzi-lo
-
Remove the tape covering the two speaker ZIF connectors.
-
-
Este passo não foi traduzido. Ajude a traduzi-lo
-
Use a spudger to flip up the retaining flap on the left speaker's ZIF connector.
-
-
Este passo não foi traduzido. Ajude a traduzi-lo
-
Slide the left speaker cable out of its ZIF connector.
-
-
Este passo não foi traduzido. Ajude a traduzi-lo
-
Use a spudger to flip up the retaining flap on the right speaker's ZIF connector.
-
-
Este passo não foi traduzido. Ajude a traduzi-lo
-
Slide the right speaker cable out of its ZIF connector.
-
-
Este passo não foi traduzido. Ajude a traduzi-lo
-
Use a spudger to gently pry up the antenna cables from their sockets.
-
-
Este passo não foi traduzido. Ajude a traduzi-lo
-
Firmly grasp the antenna cable and peel up the grounding tape attaching it to the logic board.
-
-
Este passo não foi traduzido. Ajude a traduzi-lo
-
Remove the 1.2 mm Phillips screw securing the bracket covering the volume control cable connector.
-
Remove the bracket.
-
-
Este passo não foi traduzido. Ajude a traduzi-lo
-
Detach the volume button cable connector by prying it straight up from its socket.
-
-
Este passo não foi traduzido. Ajude a traduzi-lo
-
Pry up the rear facing camera cable connector from its socket.
-
-
Este passo não foi traduzido. Ajude a traduzi-lo
-
Pry up the home button/microphone ribbon cable connector from its socket.
-
-
Este passo não foi traduzido. Ajude a traduzi-lo
-
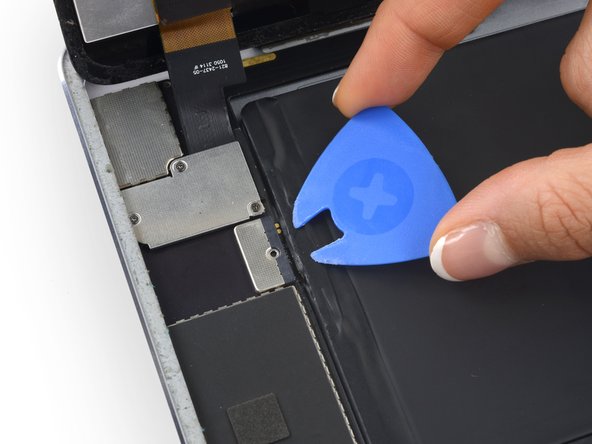
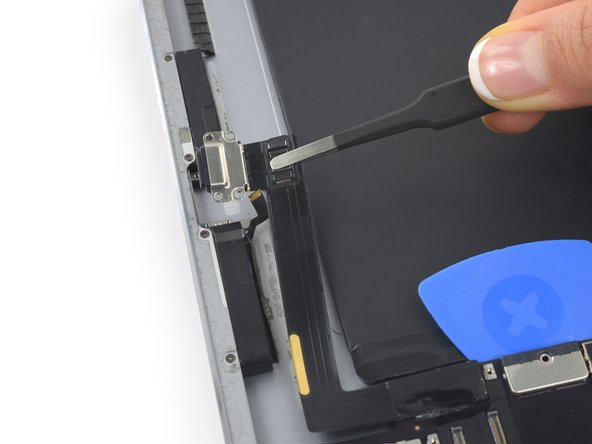
Use the flat end of a spudger to disconnect the Facetime camera connector from its socket on the logic board.
-
Pry up the adhesive attaching the Facetime camera cable to the audio jack cable underneath.
-
Fold the Facetime camera cable up and out of the way.
-
-
Este passo não foi traduzido. Ajude a traduzi-lo
-
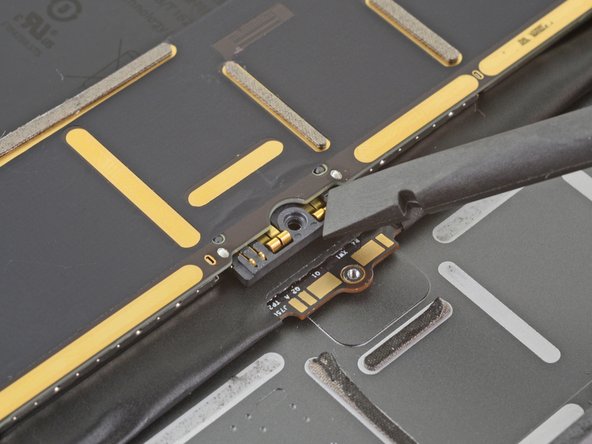
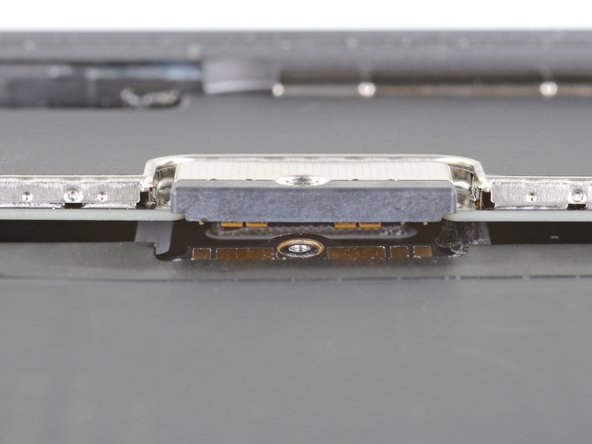
Disconnect the headphone jack cable connector from its socket on the logic board.
-
Pry the cable up to free it from the adhesive securing it to the rear case.
-
Pull the audio jack cable out of the way of the logic board below.
-
-
Este passo não foi traduzido. Ajude a traduzi-lo
-
Use tweezers to peel up the rightmost grounding tape attaching the antennas to the logic board.
-
Bend the antenna wire back and out of the way of the logic board.
-
-
Este passo não foi traduzido. Ajude a traduzi-lo
-
Peel up the tape covering the top left edge of the logic board.
-
-
Este passo não foi traduzido. Ajude a traduzi-lo
-
Remove the four 1.6 mm Phillips screws attaching the lightning port to the rear case.
-
-
Este passo não foi traduzido. Ajude a traduzi-lo
-
Insert an opening pick underneath the Lightning cable where it meets the logic board.
-
Slide the opening pick towards the bend in the cable.
-
-
Este passo não foi traduzido. Ajude a traduzi-lo
-
Pull the Lightning connector straight out of its recess in the rear case.
-
-
Este passo não foi traduzido. Ajude a traduzi-lo
-
Prepare an iOpener following the steps in the Aquecimento da bolsa térmica iOpener Guide.
-
Place the iOpener along the top of the back of the iPad for 2-3 minutes to soften the adhesive holding the logic board in place.
-
-
Este passo não foi traduzido. Ajude a traduzi-lo
-
Insert an opening tool underneath the logic board below the FaceTime camera.
-
Pry the left edge of the logic board up.
-
-
Este passo não foi traduzido. Ajude a traduzi-lo
-
Insert an opening pick underneath the portion of the logic board pried up in the previous step.
-
Slide the opening pick towards the volume control buttons, and stop at the bend in the logic board.
-
-
Este passo não foi traduzido. Ajude a traduzi-lo
-
Place a heated iOpener on the lefthand side of the back of the iPad for 2-3 minutes.
-
-
Este passo não foi traduzido. Ajude a traduzi-lo
-
Insert a plastic opening tool underneath the logic board, inside the rectangular cut out, and gently pry the logic board up.
-
Slide the opening tool down the length of the gap while continuing to pry the logic board up.
-
-
Este passo não foi traduzido. Ajude a traduzi-lo
-
Insert an opening tool underneath the logic board on the other side of the rectangular cut out and pry it up.
-
Slide the opening tool down the length of the gap while continuing to pry the logic board up.
-
-
Este passo não foi traduzido. Ajude a traduzi-lo
-
Insert a plastic card underneath the logic board.
-
Slide the card down the length of the logic board to release the adhesive.
-
-
Este passo não foi traduzido. Ajude a traduzi-lo
-
Slide a plastic card underneath the center of the logic board, pushing it in as far as it will go.
-
Slowly swing the left edge of the logic board up, while making sure it doesn't snag against any of the disconnected cables.
-


Cancelar: não concluí este guia.
34 outras pessoas executaram este guia.

7 comentários
If the logic board needs to be replaced, does that contain all the memory of the iPad? By installing a new logic board, do you basically start with a clean slate?
yes, effectively like swapping out the desktop but keeping screen, keyboard and outer box. the Memory is build into this
Hello,
Is there a Logic board with LTE for iPad Air 2? Can't find some in your store.
If not, is it possible to replace the logic board from an ipad with cellular with a logic board with only wifi? So after this I would have a iPad without cellular, but at least a working one.
br,
Max
Are 16GB, 64GB, and 128GB logic boards interchangeable or do I need to match what was previously in the ipad? Also, if I leave the existing home button in there I will only lose fingerprint recognition, correct?
Thanks.