Introdução
Replace the hard drive in your iMac Intel 21.5".
This guide also includes steps to upgrade your iMac's hard drive with a SSD. It describes how to install the SSD's temperature sensor so that the Mac's fans will operate at the correct speed.
Before beginning any work on your iMac: Unplug the computer and press and hold the power button for ten seconds to discharge the power supply's capacitors.
Be very careful not to touch the capacitor leads or any exposed solder joints on the back of the power supply.
O que você precisa
-
Ferramenta utilizada neste passo:Heavy-Duty Suction Cups (Pair)$14.95
-
Stick a suction cup near each of the two top corners of the glass panel.
-
If your suction cups refuse to stick, try cleaning both the glass panel and the suction cup with a mild solvent.
-
-
-
Gently lift the glass panel perpendicular to the face of the LCD enough to clear the steel mounting pins attached along the underside of the top edge of the glass panel.
-
Pull the glass panel away from the lower edge of the iMac and carefully set it aside.
What's the best product to clean the face of the LCD?
Microfiber Cloth
Try your best not touch it in the first place
Brian -
Wearing Nitrile or regular surgical gloves helps prevent finger prints if you accidentally touch the glass.
I use a Swiffer duster from above at the last moment before I let the magnets grab the glass cover. This has worked so well the last dozen or so times I’ve replaced a glass cover since I never have access to a “clean room” and don’t wear a “bunny suit”.
Also, more dust will shed from your skin if you’ve just taken a shower, so I like to finish these repairs in the morning before a shower.
-
-
-
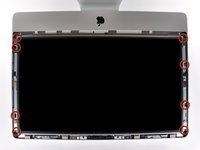
Remove the eight 8 mm T10 Torx screws securing the display to the outer case.
8 vis, pas 2
On reassembly, it is REALLY HARD to align those screws, because of the field of the strong magnets that hold the glass cover on. I'm sure there's a trick to it, but I'd love to know what it is for future reference.
A short piece of small gauge vinyl tubing that fits tightly over the head of the T-10 driver leaving an 8th of an inch or so in which to insert the screw to engage the head will hold the screw long enough to keep it away from the magnet and get it going in the hole.
I use non magnetic SS curved tip tweezers together with a magnetized #10 torx bit both to remove and reinstall the screws. You can magnetize and demagnetize the bit using the strong magnets on the LCD frame. Don't worry too much during removal, you can recover the screw. But loath the moment you drop the last screw during reassembly. For that reason, reinstall the screws near the magnets and hardest to get to first.
-
-
-
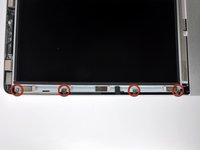
Slightly lift the top edge of the display out of the outer case.
When putting the display back I have resistance from the foam elements (on the top end where the iSight is) and have to press down really hard. Is that okay?
Well, stupid me put the 3.5" to 2.5" cage the wrong side up. ;)
-
-
-
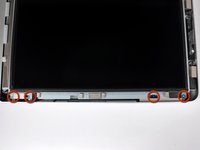
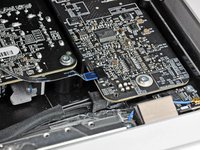
Pull the vertical sync ribbon cable out of its socket on the LED driver board near the top left corner of your iMac.
Reassembly of this part was the closest I came to disaster on this project. I tried inserting the connector a few times without success, and when I looked it it the leads, which are fragile, were all mangled. I smoothed them out by hand as best I could and and reinserted, very carefully this time. The trick is that the tip of the connector should be pointed somewhat upwards when reconnecting.
I was pretty sure that when I was done, I would reboot but have no display; but fortunately, everything worked.
So let’s say someone wanted to suck some of the dust off the back of the display before reassembly. Let’s just say that. Someone would likely suck this forsaken cable up into the vacuum tube then, wouldn’t they? They might. And if it were to oscillate in a rushing torrent of air, it might get munged? It might.
Here’s how you overcome such a disaster:
1) cut the end fresh, as close to the end as you can while cutting off any frayed end.
2) abrade the end gently, repeatedly, along the connector wire axis. I used emory paper. Your goal is to expose the copper conductors in the last 1/4” of the fragile evil wire.
3) Tape a small stiff cardstock to the back of the end of the connector. This is essential to press the connector wires into the connector.
4) Gently insert, taking special caution to not peel the copper off of the connector.
5) Tape that connector down deftly, without letting it move a millimeter and securing it for all time.
I just leave it connected. After disconnecting the other cables, there is enough slack to lay the display on its backside if you’re working on a flat surface.
I have replaced the hdd in this model about 8-10 times - I have never had to disconnect any cables other than the sata and temp sensor cables on the hdd. I just prop the lcd up with an egg carton (or something about 3 inches high that is soft and light) and access the hdd that way. The only thing I ever have trouble with are is putting the LCD screws back in around the magnets - but I have pretty much perfected that with a sissor/ tweezer tool.
Could you put up some photos of this procedure - egg carton etc…
The LCD screen is super soft on these since they rely on external glass for protection. Since LCD side will be facing down without disconnecting vsync, I'd lay it on a flat surface with soft fabric rather than putting the LCD on a rough surface like egg cartons.
Howard -
Any ideas where to replace this cable?
I followed Suzanne’s comment and also did not disconnect this cable (vertical sync ribbon cable) to avoid damage. I pivoted the screen about 110 degrees after the other cables where detached. On a flat surface, this is easily done and the cable is not tight. Image of my angle if I can drop a link. and cable in this position not in tension.
Where can I buy the replacement for this vertical sync replacement cable?
-
-
-
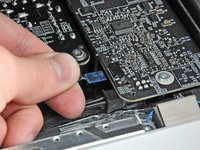
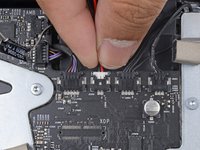
Rotate the display out of the outer case enough to disconnect the LED backlight power cable from the LED driver board.
I found it easier to very slightly lift the front edge of the black connector with a small spudger, then gently pulling away towards the bottom of the iMac. Pressing felt a little crude and didn’t work for me.
-
-
-
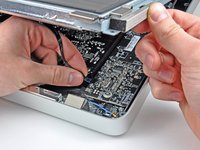
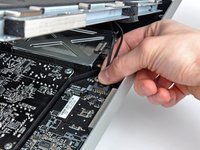
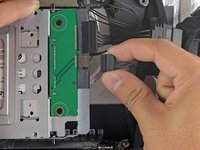
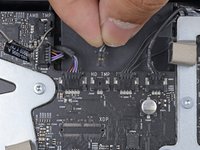
Squeeze the two display data cable connector arms together to unlock it from its socket on the logic board.
-
Pull the display data cable connector away from its socket on the logic board.
Aperte as duas exibição do conector do cabo de dados braços juntos para desbloqueá-lo de seu soquete na placa lógica.
Il vaut mieux déconnecter la partie du côté écran en premier (sous l'autocollant noir)
Je suis d’accord. C’est plus facile. Merci mon ami
Translation: It is better to disconnect the screen side first (under the black sticker)
ALWAYS ALWAYS ALWAYS REMOVE THIS CABLE!!! Even if you are "only in there for a minute" tearing the connector off the board is EXTREMELY easy.
-
-
-
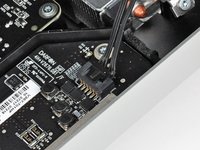
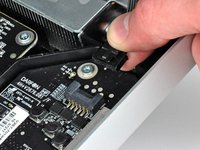
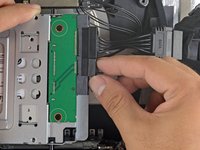
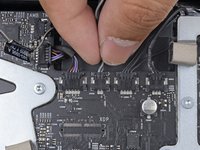
Disconnect the LCD thermal sensor cable connector from its socket on the logic board.
This is important regarding the fan running full speed
Is there a way to test the power supply to see if it's dead?
Achtung! Dieser Stecker kann sehr fest sitzen, hier hilft ein guter Fingernagel um den Stecker abwechselnd rechts und links zu Hebeln
English translation of bluesoundsmusic comment: “Caution! This plug can be very tight, here a good fingernail helps to lever the plug alternately right and left”
-
-
-
-
Disconnect the thermal sensor by pulling its connector away from the side of the hard drive.
I don't understand how to reverse the thermal connector. There's only one way to insert it; unless they mean to reverse the grey and black wires? Confused, but hoping I don't have any fan issues.
I had the same problem, i have the fan running at high speed, the connectors cannot be reversed. There is only one way to insert on either end.
timzane -
I still don't understand the instruction to reverse the connector. A photo would be helpful. Does this mean to take the connector and turn it upside down from how it was originally connected? What if the socket for the connector will only allow it to be inserted in one manner? I've changed out my hard drive and the fan is on high all the time, so something is wrong, though I thought I had followed the instructions carefully.
Did you previously have a Toshiba hard drive in your iMac?
I replaced the hard drive with an Samsung 840 EVO SSD. I used a Newer Technology Adaptadrive bracket (fit perfectly). Since the SSD doesn't have a temperature sensor, I used a suggestion on this forum to just short the sensor plug with a small piece of wire and tape the connector down out of the way against the iMac's case. Works perfectly, and the fans run at minimum speed (verified with http://www.crystalidea.com/macs-fan-cont... ). I wouldn't recommend shorting the sensor for a mechanical hard drive, but for an SSD (which runs cool anyway) there shouldn't be any problem.
I perfectly agree with you, I replace too the origin HD with an Samsung EVO 840 1T, no shorting of the sensor, without problems. I just set the fan control with Macs fan control !
Filippo -
I am planning on upgrading & replacing the HDD with a SSD. I don't have the Apadtadrive bracket but I have this SABRENT 2.5 to 3.5 Inches Internal Hard Disk Drive Mounting Kit (BK-HDDH). Will this be fine? Here is the link to the product on Amazon (http://tinyurl.com/jkjnk6q)
rupeshbk -
I'm trying to replace Seagate 500Gb drive with a new WD 1Tb drive. Can not fit the thermal connector to the WD drive. How does one fit it??
You need to replace the Seagate with another Seagate or use software to control the fans.
On reassembly, I found there was no place on the hard drive to plug the connector in. Like u, I got a WD drive from iFixit, whereas the Mac came with a Seagate. So i just left the thermal connector dangling. Following startup, however, I am not getting fan noise.
Whoops. I take back what I said about no fan noise. Eventually it started back up....
Note - If you’re replacing the conventional HDD with an SSD, and using the appropriate thermal coupler, you only need to detach the sensor from the main board, you can leave the other end on the Hard Drive you’re removing. This also means that you have no need to worry about the orientation of the connector.
-
-
-
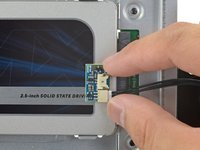
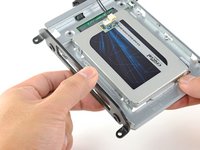
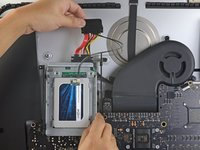
Disconnect the SATA data cable by pulling its connector away from the hard drive.
-
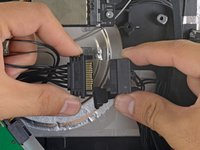
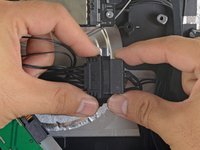
Use the flat end of a spudger to help disconnect the SATA power connector from the hard drive.
Except this picture identifies them backwards. The larger connector of the two is the power connector. The smaller is the data connector.
-
-
-
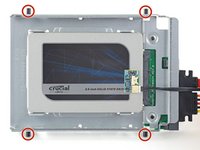
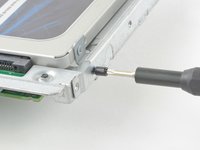
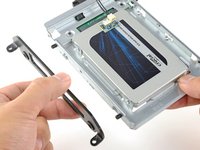
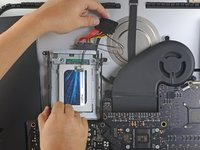
Remove the two T8 Torx screws securing the upper bracket to the hard drive.
-
Remove the upper bracket from the hard drive.
-
-
-
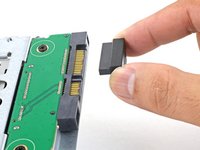
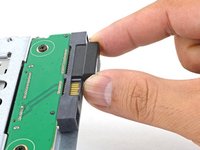
Line up the SSD connectors with the metal enclosure's sockets.
-
Press the drive against the enclosure sockets until the SSD is firmly seated.
-
-
-
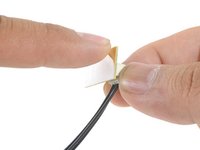
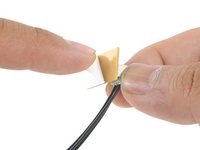
Peel the white liner off the back of the small temperature sensor board in order to expose the adhesive.
-
Adhere the temperature sensor board to an exposed, metal surface of the SSD, close to the SATA connector.
-
Fold the excess temperature sensor wires so that they are out of the way while you install the enclosure.
-
-
-
Find the connector on the motherboard labeled HD TMP or HDD TEMP.
-
If the previous temperature cable is still connected to the board here, disconnect and remove it. You will no longer need it.
-
Connect the temperature sensor's two-wire red-black cable to the motherboard plug labeled HD TMP or HDD TEMP.
-
Route the excess wire so it does not interfere with any other components.
-


To reassemble your device, follow these instructions in reverse order.
To reassemble your device, follow these instructions in reverse order.
Cancelar: não concluí este guia.
381 outras pessoas executaram este guia.

67 comentários
Make sure the hard drive is of the same producer and it has a temp sensor connector. It's the only way to ensure that the heat sensor connector will fit into the hard drive's socket. If you don't plug in the temp sensor iMac's HDD Fan will rotate at its maximum speed, ie. over 6000 rpms - the noise is extraordinary!!!
I replaced my internal HDD on my 215" iMac, but the iMac can't get access to the new hard disk's (Seagate Barracuda Green) temperature sensor. The HDD fan in the iMac steps up the RPM, and over about 15min reaches 6000RPM (VERY loud) and stays there until machine is shutdown or put to sleep.
I found a fix for this: http://hddfancontrol.com/HDDFanControl/H... - this tiny piece of shareware software allows the iMac to see the temperature of the drive via S.M.A.R.T., and therefore the fans react according to the correct temperature again!
One thing Andrew left out here, which I discovered on my own, is that even if you have the temperature sensor connected to the correct pins, you ALSO have to make sure that it is 'oriented' properly.
On the sensor connector (the little head that plugs into the hard drive) I saw a little white dot on one side, which it turns out, indicates that's the 'top'. So on my iMac, you have to make sure when you connect the temp sensor connector with the white dot showing.
Otherwise, I got the 6000 rpm fans.
Success. For any interested people, it's about an hour - going slowly. Now that I've done it, I assume I could do it again in 15 minutes if I had to.
Just have the right tools handy, the T 8 and T 10 bits in particular. Getting off the display screen is easy. The screws are harder than you'd think because of the magnets, but they're not that bad. I recommend having tweezers to help pull them and place them later on.
Overall, the thing that worried me most was the fan issue. And, so far... it's not an issue. I had a seagate 500 gb, and I replaced it with a seagate barracuda 3 tb hhd. Everything fit right into it, just as it did into the original. No optical sensor needed. No new sensor needed, period. No software needed. Nothing. Just put in the new hd, and it works. I'm very pleased, and very proud of myself. Good luck to anyone considering doing this upgrade. You can do it, really.
It's a pretty straightforward procedure. Took less than an hour. I replaced the 500GB Seagate Barracuda with a Seagate Barracuda 2TB, model ST2000DM001. So far, after about 30 minutes of use, it's working great, and I haven't had the fan problem, but we'll see what happens.
Kevin's advice about the tweezers for extracting and inserting the screws that attach the display to the case was right on (although I used a small pliers instead).
Before you begin the replacement procedure, I highly recommend putting the new drive into a hard drive dock, and restoring to it from a Time Machine backup. Try booting off the new drive once to make sure it works. Then, when you swap the new drive for the existing internal drive, it'll be ready to go with no further effort needed.
The removal of the screen (step 1&2) can easily be done with just a normal plunger. No need to go and buy suction cups.
I discovered that using some of the many iTunes cards that for packrat reasons I throw in my desk drawer can be used to carefully side in between the glass and the case. Once You get one in leave it there and use another to advance across the top. With 4 cards in place I was able to get the glass far enough off that I could then remove it. (It astounds me when I add those cards up how much I’ve spent) Going to the less expensive iTunes & App Store model was a stroke of genius.
Screen removal was easy with the suction cups. I replaced my Western Digital 500GB blue drive by another Western Digital Blue 1TB because I thought I'd avoid the fan issue but finallythe fan started running at 6000rpm. I ended up buying the software at http://www.hddfancontrol.com/ to correct the issue.
I installed an SSD drive and because there's no thermal sensor connection on it, I used SSD Fan Control (http://exirion.net/ssdfanctrl/), which is free, to set the fan to a quiet level.
Whole thing works like a charm... revived a 5 year old iMac!
Anybody here knows anything of update to SSD? I can't find any tutorial on the net.
T
What kind of update?
I replaced my 500GB Hitachi drive with a 1TB Samsung 840 EVO SSD yesterday. I have only two significant remarks:
# To fit a 2.5" SSD in the 3.5" HD bay, you must use some kind of brace/adapter. Some SSDs can be bought in kits which include an adapter; mine didn't, so I bought a Deltaco brace.
# There's no connector for the apple temperature sensor on the SSD. You must either disable the apple fan control or buy an external sensor.
** You can disable the fan control by short-circuiting the sensor cable. This fools the apple fan control into believing the drive is forever cool. This is what I did.
** You can install some kind of software which overrides the apple controls. I did this, too, using Macs Fan Control.
** You can attach an external sensor on the SSD and connect the sensor cable to it. I would have liked to do this, but I couldn't find any reliable information on which sensor to buy.
lenborje -
Thomas, see my previous comment.. It works like a charm, no issues.. just make sure you use something like SSD Fan Control (http://exirion.net/ssdfanctrl/) otherwise it'll be running at 6k RPM.
I called Seagate July 22 2013 . They claim that " Seagate never made this HD and it was modified by apple " They also insisted the Sensor connector was a " Jumper option block " . Also they have no replacement telling me " Any SATA Seagate would work . I also called many retail HD sellers and all gave me the same incorrect info . I even sent photos of the HD connector and the MB connector and all insisted it was only a Jumper block and all HDs have them . So much for Tech Support . I did find some original Apple HD for $ 225 to $ 400 . I installed a standard HD and will try the Software Speed Control described in this fine iFixit guide .
To pull the front plastic lens I used the Windshield mount from a GPS .
It is not necessary to remove any connectors or cables from the LCD to the MB . Just lean the LCD back about 5 inches . Use a 1/4 inch ratchet wrench with a 1/4 socket to hold the Torx bits , or a short Torx screwdriver . Unscrew the 2 HD screws , lean the HD up out enough to disconnect the 3 connectors . I do not like the Orange suction cups also . They are very stiff and also have a metal screw in the center off the cup which might put a mark on the plastic lens . I use GPS car windshield mounts . The lens is very easy to pull off . The locater pins on the lens Bezel are poorly attached and may fall off . Super glue them back on or just forget them as they are really made to make factory assembly faster .
Fan Control Software : I used this Free software for controlling the speed of my fan . It seems to work after 5 hours of testing . Link to site ( http://exirion.net/ssdfanctrl/ ) .
I also try this software, but I'm not happy with it! The fan is always hearable and runs always with min 1100 rpm. Before the HDD replacement I rarely heard a noise from the fan!
And how can I now uninstall this software?
Upgraded to a 2TB, 8GB SSD combi from Seagate - as recommended same company as the HDD which was in the iMac - scary to do but with a little help (holding the screen whilst I unplugged the cables, and reverse) it worked very well indeed - bought the tools through Ama(XXX)on in the UK and the company charged a fortune - did not find the iFixit EU shop which has the same prices as the US one
GREAT job with these instructions - would have had to rely on a sloppy shop to do it otherwise...
Only getting back to status quo ante is proving difficult due to not quite working time-machine.
I had the same experience as eschienbrood- replaced a 500 GB Seagate with a 1 TB Seagate; took about an hour, and would've gone faster if I hadn't dropped one of the screws for the monitor into the chassis. Replacing the 8 screws for the monitor was by far the hardest part of the operation. The heat sensor for the HD went in the same way as it was on the old drive, and there are no fan problems.
great guide ! I replaced my four year old 500Gb classic hard drive by a Samsung SSD 840 EVO 500GB. The HD's internal temperature sensor I replaced by a original DVD drive sensor (ordered @ Applecomponents.com / Apple part# 922-9229, Hard Drive Temp Sensor Cable 2009/2010 iMac 21", 27", $20.81) and mounted the SSD in two 2,5" > 3,5" adaptor brackets. Be careful, use ESD protection when working inside your iMac. First I put a "ESD protection bubble plastic sheet" on the table, then on top aluminum foil for the display and the glass panel. The iMac was on a real ESD carpet on top of the (ESD) plastic and grounded.
Once I had successfully completed all the above steps I connected an external USB DVR drive to my imac and turned it on and it booted up the installation DVD no problems straight from the external DVD drive. I have heard contradicting things about whether OSX we boot up from an external drive or not but mine did no problem.
The next thing to bare in mind is that when you boot up your machine, if you want to do a fresh install onto your new hard drive you will need to go to Disk Utility and click on your new drive in the left hand tree and select partition. Select 1 partition and then select options which will allow you to select GUID, click ok and then click on apply and your hard drive will be formatted. Now when you try to install the OS you will be able to select your newly installed hard drive.
My factory installed drive was a Seagate 1TB drive and I have just replaced it for a Seagate 2TB SSD/Sata hybrid.
This Guide works perfect for me. I've upgrade my MAC to a Samsung EVO 500 GB SSD without any problems. I also didn't use any additional HDD frame ore something else.
I use the original HDD frame (the little metal bar), drill in two new holes and then screwed the on the SSD Cause there isn't any movable part on a SSD therefore also no vibrations occurs. :-)
I solve the FAN@6000 issue like others here, with this free tool:
( http://exirion.net/ssdfanctrl/ )
It also works perfect, cause it running as a service from the start of your MAC
About step 10 reversing the thermal cable. If its a Seagate Barracuda to be replaced the thermal-sensor cable needs to be modified to fit. I have replaced with Toshiba drives and they have two pins in the middle of the female connector.
Use a cutter to modify the cable to be able to turn it. Otherwise the fans will run at full speed.
Hi Peter! I need to replace a Barracuda in my iMac mid 2011, and have found out about this annoying question of the thermal sensor. (theres a thermal sensor by OWC but it's not available in Argentina, unforntunately) Can you explain more clearly how to modify these pins ? And which HDD models would allowed such modifciation? Does it really work? Thanks!
Diego -
I've finished a HD replacement on my EMC 2308. Some notes from my experience:
-During reassembly, cables can easily get pinched, damaged.
-Mind well the fan issue. Err on the side of safety. I lost my LED Driver Board due to overheating. After HD replacement, screen did some brightness flickering- this is a warning sign that your board is overheating. React immediately. Up your fan RPMs or turn off computer. I played with my fan RPMs and had them ranging between 2000-2500 RPMs, but alas, it was not enough(my computing was non-intensive). A couple flickers, then 5 minutes later the screen went black for good. Burnt circuits on the board.
-If you do achieve 'major fail' status, there are lots of people parting these things out nowadays, check that auction site for boards and cables. Mind the details.
-Have a can of compressed air at the ready. Banish the dust, don't manage it.
-Also, a nice clean microfiber is handy.
-Respect the delicate nature of the machine's functions and Apple's particularities.
Excellent directions. I just replaced the original 500 GB with a 1 TB and now I'm reloading the operating system. No issue with the temperature sensor orientation since the new drive and the plug are keyed and will only go in one way. Also, you really don't need any suction cups to remove the front glass. Just use a finger nail or anything somewhat soft, like a credit card, to raise it at one corner and then gently lift up and it will come away from the magnets very easily. Thank you for the great directions!!
I successfully replaced my failed drive following this fantastic guide a few days ago and everything is running great! The entire process took me about an hour and that was with me working very slowly, making sure I followed all the directions and warnings in the guide.
Throughout the process, I was really concerned about the possible fan issue. So far... it has turned out to be a non-issue. My original drive was Seagate 500 gb, and I replaced it with a Seagate Barracuda 1 TB HD model ST1000DM003. Everything fit just like the original. No additional cables or no new fan control software has been needed . I just put in the new hd, and it worked. I have an additional 2010 iMac that will be needing this same upgrade soon and I hope to tackle that one after the holidays. :-)
I just replaced the LED control board on my late 2009 21.5" iMac and everything worked well. Great guide! So now I am thinking about replacing the HD with a 1TB SSD, and also about putting in a 2nd smaller SSD in the optical drive bay. Can I control the fans for both of those with software? That seems to be the easiest solution, rather than messing around with shorting out the lead or trying to add a third-party sensor in some way. I have 16 GB or RAM on this puppy and if I can get SSDs in there I can see using this computer for another couple of years at least.
This is what I did: I bought a WD Black (4T) and an enclosure for my old HD. First I put the WD disk in the enclosure and made a copy using CarbonCopy Cloner. The first copy failed somewhere during the night so I retried with all the energy/screen saving features off, network off and connected the enclosure directly to the iMac instead of using my usb hub. This went okay.
Then I opened up my iMac and swapped the disks. I put the thermal connector in a position away from the other connectors.
Then booted the iMac from the old HD, OSX does this automatically and selected the new WD as start up disk in the System Preferences. Rebooted.
iFixit!
Hi guys,
really interesting staff here. I need your help for an issue I have with my Imac 2008. I had replace the HD ( i didn't do by my self, but in arepair center): they assured me that new HD is ok and they had done a complete back of the data included OSX, but once I've started mi imac it stay on White screen. What can i do: obviously I call them back and ask for help, but I need to understand if they had done a good job and if their are able to fix the issue.
hank you for your help
Hi! Thanks for instructions! It took me almost one hour to replace a 500G HDD. Since it was a Toshiba 1TB, I had to follow Ian tip and used HDD Fan Control. After installing I just copied the backup I've done before via CopyCloner. It took almost 6 hours. Now I have plenty of space. Thank you guys at Ifixit!
Tempreture sensor from Other World Computing, https://eshop.macsales.com/item/OWC/DIDI...
Hey guys,
I'm about to replace my hard drive but I was wondering if I need to install the IOS software after the replacement is all said and done. I've done an SSD swap in the past with a 2010 Macbook pro and required a separate 10 gb memory thumb drive with the IOS software already downloaded onto it. Not sure if i need to do the same for the IMAC EMC 2308. Thank you
Just replaced the hard drive on a late 2009 imac 21.5" because nothing was working. It started with a "beach ball" where I could not access anything then finally ended up with the Apple logo, a spinning wheel and a progress bar that would not load anything. So I figured it was the hard drive. Now the computer is working just fine, it comes on quick and the fan are spinning normally but, but, the DVD's (2) provided with the system when bought are being rejected from the super drive !!!! I follow the instructions on the DVD but to no avail, I get the flashing question mark and don't no now what to do....can anybody help?
Hey Atara, I'm in a similar situation. I replaced the hard disk on the same model iMac, but now when I boot up, the system doesn't detect the new SSHD. I just get the flashing "folder of death."
Putting the original drive back in yields the same result, so I think there is a problem where the drive's power cable connects to the PS. That's beyond my level, so it's at the tech shop now.
Both drives boot fine from a USB enclosure. It's not the drive.
As for your issue, not sure what's up there. The superdrive on our model crapped out a long time ago and it just takes up space now.
smith981 -
I successfully used this guide on my 2012 27". I was able to do only removing the 2 wire LCD cable. Replaced a Seagate with a Seagate 2TB, but still ended up with the fan issue. Mine starts out normal, & then after an hour cranks way up. At times it slows down and sounds like ikt will go back to near silent running, but then escalates again. Going to try HDD fan software or similar.
Need HELP, please. Took a late- 2009 iMac 21" into Apple for technical help. The PC crapped out on me. Was told that the HD needed replacing. I just installed a WD 1 TB Blue IHD. It does not have the temperature sensor pins, however I thought I could work around that via a software program. I spent a considerable amount of time making certain all was connected correctly, however when I turned the PC on I have a white screen but I also have a blinking "?" (Question Mark). What to do??
You have a empty Harddrive. So there is no Operationg System - this is the "?".
Start with Snow Leopard / Lion CD.
Have you OSX installed on your HD ?
Hello.. I have a 2010 imac 27, And this day I have installed a toshiba 3to without temp sensor, for the issue with the fan I have a 2009 macbook pro for parts, and many temp sensor, after little modification on the wiring, the chassis temp sensor of the macbook pro fit perfecly on the hdd with some tape, and no error, fan at correct speed, and could read temp of the hdd in macfan control.... Succes
Sorry for my language, i'm french.
Well done Sylvain
Hello, I changed the HDD of my late 2009 21,5" iMac with a crucial 2"5 Crucial SSD. Everything seemed to be OK, but when I started the computer I got the "?" sign for non-reconnaissance of the SDD. After dismounting and control I observed the data cable was not properly fixed. Then I closed the machine and I put a USB key for starting.
After installation of MacOS Sierra, I only had to stop the incredible fan noise : Mac fan control is very efficient. You need to know the maximum acceptable temperature for the CPU. I have a "new" computer. Thanks for the tutorial.
You can buy a Temperature Sensor for 2009 iMac on Ebay. I did this and don't need any Tools for Fan Control.
Also replace the HDD with SSD and .. omg .. the iMac is around 30 times faster then before. O_o
Very helpful tips: http://architecture.uonbi.ac.ke/
The original Apple temperature sensor consists of an ordinary NPN-transistor. The type is BC547 or the equivalent 2N3904.
You connect the base and collector leads to the black wire and the emitter lead to the grey wire. Then you use double adhesive tape to fasten the transistor to the hard drive a few centimeters from the drives circuit board.
Sven, Gotland
Hallo, habe gestern die original Festplatte im 21,5“ iMac Late 2009 (500 GB Seagate) gegen eine neue SSHD Seagate Firecuda 1 TB getauscht. Ich habe dann einfach den eingebauten Thermalsensor wieder an die neue Platte gesteckt. Alles in Ordnung, keine Lüfterprobleme! Der rote Text im Schritt 10 trifft also nicht auf mich zu bzw. meinen iMac.
Der über Alternate bestellte OWC-Sensor geht wieder zurück. Abzocke von OWC?
—————————————-
Hello, I replaced the original HDD (500 GB Seagate drive installed by Apple) in my 21.5“ iMac Late 2009 with a new SSHD Seagate Firecuda 1 TB yesterday. Then I simply connected the original built-in thermal sensor to the new drive. All works fine, no fan issues or something else! Red text in step 10 was not true for me btw. my iMac!
The thermal sensor adapter by OWC will take it’s way home to Alternate, where I bought it. Rip off by OWC?
Tom, Berlin (Germany)
Great guide! I just replaced the old Hitachi 500 GB with a new Seagate 2 TB Drive and encountered the issue with the temp sensor connector. I ordered a spare cable from an old model with had a Seagate drive from Ebay (Item number 593-0998) and replaced that as well. Now everything is working as intended!
I tried to replace the hd with ssd. Changed the hd and put everything back to place. Tried to start but nothing, no sound, no fan.
Tried to start the mac without the display attached and the mac start. How can i know which cable i damaged ?? Any ideas ?
A few comments having updated 5 machines in a row:
1) The OWC 2.5-3.5” tray / SDD holder is a better option than the ICY dock used here. The OWC tray is made of die-cast metal and allows much better air circulation than the plastic icydock. Plus, the temperature sensor board (sourced from OWC) has more room between it and the iMAC display panel
2) Carbon Copy Cloner and a external drive enclosure or dock with a FireWire 800 interface are your best bet re: a fast and easy transfer. Apple Disk Utility will not clone a drive you’re booting off so unless you’re willing to wait through an endless boot from a DVD install disk, get Carbon Copy Cloner. It will even re-size / partition / install the recovery disk.
3) It’s a shame that in some cases parts-only kits are not available here or elsewhere. I only needed a single set of tools.
4) By far the longest-taking aspect of the upgrade is the hard drive transfer. If you have multiple machines that need a upgrade, bring multiple docks and start cloning in advance.
There is a glue around the display when open it ?
Hi Simone,
There is no glue in this model. The screen is held in place with magnets!
First thing I noticed was that the LCD screen on my computer did not come out the same as this one. I’m fairly crafty, so I figured out how to lift the screen out, only to find that all of the connections were different. Still managed to get it apart but when I got to the HD removal, the screws were not placed conveniently vertical like this computer. On mine, they were on the side and completely inaccessible without removing circuit boards. Argh!! decided not to go any further as everything was different and didn’t want to end up with an inoperable computer, so off to the store it will go for install. Best to leave it to people more familiar than me. On the bright side I did manage to get it all back together and working.
Thank you, thank you, thank you!
DO make sure that you’re using the right guide. The code (EMC 2308) is embossed on the base of the iMac stand.
I used a USB to SATA cable (USB to SATA) to reinstall a working OS onto the new SSD and then backed it up from Time Machine. This meant that I knew I had a working replacement BEFORE I opened up the machine to replace the old disc with the new one.
There’s a lot of confusing information about the thermal sensor here, BUT if you’re replacing a conventional HDD with an SSD, you just need to make sure that you’ve got the appropriate SATA bridge with the sensor built in: Thermal Sensor NO fan problems!
I had no problems disconnecting and reconnecting the four main links behind the LCD screen and felt much happier having painless access into the main body of the computer, while the LCD sat safely on a clean cloth, well away from the dusty interior of the open iMac. After procrastinating for a year. This turned out to be painless!
Excellent; I chose to replace with a 1TB SSD and the guide worked for me all the way through. This is the most ambitious fix so far for me and has given me more confidence (not to say a faster computer with doubled storage) so thank you Andrew.
How will the data on the original hard drive...and anything else be recovered? No one writes about data backups, is it necessary? Reinstall or something?
Thank you for your answers!
I completed the upgrade and I am getting an issue where the drive cannot be formatted correctly. In Disk Utility it gives an error: error wiping volume data to prevent future accidental probing failed
I even tried it without the thermal sensor adapter and it was the same. When I tried the drive in an external usb adapter it had no issues being formatted. Could this be an issue of the Sata cable?
If your drive is already formatted, why not trying to see if it works properly inside the iMac ?
The extraction of the screen is a bit tricky: make sure you have a flashlight while you're disconnecting the cables connected to the main board. Could be useful the help of someone for holding the screen while you're disconnecting the cables.
I put a new Seagate 500Gb HD in my iMac 2009 and did it by stopping at step 6 after pulling the sync ribbon cable out of its socket.
I then raised the Display up to a 45 degree angle and placed a new Ticondaroga pencil in each corner, much like a hood on a car gets held up.
I then could use 2 hands to unscrew the HD from the bracket and to remove the SATA cables.
The only issue that took longer to do then all the rest was the 8 display screws :-) I used a mini Hemostat but those magnets are really strong.
And that was that about that. Quick, easy and little trauma to the iMac cables, etc.
The iFixit suction cups worked great but they leave a gummy residue circle on the screen.
I used some Meguiar’s Cleaner Wax (the same I use on my guitar) to clear it up nice and smooth and shiny.
Very easy to lift the glass out. Don't jerk too hard.
kctipton - Responder
Another comment on DATA & LCD Temp. Sensor cables: I had to remove the vertical sync, and the backlight cable, however, if you have an assistant or/can carefully rotate the screen clockwise/and then have it held up about 5" to 6" at a slight angle, you do not need to remove LCD data cable or LCD thermal cable, however - IMPORTANT: you must have a second pair of hands/or way to securely prop up the LCD. Also, don't rotate too much, since then you will pull out LCD data cable, and it renders the whole exercise moot, or can damage the cable or connector.
MaximBorzov - Responder
You don't need suction cups. The screen, held by magnets, can simply be pried off using a very thin blade such as a screw driver and fingers.
Deepsurvival - Responder
That's a bad idea. using a metal tool to pry off glass is likely to end with an expensive broken front glass.
Suction cups are common. Find a couple and do it the safe way. I use some cheap ones that came with iPhone repair kit.
max damage -
No need for suction cups, I just stuck my nails (short like guys usually have) between the top part of the screen and body, and it came off easily. I've never done it before, so it seems to be very easy.
Nikolas Lintulaakso - Responder
Nails worked for me too
Rob Dale - Responder
Just completed the replacement of the optical drive with an SSD using an OWC Data Doubler kit. Attempted to remove the optical drive without disconnecting any cables but found it a bit fiddly to orient the screen for good access. I bit the bullet and disconnected them and found the process less daunting than I imagined. Reconnecting them was similarly straightforward if you're careful.
Tip: you can skip the step for removing the optical drive thermal sensor connector from the motherboard. Still need to remove the sensor from the optical drive but you can leave that hanging and reattach it to the SSD later.
osienna - Responder
I use Garmin GPS suction cup. Work very well
jc3Dcx - Responder
I’ve just successfully installed a 1TB SSD in place of my optical drive thanks to the information here- thank you to everyone who has contributed!
3 comments- the procedure described here seems to vary between HD replacement and dual HD/optical drive replacement. This can be confusing at times.
Expect there to be minor differences between the layout described and what you find when you open up your iMac. There are also, surprisingly, differences between the HD enclosure description, and the article provided by ifixit.
I was able to replace the DVD/HD enclosure single-handedly without fully removing the LCD, or deconnecting any of the cables (steps 5-11). It’s a bit cramped, and fiddly, but I was not happy removing any of the cables despite watching videos, etc., since they all seemed to involve applying more force than I was comfortable with. A more detailed description of how to release them might have helped, but even here, there may be minor variations even within the 2389 model.
Good luck!
ivan birks - Responder
I did it several times with one suction cup at the end of a kitchen brush. Once with the blade of a swiss army knive, also ok. And i’m pretty sure it works with fingernails too
Tai - Responder
Fingernails are all you need to free the glass from its magnetic hold. If you don’t have them, slip something thin and plastic, like a spudger, at a top corner.
Max Powers - Responder
Minha dúvida é a seguinte: após o técnico trocar o HD do meu iMac de 21,5 polegadas, a câmera parou de funcionar. Seria por causa da troca do HD? Tem solução?
Claudio - Responder
Creio que o cabo da camera não foi plugado ou deu mau contato… ou até danificado.
glecyo@gmail.com
glecyo medeiros -
I can’t get my glass to budge. I’m replacing a cracked one and now it’s about to shatter.
jamboxmitchell - Responder
I know that I'm replying really late but I advise to use clear tape over any cracks so the cracks don't get bigger
Jace Holmes -
Check for chips in the glass BEFORE you do this step. If there is a chip when you pull up with the suction cups you will wind up with a jagged mess. If you do have a chip I would advise covering the screen near the chip with clear tape of some kind before lifting out. Mine shattered right at the chip and the resulting glass dust cloud got all over. My solution was buying a new glass screen.
BCam - Responder