Introdução
Use this guide to replace a faulty optical drive in an Xbox Series X.
Before you begin, completely power down and unplug all cables from your console. Remember to follow general electrostatic discharge (ESD) safety procedures while repairing the console.
The board inside the optical drive is software-linked to the console’s motherboard. This board will need to be transferred into the replacement optical drive to restore full functionality. This will require you to de-solder and solder two wires. Follow general soldering safety guidelines such as wearing eye protection, working in a well-ventilated area, and washing your hands after with soap and water after soldering.
O que você precisa
-
-
Use a pair of tweezers to remove the sticker hiding the first screw on the back panel, near the base.
-
-
Ferramenta utilizada neste passo:Magnetic Project Mat$19.95
-
Use a T8 Torx driver to remove the two 7.4 mm‑long screws securing the back panel.
-
-
-
Insert the flat end of a spudger into the gap between the back panel and the shell, near the left side of the base.
-
Pry up the back panel to release it from the locking clips.
-
-
-
Grip the back panel at the opening you just created and pull it up and away from the shell to unclip the long edges.
-
-
-
Use the flat end of a spudger to lift up on the locking tab holding the base to the shell.
-
-
-
-
Grip the base and rotate it counterclockwise to unlock it from the shell.
-
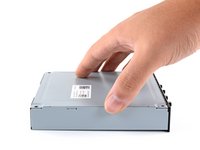
Remove the base.
-
-
-
Use a T8 Torx driver to remove the two 8.8 mm screws securing the optical drive's vibration isolator to the shell: one on the base and one on the top of the isolator.
-
-
-
Lift up the optical drive's vibration isolator to remove it.
-
-
Ferramenta utilizada neste passo:Tweezers$4.99
-
Use a pair of blunt tweezers to grip the edges of the optical drive power connector and pull up to disconnect it from the optical drive.
-
Use your fingers to pull up and disconnect the data cable from the optical drive.
-
-
-
Grip the top edge of the optical drive and pull it out of its slot in the shell to remove it.
-
-
-
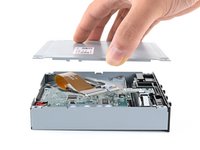
Use a Phillips screwdriver to remove the four 3.6 mm screws securing the optical drive cover.
-
-
-
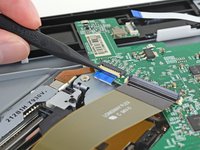
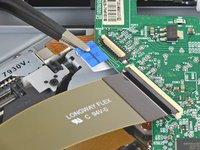
Use the pointed end of a spudger to flip up the hinged locking tab on the large ribbon cable's ZIF connector.
-
-
Ferramenta utilizada neste passo:Tweezers$4.99
-
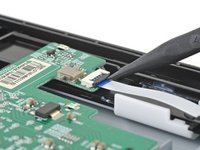
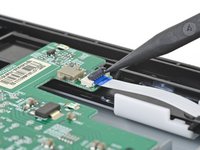
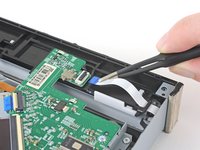
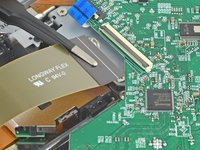
Use a pair of blunt tweezers to remove each of the three ribbon cables from their connectors.
-
-
-
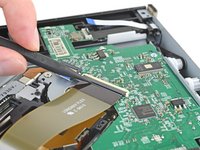
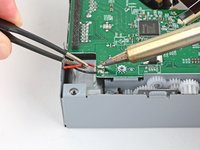
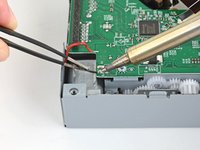
Use a soldering iron to desolder the red wire in the corner of the optical drive board.
-
Then, desolder the adjacent black wire. Use a pair of blunt tweezers to hold and pull away the wires from the board.
-
-
-
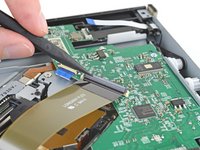
Use a Phillips screwdriver to remove the three 3.3 mm‑long screws securing the optical drive board.
-
-
-
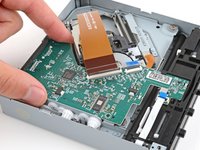
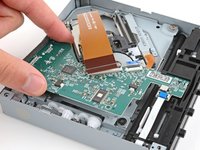
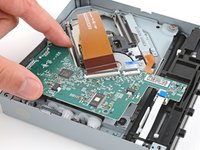
Lift the edge of the board near the plastic gears and slide the board towards the edge so it comes out from under the clip near the barcode.
-
-
-
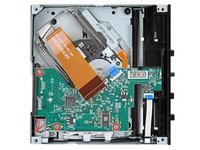
Remove the optical drive board.
-
Use the same process (starting at this step) to remove the optical drive board from your replacement drive.
-
You'll need to transfer your original optical drive board into the new drive.
-


To reassemble your device, follow these instructions in reverse order.
Take your e-waste to an R2 or e-Stewards certified recycler.
Repair didn’t go as planned? Try some basic troubleshooting, or ask our Xbox Series X Answers community for help.
To reassemble your device, follow these instructions in reverse order.
Take your e-waste to an R2 or e-Stewards certified recycler.
Repair didn’t go as planned? Try some basic troubleshooting, or ask our Xbox Series X Answers community for help.
Cancelar: não concluí este guia.
7 outras pessoas executaram este guia.


8 comentários
Where can I get a replacement disk drive for my Series X? Figures the warranty just ran out last month and now the disk drive wants to start acting stupid. Doing the same exact thing my One X did where it'll read some discs no problem but won't read others. Just got Guardians of the Galaxy brand new, first time ever taking it out of it's case and inserted directly into the console and it won't read.
After zooming into the drive cover, we find the model number is DG-6M5S-03B Which can then be googled, to find that its the exact same replacement drive from previous xbox models. The only difference being the drives motherboard, which you will be swapping to your current one anyway.
Where can I get replacement drive?
After zooming into the drive cover, we find the model number is DG-6M5S-03B Which can then be googled, to find that its the exact same replacement drive from previous xbox models. The only difference being the drive's motherboard, which you will be swapping to your current one anyway.
I bought a replacement drive for my One X and never installed it, but am now having issues with my Series X drive. The spare I have is P/N DG-6M5S-02B. Is this a compatible replacement?