Introdução
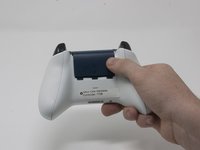
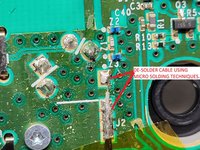
The Bottom Motherboard on your Xbox Controller may need to be replaced if the controller is not working. Complete removal will require soldering. The link to the soldering guide is included to help you. This guide will show you how to access the bottom motherboard on your Xbox One Wireless Controller Model 1708.
O que você precisa
-
-
Slide the battery cover toward the top of the controller to remove it.
-
Lift up the batteries or the battery pack from the battery compartment.
 Pergunte ao FixBot
-
-
-
Insert a plastic opening tool into the top seam, and gently work the opening tool to the bottom of the controller.
-
Continue using the opening tool to gently pry the side plate off of the controller.
-
Repeat this process for the second side plate.
-
-
-
Gently peel the battery label or punch a hole in the center of the sticker in the battery compartment to reveal the hidden screw.
-
Remove the five 9mm torx-9 security screws from the back of the controller.
-
-
-
Orient the controller so the front plate is facing up.
-
Lift the front cover off of the controller.
-
-
-
-
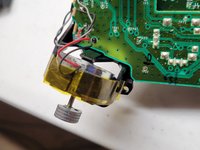
Tape the Rumbler/shock motors in place.
-
This will prevent the motors from falling out.
-
-
-
Turn the device over and remove the directional pad by gently pulling it away from the controller.
-
-
-
Turn the device over and remove the two 7mm torx-6 screws in the bottom left and right corners.
-
-
-
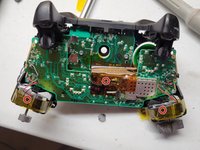
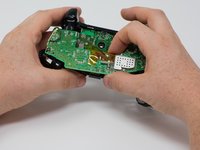
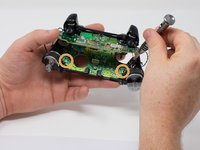
Firmly grasp the top and bottom motherboards in opposite hands, then gently pull them apart.
-
-
-
Remove the audio port from the bottom mother board.
-
-
-
Remove the three 70mm torx-6 screws from the center of the bottom motherboard.
-
Remove the two 70mm torx-6 screws next to the rumble motors on the bottom motherboard.
-
Remove the one 70mm torx-6 screw located on the left side of the bottom motherboard.
-
-
-
Use a plastic spudger to lift the plastic clip off the front pegs.
-
Remove the plastic clip by sliding it upwards.
-
-
-
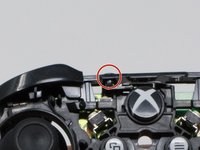
Use a spudger to release the small hooks at each end of the left and right bumper.
-
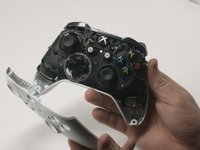
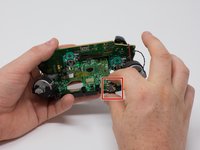
After you release these hooks, be careful as you separate the face plate from the back of the controller. The connect/sync button (see second image) is held in by this face plate and will come loose as you perform this step.
-
-
-
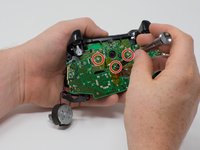
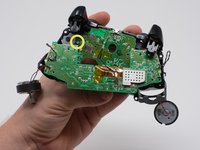
To avoid disconnecting the wires connected to the motherboard, lift the mother board away from the plastic frame as if opening a laptop.
-


To reassemble your device, follow these instructions in reverse order.
Cancelar: não concluí este guia.
32 outras pessoas executaram este guia.
Equipe

Cal Poly, Team S18-G3, Forte Fall 2017 Membro de Cal Poly, Team S18-G3, Forte Fall 2017
CPSU-FORTE-F17S18G3
4 Membros
Autoria de 42 guias
15Comentários do guia
Just to clarify you don’t need to do any soldering. If you are careful enough with the top mobo and rumble motors the wires should stay connected and you can take out the bottom mobo fairly easily. I saw some youtube videos that imply that you do need to disconnect and solder them back. Not the case!
What is the wire that connects the two motherboards together with the copper adaptor for? When taking mine apart, the wire came loose from that tiny copper piece and is unrepairable. I think it's for the Bluetooth functionality. The wire used looks to have a very tiny wire inside itself surrounded with what looks to be ground wire. It's the black one in the middle.
It will clip back into place if you align it properly.its similar to the antenna clip of motherboard in a iPhone 4 you don’t need to solder it just lift and be careful when reattaching it don’t force it if it bends you are screwed. But when lined up right minimal pressure will snap back into place.
I’ve tried many different angles and pressures to get that thing back in, the pin doesn’t look bent but it just won’t go back in.
does anyone know part number for controller in which the mother and daughter board are connected with a ribbon cable? this one has a plug
i need to replace the ribbon cable connector. thoughts.