Ir para o conteúdo principal
Participe da comunidade de reparos - Criar conta

Nikon D3100 Motherboard Replacement

O que você precisa

    1. Nikon D3100 Motherboard Replacement, LCD Screen: passo 1, imagem 1 %32
      • Use a Phillips #00 screwdriver for all of the screws.

      • Remove two of the 4mm screws indicated by the circles on the bottom side of the camera.

      Pergunte ao FixBot

      Comentar

    2. Nikon D3100 Motherboard Replacement: passo 2, imagem 1 %32 Nikon D3100 Motherboard Replacement: passo 2, imagem 2 %32
      • Remove four of the 3mm screws around the eye piece located on the top of the back panel, including the screw hidden behind the auto focus label.

      • Remove the 3mm screw behind the rubber grip on the top right of the back panel.

      Pergunte ao FixBot

      Comentar

    3. Nikon D3100 Motherboard Replacement: passo 3, imagem 1 %32
      • Peel back the rubber grip on the right side of the camera using a spudger.

      • You may need a heating pad to melt the glue holding the rubber grip to the camera. If using the heating pad, use caution and handle carefully.

      • Remove two of the 5mm screws under the rubber grip.

      Pergunte ao FixBot

      Comentar

    4. Nikon D3100 Motherboard Replacement: passo 4, imagem 1 %32
      • Remove two of the 4mm screws on the left side of the camera.

      Pergunte ao FixBot

      Comentar

    5. Nikon D3100 Motherboard Replacement: passo 5, imagem 1 %32 Nikon D3100 Motherboard Replacement: passo 5, imagem 2 %32
      Ferramenta utilizada neste passo:
      Tweezers
      $4.99
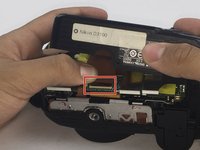
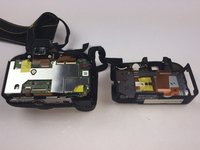
      • Starting from the top, gently lift the back panel of the camera off. Slowly separate the back panel from the main body of the camera.

      • Be careful not to pull the panel out too fast or the ribbon may be damaged.

      • Carefully remove the ribbon using a spudger to lift up the connector and then use tweezers to pull out the ribbon.

      • Separate the back panel from the main body of the camera.

      Pergunte ao FixBot

      Comentar

    6. Nikon D3100 Motherboard Replacement: passo 6, imagem 1 %32
      • Be careful when separating the metal plate from the back panel because the speaker wire is connected to the metal plate. It can easily be torn if caution is not taken.

      • Remove nine of the 3mm screws connecting the metal plate to the plastic panel.

      Pergunte ao FixBot

      Comentar

    7. Nikon D3100 Motherboard Replacement: passo 7, imagem 1 %32
      • Remove the tape covering the ribbons. Be careful not to break the tape.

      Pergunte ao FixBot

      Comentar

    8. Nikon D3100 Motherboard Replacement: passo 8, imagem 1 %32
      • Remove the two ribbons connecting the LCD screen to the metal plate using the same method from Step 5.

      Pergunte ao FixBot

      Comentar

    9. Nikon D3100 Motherboard Replacement: passo 9, imagem 1 %32
      • Remove the old LCD screen from metal plate.

      Pergunte ao FixBot

      Comentar

    1. Nikon D3100 Motherboard Replacement, Motherboard: passo 10, imagem 1 %32 Nikon D3100 Motherboard Replacement, Motherboard: passo 10, imagem 2 %32
      Ferramenta utilizada neste passo:
      Tweezers
      $4.99
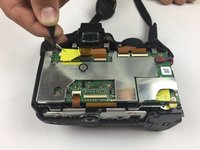
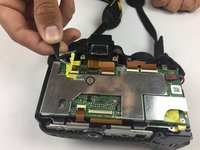
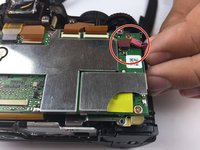
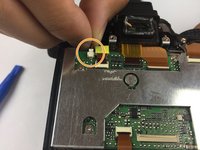
      • Use tweezers to gently lift the yellow tape from the back of the camera.

      Pergunte ao FixBot

      Comentar

    2. Nikon D3100 Motherboard Replacement: passo 11, imagem 1 %32
      • Use a plastic spudger to remove the 6 ribbons.

      • Be careful not to tear the ribbons.

      Pergunte ao FixBot

      Comentar

    3. Nikon D3100 Motherboard Replacement: passo 12, imagem 1 %32 Nikon D3100 Motherboard Replacement: passo 12, imagem 2 %32
      • Remove the plug located on the top-right side of the camera.

      • Remove the plug located on the top-left side of the camera.

      Pergunte ao FixBot

      Comentar

    4. Nikon D3100 Motherboard Replacement: passo 13, imagem 1 %32
      • Use a Philips #00 Screwdriver to remove the five 3 mm screws marked in the image.

      Pergunte ao FixBot

      Comentar

    5. Nikon D3100 Motherboard Replacement: passo 14, imagem 1 %32 Nikon D3100 Motherboard Replacement: passo 14, imagem 2 %32
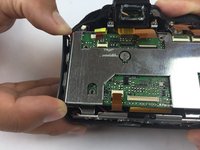
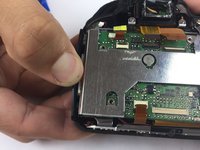
      • Gently pull out the side wall of the camera so that the motherboard comes out easier.

      • Do not pull too hard or you will risk breaking the plastic.

      Pergunte ao FixBot

      Comentar

    6. Nikon D3100 Motherboard Replacement: passo 15, imagem 1 %32
      • Be careful while lifting the motherboard because there is one more ribbon attached.

      • Gently lift the motherboard to separate it from the back of the camera.

      • Use a plastic spudger to detach the ribbon.

      Pergunte ao FixBot

      Comentar

    7. Nikon D3100 Motherboard Replacement: passo 16, imagem 1 %32
      • Replace the motherboard.

      Pergunte ao FixBot

      Comentar

Conclusão

To reassemble your device, follow these instructions in reverse order.

Cancelar: não concluí este guia.

6 outras pessoas executaram este guia.

Jet Mejia

Membro desde: 09/26/16

686 Reputação

Autoria de 3 guias

Equipe

USF Tampa, Team 14-1, Eyestone Fall 2016 Membro de USF Tampa, Team 14-1, Eyestone Fall 2016

USFT-EYESTONE-F16S14G1

3 Membros

Autoria de 4 guias

0Comentários do guia

Comentar

Visualizações:

Últimas 24 horas: 5

Últimos 7 dias: 19

Últimos 30 dias: 94

Ao todo: 6,706