Essa tradução foi gerada por um programa e ainda não foi revisada por uma pessoa. Falas essa língua? Dá uma olhada.
Introdução
Utilize este guia para substituir a bateria do seu Nexus 7.
O que você precisa
-
-
-
Desligue o seu dispositivo.
-
Use a sua Ferramenta de abertura para inserir nas frestas ao redor das laterais do dispositivo. Force a abertura de cada lado, um de cada vez. Para algumas pessoas, a unha pode funcionar melhor. A carcaça sobe bastante até o vidro.
 Pergunte ao FixBot
-
-
-
Trabalhe com os dedos ao redor da fenda entre o dispositivo e a capa traseira. Use a sua Ferramenta de abertura e os dedos para separar cada lado até que o dispositivo e a capa traseira estejam completamente separados.
-
-
-
-
-
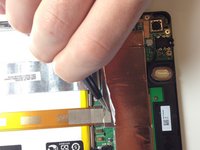
Insira a Ferramenta de abertura sob a borda lateral do conector da bateria e alavanque suavemente para cima para desconectá-lo.
-
-
-
-
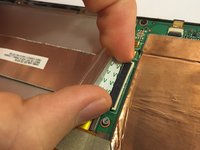
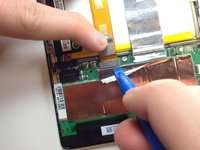
Use a ponta chata de uma espátula ou a sua unha para levantar a aba protetora transparente no soquete ZIF do cabo plano.
-
Usando a ponta chata de uma espátula ou a sua unha, levante a parte fina do conector (a parte branca, no lado oposto ao que o cabo é inserido) para soltar o cabo do seu soquete.
-
Deslize o cabo para fora do soquete ZIF.
-
-
-
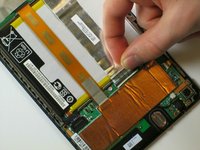
Descole a película protetora da tampa superior da placa-mãe para expor a conexão do cabo flat laranja.
-
-
Ferramenta utilizada neste passo:Tweezers$4.99
-
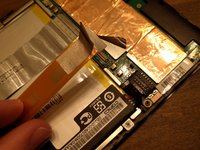
Usando a pinça, retire a película protetora prateada sobre o conector de fita laranja.
-
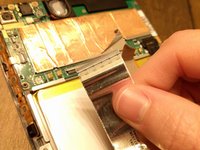
Usando a ferramenta de abertura, force para cima sob o conector de fita laranja. Ele sairá do lugar.
-
-
-
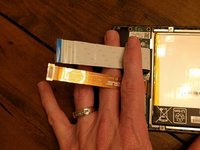
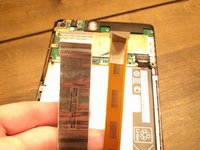
Agora que as duas fitas principais estão desconectadas, dobre-as e segure-as com os dedos, ou coloque a pinça ou um objeto leve sobre as fitas para mantê-las no lugar.
-
-
-
Use a chave Phillips #0 para remover os quatro parafusos Phillips #0 prateados de 3 mm ao redor do compartimento da bateria.
-
-
-
Remova a bateria do seu dispositivo aplicando pressão na bateria da base e levantando-a para fora.
-
-








Para a remontagem de seu dispositivo, siga estas instruções na ordem inversa.
Cancelar: não concluí este guia.
73 outras pessoas executaram este guia.

Equipe

Cal Poly, Team 20-16, Maness Winter 2015 Membro de Cal Poly, Team 20-16, Maness Winter 2015
CPSU-MANESS-W15S20G16
4 Membros
Autoria de 72 guias
20Comentários do guia
Don't be a goof like me and spend seven minutes trying to pry in the gap between the screen glass and the plastic. I thought that the plastic cover wrapped around the whole of the side and met the unit just under the glass. Nope...find the seam near the halfway point of the case side, between plastic and plastic. (The first photo here is not sufficiently clear to make this obvious.)
This is such a valuable comment. The photos are VERY misleading. Thank you for pointing this out!
1 If you look closely, you'll see that at the edge of the glossy, black screen there is a glossy, black, 1mm hard plastic band going all the way around the screen. This provides the beveling on the edge of the screen. Around that is the dull, black plastic case. Insert your spunger or fingernail between these two plastic bands. It is easiest to do near the middle both of the long sides. Gently slide up toward the corners popping each little snap. When you get near the corner, keep one fingernail/spunger in the gap you've created on the side, near the corner, then use another nail/spunger to go around the corner. Be careful here. This is the easiest place to damage.
Once the corners have popped, the end/short top edge is easy. The bottom edge is different since the micro-USB port is also there. I did not pry it open but lifted the other three sides and just slid the screen out from that end. I inserted the USB end first also when reassembling, snapping the other edges then corners in afterward.
2 I did crack that hard plastic band in two spots on the top left corner of my Nexus 7 (opposite the camera). On spot a tiny piece broke out, but the band is still continuous at the glass edge. Around the corner, the band actually appears to have broken in two. If I rub my finger there, I can begin to peel it up. I hope my case will keep it protected.
I had trouble with the stupid ribbon cable zif socket. Everything went well until the very end when I was reassembling and I had to stick that sucker in. It was really difficult, and the plastic tab came off. Then the end I pulled out at the beginning wasn't going back in. After trying to glue the plastic pulling-flap back on (hint: don't do that) I gave up, but then I had an idea. I pulled out the entire ribbon from both ends and just flipped them. Put in the troubled end in the bottom socket (it was easier than wrestling with it), and the better end in near the top of the tablet next to that orange ribbon, and it worked! I'm so relieved...! Now my tablet is back to working condition!
