Ir para o conteúdo principal

Motorola Droid Turbo 2 Battery Replacement

O que você precisa

  1. Motorola Droid Turbo 2 Battery Replacement, Midframe: passo 1, imagem 1 %32 Motorola Droid Turbo 2 Battery Replacement, Midframe: passo 1, imagem 2 %32 Motorola Droid Turbo 2 Battery Replacement, Midframe: passo 1, imagem 3 %32
    • Power off your phone before you begin working.

    • Insert a SIM eject tool, SIM eject bit, or a straightened paperclip into the small hole in the SIM card tray.

    • Press to eject the tray.

    • Remove the SIM card tray assembly from the phone.

  2. Motorola Droid Turbo 2 Battery Replacement: passo 2, imagem 1 %32
    • Heat an iOpener and apply it to the top edge of the phone for a minute.

    • A hair dryer, heat gun, or hot plate may also be used, but be careful not to overheat the phone—the display and internal battery are both susceptible to heat damage.

  3. Motorola Droid Turbo 2 Battery Replacement: passo 3, imagem 1 %32 Motorola Droid Turbo 2 Battery Replacement: passo 3, imagem 2 %32
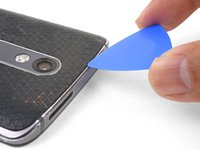
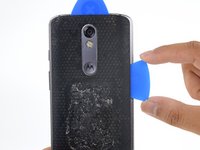
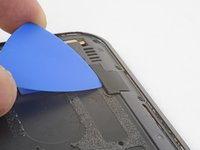
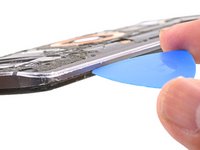
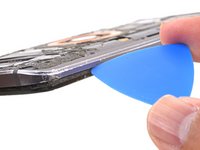
    • Angle an opening pick and firmly press so that it slips under the back cover.

    • Depending on the age of the phone, this can be difficult. Additional heating with the iOpener may help. You can pry carefully with a metal spudger to create a gap for the opening pick.

  4. Motorola Droid Turbo 2 Battery Replacement: passo 4, imagem 1 %32 Motorola Droid Turbo 2 Battery Replacement: passo 4, imagem 2 %32 Motorola Droid Turbo 2 Battery Replacement: passo 4, imagem 3 %32
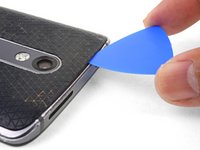
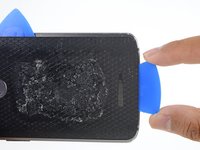
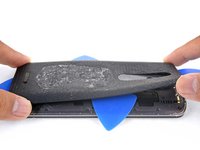
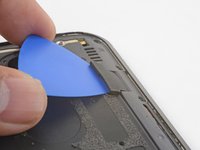
    • Slide the opening pick along the top edge of the phone to break up the adhesive.

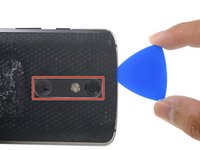
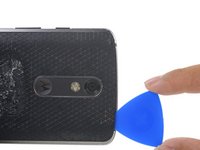
    • Use the pick to release the deeper areas but avoid slicing through the camera bezel area.

  5. Motorola Droid Turbo 2 Battery Replacement: passo 5, imagem 1 %32 Motorola Droid Turbo 2 Battery Replacement: passo 5, imagem 2 %32 Motorola Droid Turbo 2 Battery Replacement: passo 5, imagem 3 %32
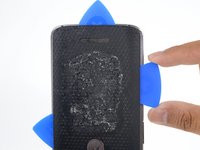
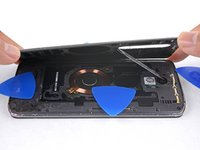
    • Repeat the iOpener heating and slicing procedures for the remaining three sides.

    • Make sure to cut into the deeper areas as the back cover is held on by a large adhesive surface.

  6. Motorola Droid Turbo 2 Battery Replacement: passo 6, imagem 1 %32 Motorola Droid Turbo 2 Battery Replacement: passo 6, imagem 2 %32 Motorola Droid Turbo 2 Battery Replacement: passo 6, imagem 3 %32
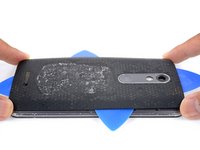
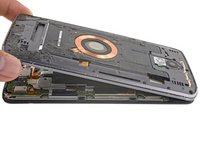
    • Once you have cut through the adhesive, slowly peel the back cover away from the frame.

    • Remove the back cover.

    • During reassembly, follow this rear cover adhesive guide to properly apply the pre-cut adhesive strip.

  7. Motorola Droid Turbo 2 Battery Replacement: passo 7, imagem 1 %32 Motorola Droid Turbo 2 Battery Replacement: passo 7, imagem 2 %32 Motorola Droid Turbo 2 Battery Replacement: passo 7, imagem 3 %32
    • Insert an opening pick under the flash connector rubber cover and pry forward to remove it.

    • To reinstall the cover, align the cover and use your finger to push it forward into place.

  8. Motorola Droid Turbo 2 Battery Replacement: passo 8, imagem 1 %32 Motorola Droid Turbo 2 Battery Replacement: passo 8, imagem 2 %32 Motorola Droid Turbo 2 Battery Replacement: passo 8, imagem 3 %32
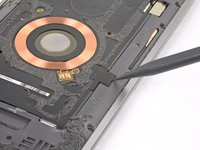
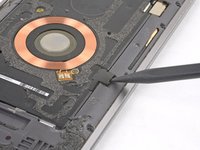
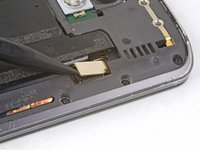
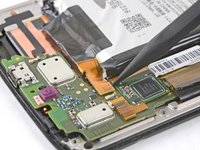
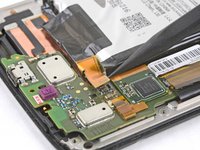
    • Use the point of a spudger to pry up and remove the coil connector rubber cover.

    • To reinstall the cover, align the cover and use your finger to push it forward into place.

  9. Motorola Droid Turbo 2 Battery Replacement: passo 9, imagem 1 %32 Motorola Droid Turbo 2 Battery Replacement: passo 9, imagem 2 %32
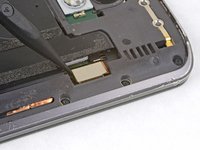
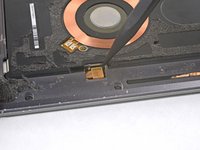
    • Use the point of a spudger to pry up and disconnect the flash connector.

    • To re-attach press connectors like this one, carefully align and press down on one side until it clicks into place, then repeat on the other side. Do not press down on the middle. If the connector is misaligned, the pins can bend, causing permanent damage.

  10. Motorola Droid Turbo 2 Battery Replacement: passo 10, imagem 1 %32 Motorola Droid Turbo 2 Battery Replacement: passo 10, imagem 2 %32
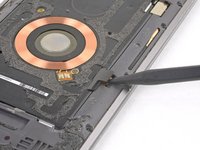
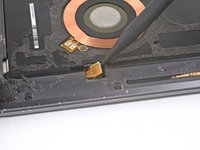
    • Use the point of a spudger to pry up and disconnect the wireless charging coil connector.

  11. Motorola Droid Turbo 2 Battery Replacement: passo 11, imagem 1 %32
    • Remove the following T3 screws securing the midframe:

    • Thirteen 3.1 mm black screws

    • Four 4.3 mm silver screws

    • Due to screw and bit variance, you may have better luck with a T4 driver. The proper bit should seat fully in the screwhead and feel slightly loose. The bit should not feel like it's stuck in the screwhead.

  12. Motorola Droid Turbo 2 Battery Replacement: passo 12, imagem 1 %32 Motorola Droid Turbo 2 Battery Replacement: passo 12, imagem 2 %32
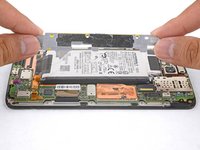
    • Insert an opening pick along the frame seam and twist slightly to release the midframe from the phone.

  13. Motorola Droid Turbo 2 Battery Replacement: passo 13, imagem 1 %32 Motorola Droid Turbo 2 Battery Replacement: passo 13, imagem 2 %32
    • Remove the midframe from the phone.

    • You can tape over the side buttons to prevent them from falling out during your repair.

    • If the buttons fall out of the midframe, reinsert them in the orientation as shown before you reinstall the midframe.

  14. Motorola Droid Turbo 2 Battery Replacement, Battery: passo 14, imagem 1 %32 Motorola Droid Turbo 2 Battery Replacement, Battery: passo 14, imagem 2 %32 Motorola Droid Turbo 2 Battery Replacement, Battery: passo 14, imagem 3 %32
    • Carefully peel the black graphite layer from the phone.

    • While it is unnecessary for normal operation, the graphite layer can be reused during reinstallation if it is in good condition.

  15. Motorola Droid Turbo 2 Battery Replacement: passo 15, imagem 1 %32 Motorola Droid Turbo 2 Battery Replacement: passo 15, imagem 2 %32
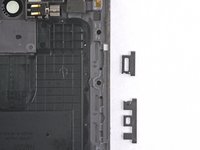
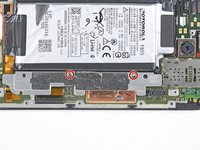
    • Remove the two 4.2 mm T3 screws securing the metal bracket adjacent to the battery.

    • Remove the metal bracket.

  16. Motorola Droid Turbo 2 Battery Replacement: passo 16, imagem 1 %32 Motorola Droid Turbo 2 Battery Replacement: passo 16, imagem 2 %32
    • Use the point of a spudger to pry up and disconnect the battery pack connector.

  17. Motorola Droid Turbo 2 Battery Replacement: passo 17, imagem 1 %32 Motorola Droid Turbo 2 Battery Replacement: passo 17, imagem 2 %32 Motorola Droid Turbo 2 Battery Replacement: passo 17, imagem 3 %32
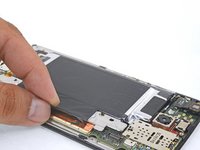
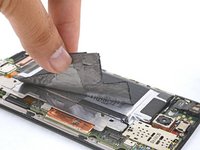
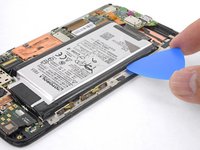
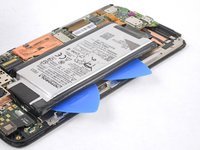
    • Angle and insert an opening pick under the long edge of the battery away from the motherboard side.

    • Insert a second opening pick along the same battery edge next to the first pick.

  18. Motorola Droid Turbo 2 Battery Replacement: passo 18, imagem 1 %32 Motorola Droid Turbo 2 Battery Replacement: passo 18, imagem 2 %32
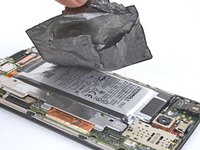
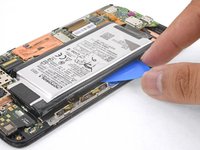
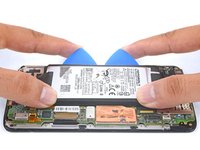
    • Apply firm, constant prying pressure to the picks to release the battery from the frame.

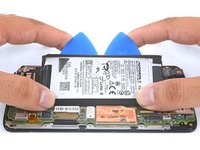
    • As the battery loosens from the frame, move the picks inward and continue to pry upwards.

    • The battery is secured to the frame with strong double-sided tape. To help release the battery, apply some high concentration (90% or higher) isopropyl alcohol under the battery to help loosen the adhesive.

    • Don't deform or puncture the battery, or it may leak dangerous chemicals or catch fire.

  19. Motorola Droid Turbo 2 Battery Replacement: passo 19, imagem 1 %32
    Ferramenta utilizada nesse passo:
    Tesa 61395 Tape
    $5.99
    Comprar
    • Remove the battery.

    • Never reinstall a damaged or deformed battery. Replace the battery.

    • To reinstall the battery, orient it such that the wires exit near the bottom towards the motherboard side.

    • To help with alignment, connect the battery temporarily to the motherboard before adhering it in place. Disconnect the battery before you continue with re-assembly.

    • Clean off any adhesive residue which may prevent the battery from sitting flush against the frame. Use a few strips of adhesive included in the battery kit or some double-sided tape to secure the battery to the frame.

Conclusão

To reassemble your device, follow these instructions in reverse order.

Take your e-waste to an R2 or e-Stewards certified recycler.

Repair didn’t go as planned? Check out our Motorola Moto Droid Turbo 2 Answers community for troubleshooting help.

78 outras pessoas executaram este guia.

Arthur Shi

Membro desde: 01/03/18

248.412 Reputação

Autoria de 503 guias

Equipe

iFixit Membro de iFixit

Staff

Membros da 136

Autoria de 16.562 guias

30 comentários

Despite being careful, I lost one screw that seemingly disappeared as I tried to place it back. Even a rare earth magnet didn't find it. It would be nice to have spare screws.

Bill Koonce - Responder

From whom would get those?

Dan Lo Fat -

Your neighbors Turbo 2…it would've up to you whether or not to tell the neighbors that you got them, lol. Everyone seems to have a junk phone around, open it up and find the closest matching one….. I be yet to find anyone that sells spare phone

Jack Gaites -

Replaced the battery, but now the display is pixelated on the right side. Any ideas? Need help ASAP.

Cameron Barringer - Responder

The only thing that got me hung up on this was the volume button reassembly. I can't seem to get the volume button to work properly again.

Richard Drawdy - Responder

Adicione um comentário

Exibir estatísticas:

Últimas 24 horas: 0

Últimos 7 dias: 10

Últimos 30 dias: 56

Duração total: 65,877