Ir para o conteúdo principal

MacBook Pro 13" Two Thunderbolt Ports 2020 Display Assembly Replacement

O que você precisa

  1. MacBook Pro 13" Two Thunderbolt Ports 2020 Display Assembly Replacement, Remove the lower case: passo 1, imagem 1 %32
    Ferramenta utilizada nesse passo:
    Magnetic Project Mat
    $19.95
    Comprar
    • Before starting this procedure, you should disable your Mac's Auto Boot feature. Auto Boot powers on your Mac when you open the lid, and may be accidentally triggered during disassembly. Use this guide to disable Auto Boot.

    • If your MacBook is running Big Sur v11.1 or later, disabling Auto Boot may not work. You can proceed normally, but make sure to disconnect the battery as soon as you're inside.

    • Completely power off and unplug your MacBook before you start. Close the display and flip the entire laptop upside-down.

    • Use a P5 Pentalobe driver to remove the six screws securing the lower case:

    • Two 6.8 mm screws

    • Two 5.3 mm screws

    • Two 3.4 mm screws

    • Throughout this repair, keep track of each screw and make sure it goes back exactly where it came from to avoid damaging your device.

  2. MacBook Pro 13" Two Thunderbolt Ports 2020 Display Assembly Replacement: passo 2, imagem 1 %32 MacBook Pro 13" Two Thunderbolt Ports 2020 Display Assembly Replacement: passo 2, imagem 2 %32
    • Apply a suction handle to the lower case near the front-center area of the MacBook Pro.

    • Lift the suction handle to create a slight separation between the lower case and the chassis.

  3. MacBook Pro 13" Two Thunderbolt Ports 2020 Display Assembly Replacement: passo 3, imagem 1 %32 MacBook Pro 13" Two Thunderbolt Ports 2020 Display Assembly Replacement: passo 3, imagem 2 %32 MacBook Pro 13" Two Thunderbolt Ports 2020 Display Assembly Replacement: passo 3, imagem 3 %32
    • Insert one corner of an opening pick into the space between the lower case and the chassis.

    • Slide the opening pick around the nearest corner and halfway up the side of the case.

    • This releases the first of the hidden clips securing the lower case to the chassis. You should feel and hear the clip pop free.

  4. MacBook Pro 13" Two Thunderbolt Ports 2020 Display Assembly Replacement: passo 4, imagem 1 %32 MacBook Pro 13" Two Thunderbolt Ports 2020 Display Assembly Replacement: passo 4, imagem 2 %32 MacBook Pro 13" Two Thunderbolt Ports 2020 Display Assembly Replacement: passo 4, imagem 3 %32
    • Repeat the previous step on the opposite side, sliding your opening pick under the lower case and up the side to pop the second clip free.

  5. MacBook Pro 13" Two Thunderbolt Ports 2020 Display Assembly Replacement: passo 5, imagem 1 %32 MacBook Pro 13" Two Thunderbolt Ports 2020 Display Assembly Replacement: passo 5, imagem 2 %32 MacBook Pro 13" Two Thunderbolt Ports 2020 Display Assembly Replacement: passo 5, imagem 3 %32
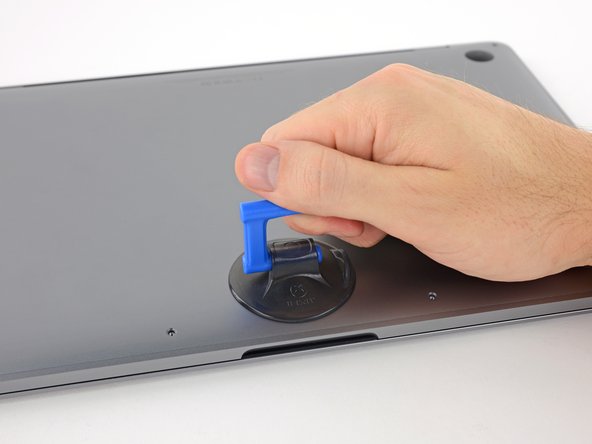
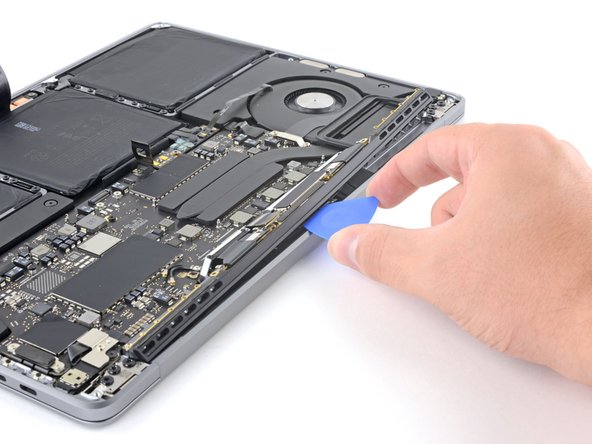
    • Insert your opening pick once again under the front edge of the lower case, near one of the two centermost screw holes.

    • Give the pick a firm twist to pop free the third clip securing the lower case to the chassis.

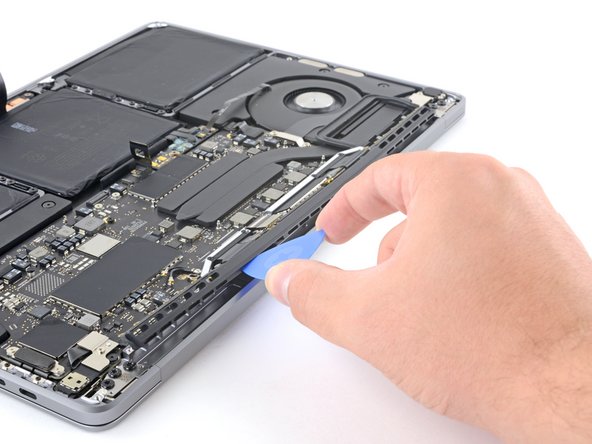
    • Repeat this procedure near the other of the two centermost screw holes, popping the fourth clip free.

  6. MacBook Pro 13" Two Thunderbolt Ports 2020 Display Assembly Replacement: passo 6, imagem 1 %32 MacBook Pro 13" Two Thunderbolt Ports 2020 Display Assembly Replacement: passo 6, imagem 2 %32 MacBook Pro 13" Two Thunderbolt Ports 2020 Display Assembly Replacement: passo 6, imagem 3 %32
    • Pull the lower case firmly towards the front of the MacBook (away from the hinge area) to separate the last of the clips securing the lower case.

    • It may help to pull first at one corner, then the other.

    • Pull to the side—not up.

    • This may require a lot of force.

    • The edges of the case can be sharp, so grip the sides carefully.

  7. MacBook Pro 13" Two Thunderbolt Ports 2020 Display Assembly Replacement: passo 7, imagem 1 %32
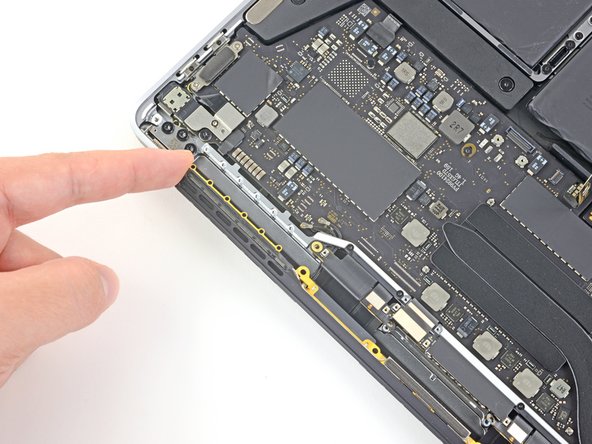
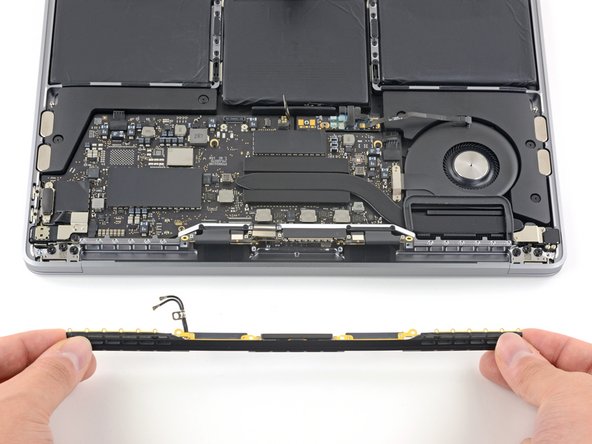
    • Remove the lower case.

    • To reinstall the lower case:

    • Set it in place and align the sliding clips near the display hinge. Press down and slide the cover toward the hinge. It should stop sliding as the clips engage.

    • When the sliding clips are fully engaged and the lower case looks correctly aligned, press down firmly on the lower case to engage the four hidden clips underneath. You should feel and hear them snap into place.

  8. MacBook Pro 13" Two Thunderbolt Ports 2020 Display Assembly Replacement, Disconnect the battery: passo 8, imagem 1 %32 MacBook Pro 13" Two Thunderbolt Ports 2020 Display Assembly Replacement, Disconnect the battery: passo 8, imagem 2 %32
    • Carefully peel up the large piece of tape covering the battery connector, on the edge of the logic board nearest the battery.

    • Remove the tape.

  9. MacBook Pro 13" Two Thunderbolt Ports 2020 Display Assembly Replacement: passo 9, imagem 1 %32 MacBook Pro 13" Two Thunderbolt Ports 2020 Display Assembly Replacement: passo 9, imagem 2 %32
    • Gently peel back the small piece of tape covering the battery board data cable connector.

    • The tape is integrated into the ribbon cable and will not detach completely. Simply peel it back enough to access the connector.

  10. MacBook Pro 13" Two Thunderbolt Ports 2020 Display Assembly Replacement: passo 10, imagem 1 %32 MacBook Pro 13" Two Thunderbolt Ports 2020 Display Assembly Replacement: passo 10, imagem 2 %32
    • Use the tip of a spudger to flip up the small black locking tab securing the cable in its connector.

    • Locking tabs on ZIF connectors are fragile, so be gentle when using the tip of the spudger.

  11. MacBook Pro 13" Two Thunderbolt Ports 2020 Display Assembly Replacement: passo 11, imagem 1 %32 MacBook Pro 13" Two Thunderbolt Ports 2020 Display Assembly Replacement: passo 11, imagem 2 %32
    • Disconnect the battery board data cable by sliding it out from its socket.

    • Slide parallel to the logic board, in the direction of the cable.

  12. MacBook Pro 13" Two Thunderbolt Ports 2020 Display Assembly Replacement: passo 12, imagem 1 %32
    • Fold the battery board data cable back and out of the way.

    • If you're replacing your battery, you may need to completely remove and transfer this cable to your new battery. Disconnect both ends and carefully remove the cable. During installation, be careful not to install it upside-down or backwards—note the orientation in the photos.

  13. MacBook Pro 13" Two Thunderbolt Ports 2020 Display Assembly Replacement: passo 13, imagem 1 %32 MacBook Pro 13" Two Thunderbolt Ports 2020 Display Assembly Replacement: passo 13, imagem 2 %32
    • Use a T5 Torx driver to remove the 3.7 mm pancake screw securing the battery power connector.

  14. MacBook Pro 13" Two Thunderbolt Ports 2020 Display Assembly Replacement: passo 14, imagem 1 %32 MacBook Pro 13" Two Thunderbolt Ports 2020 Display Assembly Replacement: passo 14, imagem 2 %32
    • Use a spudger to gently lift the battery power connector, disconnecting the battery.

    • Lift the connector high enough so that it stays separated from its socket.

    • If it accidentally makes contact during the course of your repair, it could damage your MacBook Pro.

  15. MacBook Pro 13" Two Thunderbolt Ports 2020 Display Assembly Replacement, Remove the antenna cable assembly: passo 15, imagem 1 %32
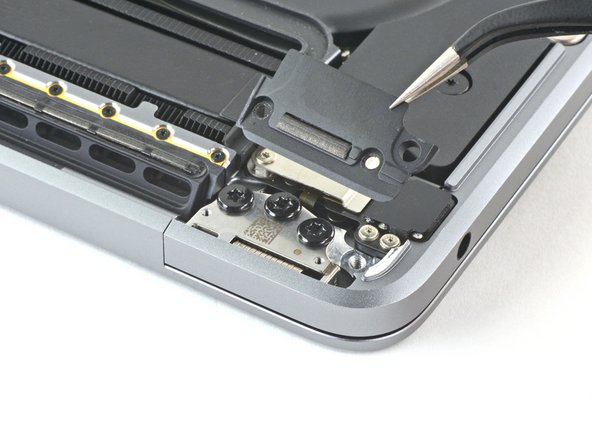
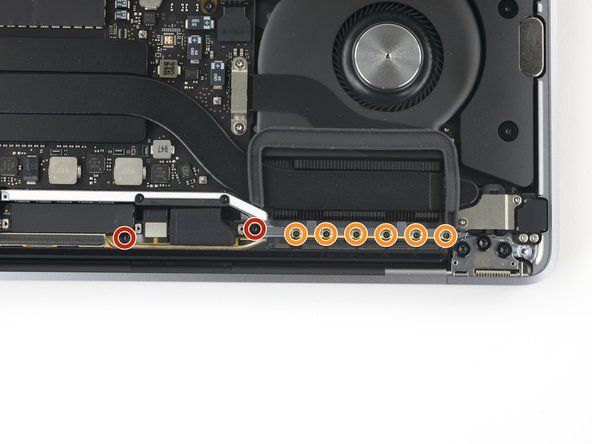
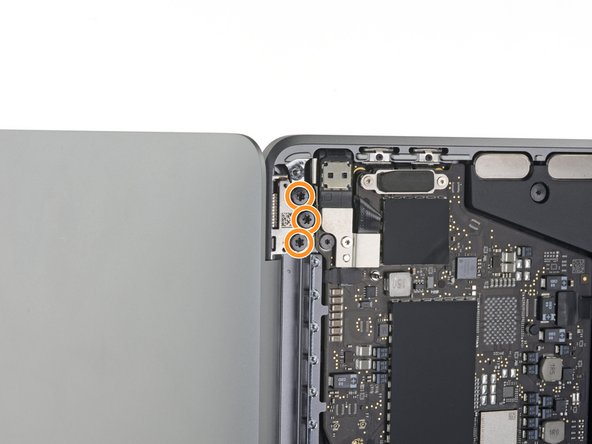
    • Remove the four 3.3 mm T3 Torx screws securing the plastic covers on top of the display hinges.

  16. MacBook Pro 13" Two Thunderbolt Ports 2020 Display Assembly Replacement: passo 16, imagem 1 %32 MacBook Pro 13" Two Thunderbolt Ports 2020 Display Assembly Replacement: passo 16, imagem 2 %32 MacBook Pro 13" Two Thunderbolt Ports 2020 Display Assembly Replacement: passo 16, imagem 3 %32
    • Remove both plastic hinge covers.

  17. MacBook Pro 13" Two Thunderbolt Ports 2020 Display Assembly Replacement: passo 17, imagem 1 %32 MacBook Pro 13" Two Thunderbolt Ports 2020 Display Assembly Replacement: passo 17, imagem 2 %32
    • Remove the two 3.1 mm T3 Torx screws securing the aluminum cover on top of the main display cable.

    • Remove the cover.

  18. MacBook Pro 13" Two Thunderbolt Ports 2020 Display Assembly Replacement: passo 18, imagem 1 %32 MacBook Pro 13" Two Thunderbolt Ports 2020 Display Assembly Replacement: passo 18, imagem 2 %32
    • Remove the two 1.7 mm T3 Torx screws securing the aluminum cover on top of the display cable flex connector.

    • Remove the cover.

  19. MacBook Pro 13" Two Thunderbolt Ports 2020 Display Assembly Replacement: passo 19, imagem 1 %32 MacBook Pro 13" Two Thunderbolt Ports 2020 Display Assembly Replacement: passo 19, imagem 2 %32
    • Pry the display board flex cable straight up from its socket to disconnect it from the display board.

  20. MacBook Pro 13" Two Thunderbolt Ports 2020 Display Assembly Replacement: passo 20, imagem 1 %32 MacBook Pro 13" Two Thunderbolt Ports 2020 Display Assembly Replacement: passo 20, imagem 2 %32 MacBook Pro 13" Two Thunderbolt Ports 2020 Display Assembly Replacement: passo 20, imagem 3 %32
    • Remove the four 1.5 mm T3 Torx screws securing the two aluminum covers on top of the two display cable connectors.

    • Use a pair of tweezers to remove the two aluminum covers.

  21. MacBook Pro 13" Two Thunderbolt Ports 2020 Display Assembly Replacement: passo 21, imagem 1 %32 MacBook Pro 13" Two Thunderbolt Ports 2020 Display Assembly Replacement: passo 21, imagem 2 %32
    • Remove the four 3.3 mm T5 Torx screws (two on each side) which secure the antenna cable assembly.

    • Also remove the twelve 1.1 mm P2 pentalobe screws (six on each side).

    • These small screws can strip easily, so make sure your P2 pentalobe driver is in good condition before applying pressure.

  22. MacBook Pro 13" Two Thunderbolt Ports 2020 Display Assembly Replacement: passo 22, imagem 1 %32 MacBook Pro 13" Two Thunderbolt Ports 2020 Display Assembly Replacement: passo 22, imagem 2 %32
    • Use a pair of tweezers to remove the plastic antenna cable cover.

    • This cover is secured with some light adhesive.

  23. MacBook Pro 13" Two Thunderbolt Ports 2020 Display Assembly Replacement: passo 23, imagem 1 %32 MacBook Pro 13" Two Thunderbolt Ports 2020 Display Assembly Replacement: passo 23, imagem 2 %32 MacBook Pro 13" Two Thunderbolt Ports 2020 Display Assembly Replacement: passo 23, imagem 3 %32
    • Carefully disconnect the two antenna coax cables by prying them straight up from the logic board.

    • Slide your tweezers or the flat end of your spudger underneath each cable until it's near the socket, and then gently twist or pry up to disconnect it.

  24. MacBook Pro 13" Two Thunderbolt Ports 2020 Display Assembly Replacement: passo 24, imagem 1 %32 MacBook Pro 13" Two Thunderbolt Ports 2020 Display Assembly Replacement: passo 24, imagem 2 %32 MacBook Pro 13" Two Thunderbolt Ports 2020 Display Assembly Replacement: passo 24, imagem 3 %32
    • To reconnect each antenna cable, use tweezers to align the connector directly over its socket, and then press down with a spudger so it snaps into place.

  25. MacBook Pro 13" Two Thunderbolt Ports 2020 Display Assembly Replacement: passo 25, imagem 1 %32
    • Remove the 3.7 mm T5 Torx screw securing the two antenna coax cables to the main board.

  26. MacBook Pro 13" Two Thunderbolt Ports 2020 Display Assembly Replacement: passo 26, imagem 1 %32 MacBook Pro 13" Two Thunderbolt Ports 2020 Display Assembly Replacement: passo 26, imagem 2 %32 MacBook Pro 13" Two Thunderbolt Ports 2020 Display Assembly Replacement: passo 26, imagem 3 %32
    • Use an opening pick to lever out the antenna cable assembly in the areas shown.

    • Don't slide the opening pick from side to side, because there are two display cables that can be damaged.

  27. MacBook Pro 13" Two Thunderbolt Ports 2020 Display Assembly Replacement: passo 27, imagem 1 %32 MacBook Pro 13" Two Thunderbolt Ports 2020 Display Assembly Replacement: passo 27, imagem 2 %32 MacBook Pro 13" Two Thunderbolt Ports 2020 Display Assembly Replacement: passo 27, imagem 3 %32
    • Carefully remove the antenna assembly while simultaneously feeding the antenna cable bundle out from underneath the heat pipe.

    • Remove the antenna cable assembly.

    • During reassembly, gently pinch the cable bundle together and guide it under the heat pipe into the correct position on the board. If needed, use your tools to help guide it through, but don't force it.

  28. MacBook Pro 13" Two Thunderbolt Ports 2020 Display Assembly Replacement, Remove the display assembly: passo 28, imagem 1 %32
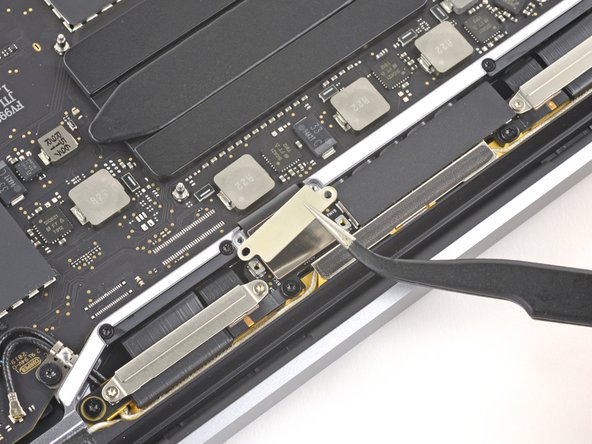
    • Remove the four 3.9 mm T3 Torx screws securing the spring hinges of the two display cables.

  29. MacBook Pro 13" Two Thunderbolt Ports 2020 Display Assembly Replacement: passo 29, imagem 1 %32 MacBook Pro 13" Two Thunderbolt Ports 2020 Display Assembly Replacement: passo 29, imagem 2 %32 MacBook Pro 13" Two Thunderbolt Ports 2020 Display Assembly Replacement: passo 29, imagem 3 %32
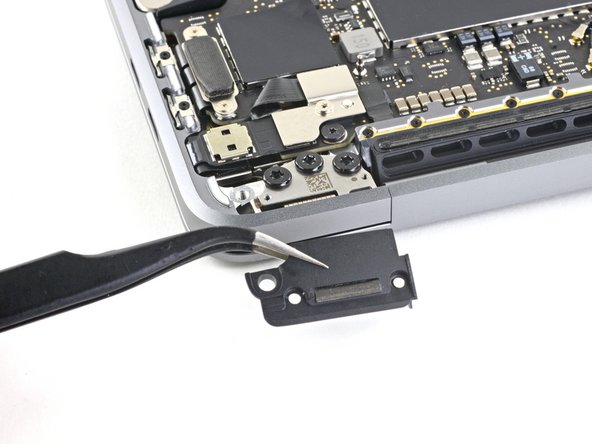
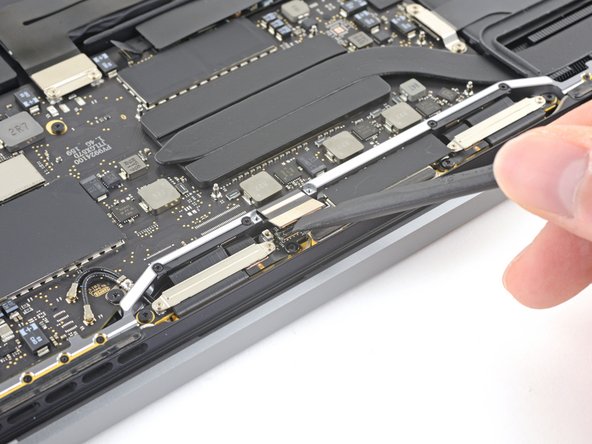
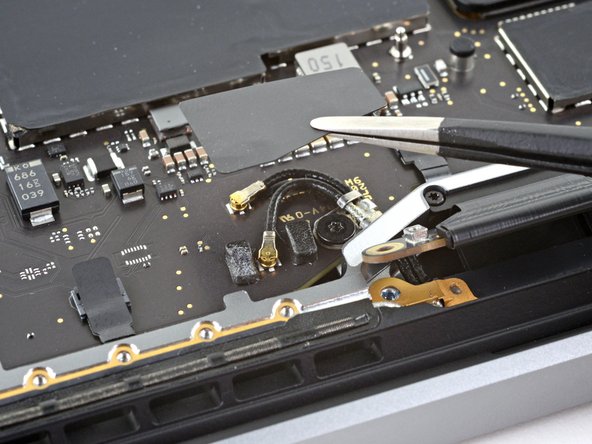
    • Grab the left side of the display cable assembly and pull it towards the bottom end of the MacBook and away from the spring hinge.

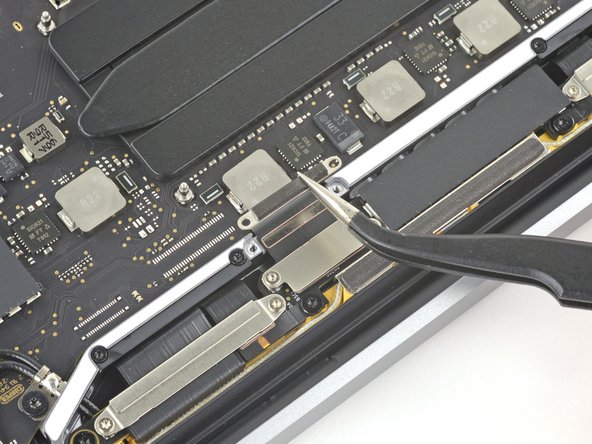
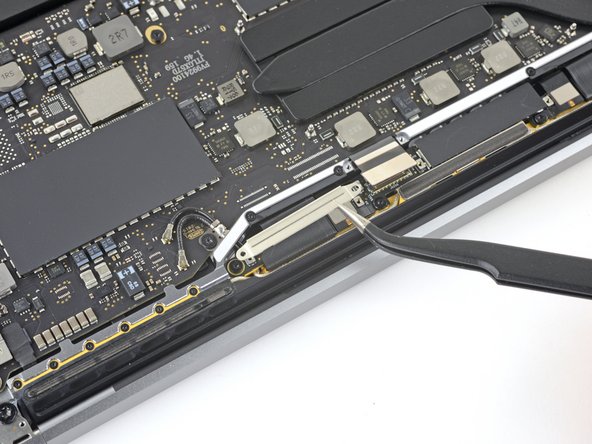
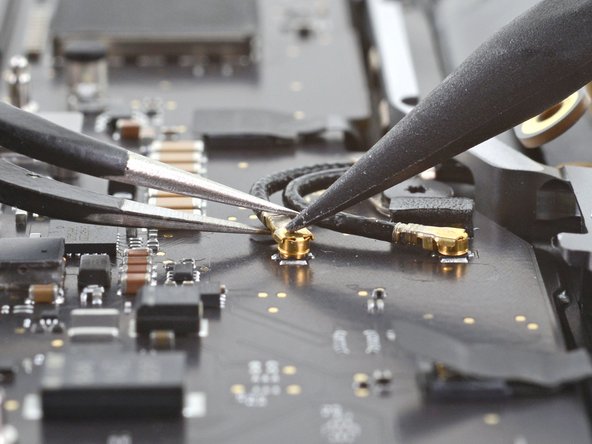
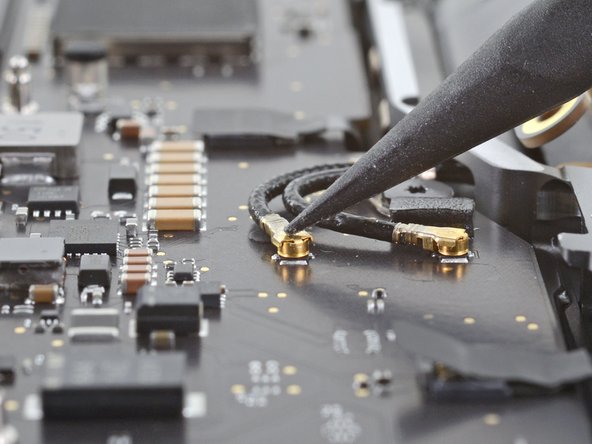
    • Use a pair of tweezers to pull the spring hinge of the display cable out of its bracket.

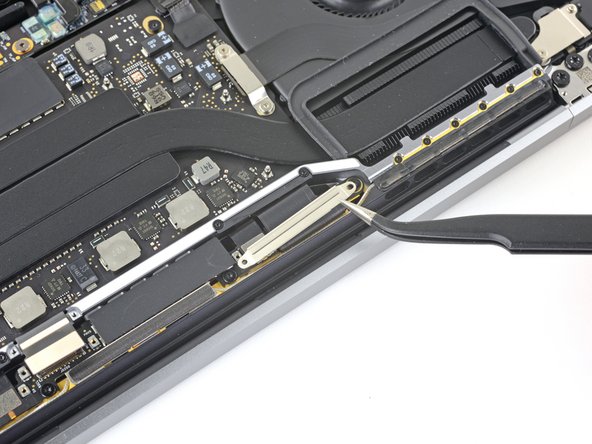
    • Repeat this step with the right spring hinge of the display cable assembly.

  30. MacBook Pro 13" Two Thunderbolt Ports 2020 Display Assembly Replacement: passo 30, imagem 1 %32 MacBook Pro 13" Two Thunderbolt Ports 2020 Display Assembly Replacement: passo 30, imagem 2 %32
    • Fully open the screen and stand your MacBook Pro up on one side.

    • While steadying the MacBook pro with your free hand, remove the three T8 Torx screws from the lower display hinge.

    • Remove the remaining three T8 Torx screws from the upper display bracket.

  31. MacBook Pro 13" Two Thunderbolt Ports 2020 Display Assembly Replacement: passo 31, imagem 1 %32 MacBook Pro 13" Two Thunderbolt Ports 2020 Display Assembly Replacement: passo 31, imagem 2 %32 MacBook Pro 13" Two Thunderbolt Ports 2020 Display Assembly Replacement: passo 31, imagem 3 %32
    • Keep a firm grip on both the screen and main body of the MacBook Pro. Either half can fall unexpectedly during this step.

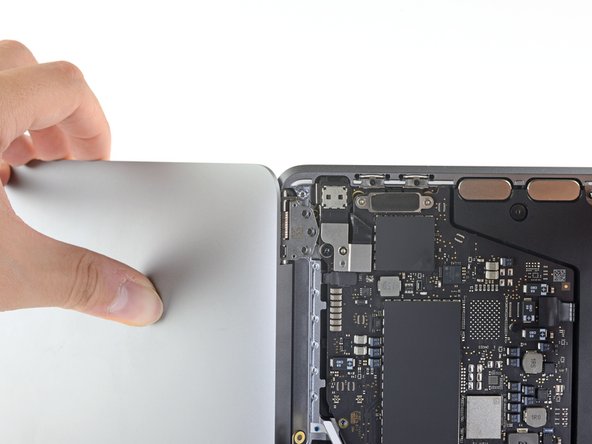
    • Push both halves of the MacBook Pro together so that the hinge brackets can be lifted clear of their recesses in the chassis.

    • Push the main body of the MacBook Pro away from you while pulling the screen toward you to separate it.

    • Remove the display/screen assembly, being careful not to snag it on any cables.

Conclusão

Compare your new replacement part to the original part—you may need to transfer remaining components or remove adhesive backings from the new part before installing.

To reassemble your device, follow the above steps in reverse order.

Take your e-waste to an R2 or e-Stewards certified recycler.

Repair didn’t go as planned? Try some basic troubleshooting or search our Answers community for help.

22 outras pessoas executaram este guia.

Carsten Frauenheim

Membro desde: 03/10/20

110.900 Reputação

Autoria de 338 guias

Equipe

iFixit Membro de iFixit

Staff

Membros da 136

Autoria de 16.566 guias

6 comentários

I’ve followed all these steps but the screen doesn’t power up and the backlight on the keyboard stays off. It just seems to be infinitely rebooting itself. Any ideas what might be wrong?

buttifli - Responder

You have to connect it to original charger and it should power right up

Mr Telephone Man -

I followed this guide and successfully and happily repaired my MacBook Pro. Thank you Carsten and iFixit! I will add that you need to be very careful and aware of your finger placement and/or wear gloves when you separate the lower case from the main body. The inner and outer edges of the case is very sharp and can slice your finger open. Unfortunately, I am speaking from a painful experience. This disclaimer should be added to that portion of the tutorial out of the safety of all DIY professional technicians. This guide is great and helped me complete the job successfully. The finger slice could have been an amateur move but it could honestly happen to anybody. Happy repairing!

Shane Samuelson - Responder

Does anyone know if the camera will work with an oem replacement? Reading a lot of posts that say it wont without config software

Jono Sidwell - Responder

Mine works without adding any config software. Followed the guide through and through without any issues or extra configurations. Happy fixing!

Shane Samuelson -

Adicione um comentário

Exibir estatísticas:

Últimas 24 horas: 26

Últimos 7 dias: 151

Últimos 30 dias: 679

Duração total: 21,468