Esta versão pode conter edições incorretas. Mude para o último instantâneo verificado.
O que você precisa
-
Este passo não foi traduzido. Ajude a traduzi-lo
-
Use a coin or spudger to rotate the battery-locking screw 90 degrees clockwise.
-
-
Este passo não foi traduzido. Ajude a traduzi-lo
-
Unscrew the three evenly-spaced Phillips screws from along the rear wall of the battery compartment.
-
-
Este passo não foi traduzido. Ajude a traduzi-lo
-
Grasp the right end of the L-shaped memory cover, then pull it towards you so it clears the battery compartment opening.
-
Lift the memory cover up and out of the computer.
-
-
Este passo não foi traduzido. Ajude a traduzi-lo
-
Remove the following 3 screws:
-
One 11 mm Phillips#00 in the middle of the lower case. (Head: 5mm dia. x .75mm thick)
-
Two 14.5 mm Phillips #00 (Head: 5mm dia. x .75mm thick)
-
-
Este passo não foi traduzido. Ajude a traduzi-lo
-
Remove the following 3 screws from the rear wall of the battery compartment:
-
One 3 mm Phillips #0. (Head: 2.75 mm. dia.)
-
Two 4 mm Phillips #0 on the either side. (Head: 2.75mm dia.)
-
-
Este passo não foi traduzido. Ajude a traduzi-lo
-
Remove the two Phillips screws from either side of the right wall of the battery compartment (not the ones closest to the battery connector).
-
Two 6.25 mm Phillips #000. (Head: 4 mm. dia. x .5mm thick)
-
-
Este passo não foi traduzido. Ajude a traduzi-lo
-
Remove the four indicated Phillips screws from the front wall of the battery compartment. When working from the left, remove the 2nd, 4th, 7th and 9th screws.
-
Four 3.25 mm Phillips #000. (Head: 4 mm. dia. x 4mm thick)
-
-
Este passo não foi traduzido. Ajude a traduzi-lo
-
Remove the following 4 screws from the back of the computer:
-
Two 11 mm Phillips #00, with Shank (2.2mm dia. x 2 mm len.) (Head: 3.2 mm. dia. x .5mm thick)
-
Two 7.25 mm Phillips #00, with Shank (2mm dia. x 3.75 mm len.) (Head: 3.2 mm. dia. x .5mm thick)
-
-
-
Este passo não foi traduzido. Ajude a traduzi-lo
-
Remove the two Phillips screws from the optical drive (right) side of the computer:
-
Two 5.2 mm Phillips #00, with shank (2.3mm dia. x 3.25 mm len.) (Head: 3.2 mm. dia. x .5mm thick)
-
-
Este passo não foi traduzido. Ajude a traduzi-lo
-
Use a plastic opening tool, an expired plastic credit, or a similarly-thick card to pry up on the upper case, starting in the upper-left corner and working around to the front of the computer.
-
-
Este passo não foi traduzido. Ajude a traduzi-lo
-
While holding up the upper case, pull up the black tab on the connector end of the silver ribbon cable away from the connector's socket on the logic board.
-
-
Este passo não foi traduzido. Ajude a traduzi-lo
-
Carefully peel the upper case cable off the adhesive securing it to the upper case.
-
-
Este passo não foi traduzido. Ajude a traduzi-lo
-
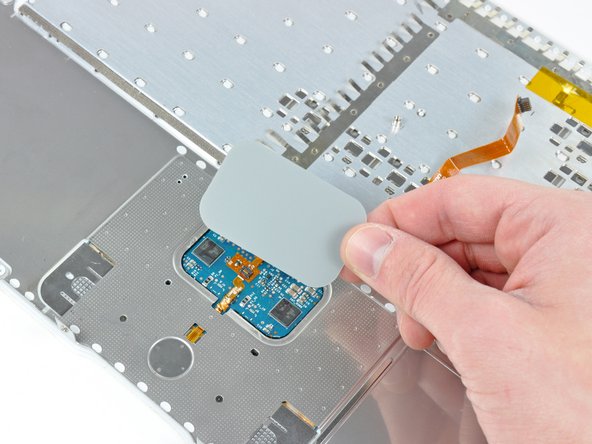
Use the flat end of a spudger to carefully peel up the adhesive around the perimeter of the plastic panel stuck to the underside of the trackpad.
-
Remove the panel from the upper case.
-
-
Este passo não foi traduzido. Ajude a traduzi-lo
-
Use the tip of a spudger or your fingernail to flip up the retaining flap on the upper case cable ZIF socket near the keyboard cable.
-
-
Este passo não foi traduzido. Ajude a traduzi-lo
-
Gently peel up the section of the upper case cable stuck to the keyboard ribbon cable, being careful not to disturb the keyboard ribbon cable in the process.
-
-
Este passo não foi traduzido. Ajude a traduzi-lo
-
Pull the top upper case ribbon cable connector out of its socket under the trackpad.
-
-
Este passo não foi traduzido. Ajude a traduzi-lo
-
Use the tip of a spudger to flip up the retaining flap on the mouse button ribbon cable socket.
-
-
Este passo não foi traduzido. Ajude a traduzi-lo
-
Pull the mouse button ribbon cable out of its socket.
-
-
Este passo não foi traduzido. Ajude a traduzi-lo
-
Use the flat end of a spudger to help peel the last portion of the upper case ribbon cable off the adhesive securing it to the underside of the trackpad.
-
-
Este passo não foi traduzido. Ajude a traduzi-lo
-
Use the flat end of a spudger to carefully peel up the adhesive around the perimeter of the plastic panel stuck to the underside of the trackpad.
-
Remove the panel from the upper case.
-
-
Este passo não foi traduzido. Ajude a traduzi-lo
-
Carefully peel the upper case cable and the piece of clear tape off the bottom of the upper case.
-
-
Este passo não foi traduzido. Ajude a traduzi-lo
-
Use the tip of a spudger to flip up the retaining flap on the upper case cable ZIF socket.
-
-
Este passo não foi traduzido. Ajude a traduzi-lo
-
Pull the upper case cable out of its socket and remove it from the upper case.
-


Cancelar: não concluí este guia.
32 outras pessoas executaram este guia.

Um comentário
I’m in need of this MacBook a1181 keyboard and trackpad connector flex. Just identical to the one they are using in the pictures give demo.